Designing Widgets
Add to favorites
Design widgets for your applications.
UI Design Handbook
1
UI Design Aesthetic
3:52
2
Design for accessibility
1:59
3
Localization
1:14
4
Color Selection
5:06
5
Pick Fonts
3:35
6
Font Managers
2:06
7
Icon Organizer
2:59
8
UI Sound Design
4:25
9
Stock Images
1:29
10
Image optimization
1:46
11
Illustrations
1:38
12
Realistic Mockups
2:47
13
UI 3D Assets
2:29
14
Introduction to Animations
5:09
15
UI Animation Resources
1:45
16
Apple Watch Faces
2:06
17
Designing for Apple Watch
4:24
18
Designing for Apple TV
1:58
19
Design for Game Center
3:43
20
Designing for CarPlay
1:37
21
Designing App Clips
7:05
22
Designing Widgets
3:29
23
Design Systems
1:27
24
UI Kits
3:33
25
Prototyping Tools
3:22
26
Voice prototyping
2:14
27
Prototyping with Code
3:01
28
Turn your Designs into Code
2:18
29
Version Control Tools
2:12
30
Developer Handoff
1:05
31
Color Theory
10:35
32
Dark Interfaces
3:53
33
Icons
10:32
34
Background Patterns
5:41
35
Typographic Scales
2:40
Creating a Widget
You need to understand the core features of your App, pick the most valuables specialties and transform them into Widgets. A Widget can work with iPhone, iPad, and Mac, so you need to choose the right context and the platform to develop your Widgets.

Designing a Widget
A Widget must be glanceable, relevant and personalized. This means that it has to be concise and have a main purpose for the user. It needs to summarize a core feature of the App and the design has to be clear. Widgets can support different sizes, make sure to choose the ones that make more sense for your app and your users.

Glanceable
You need to show the most valuable information that will interest your users. Make sure that the information you display is easy to understand in the minimum amount of time.

Relevant
The information you will put in your widget has to be valuable for the user, something that will aid the user's day in and day out activities.

Personalized
A Widget is like your custom made personal board. The more freedom you can give the users to choose between the size, information, color of the widget, etc., the better.

Widget Styles
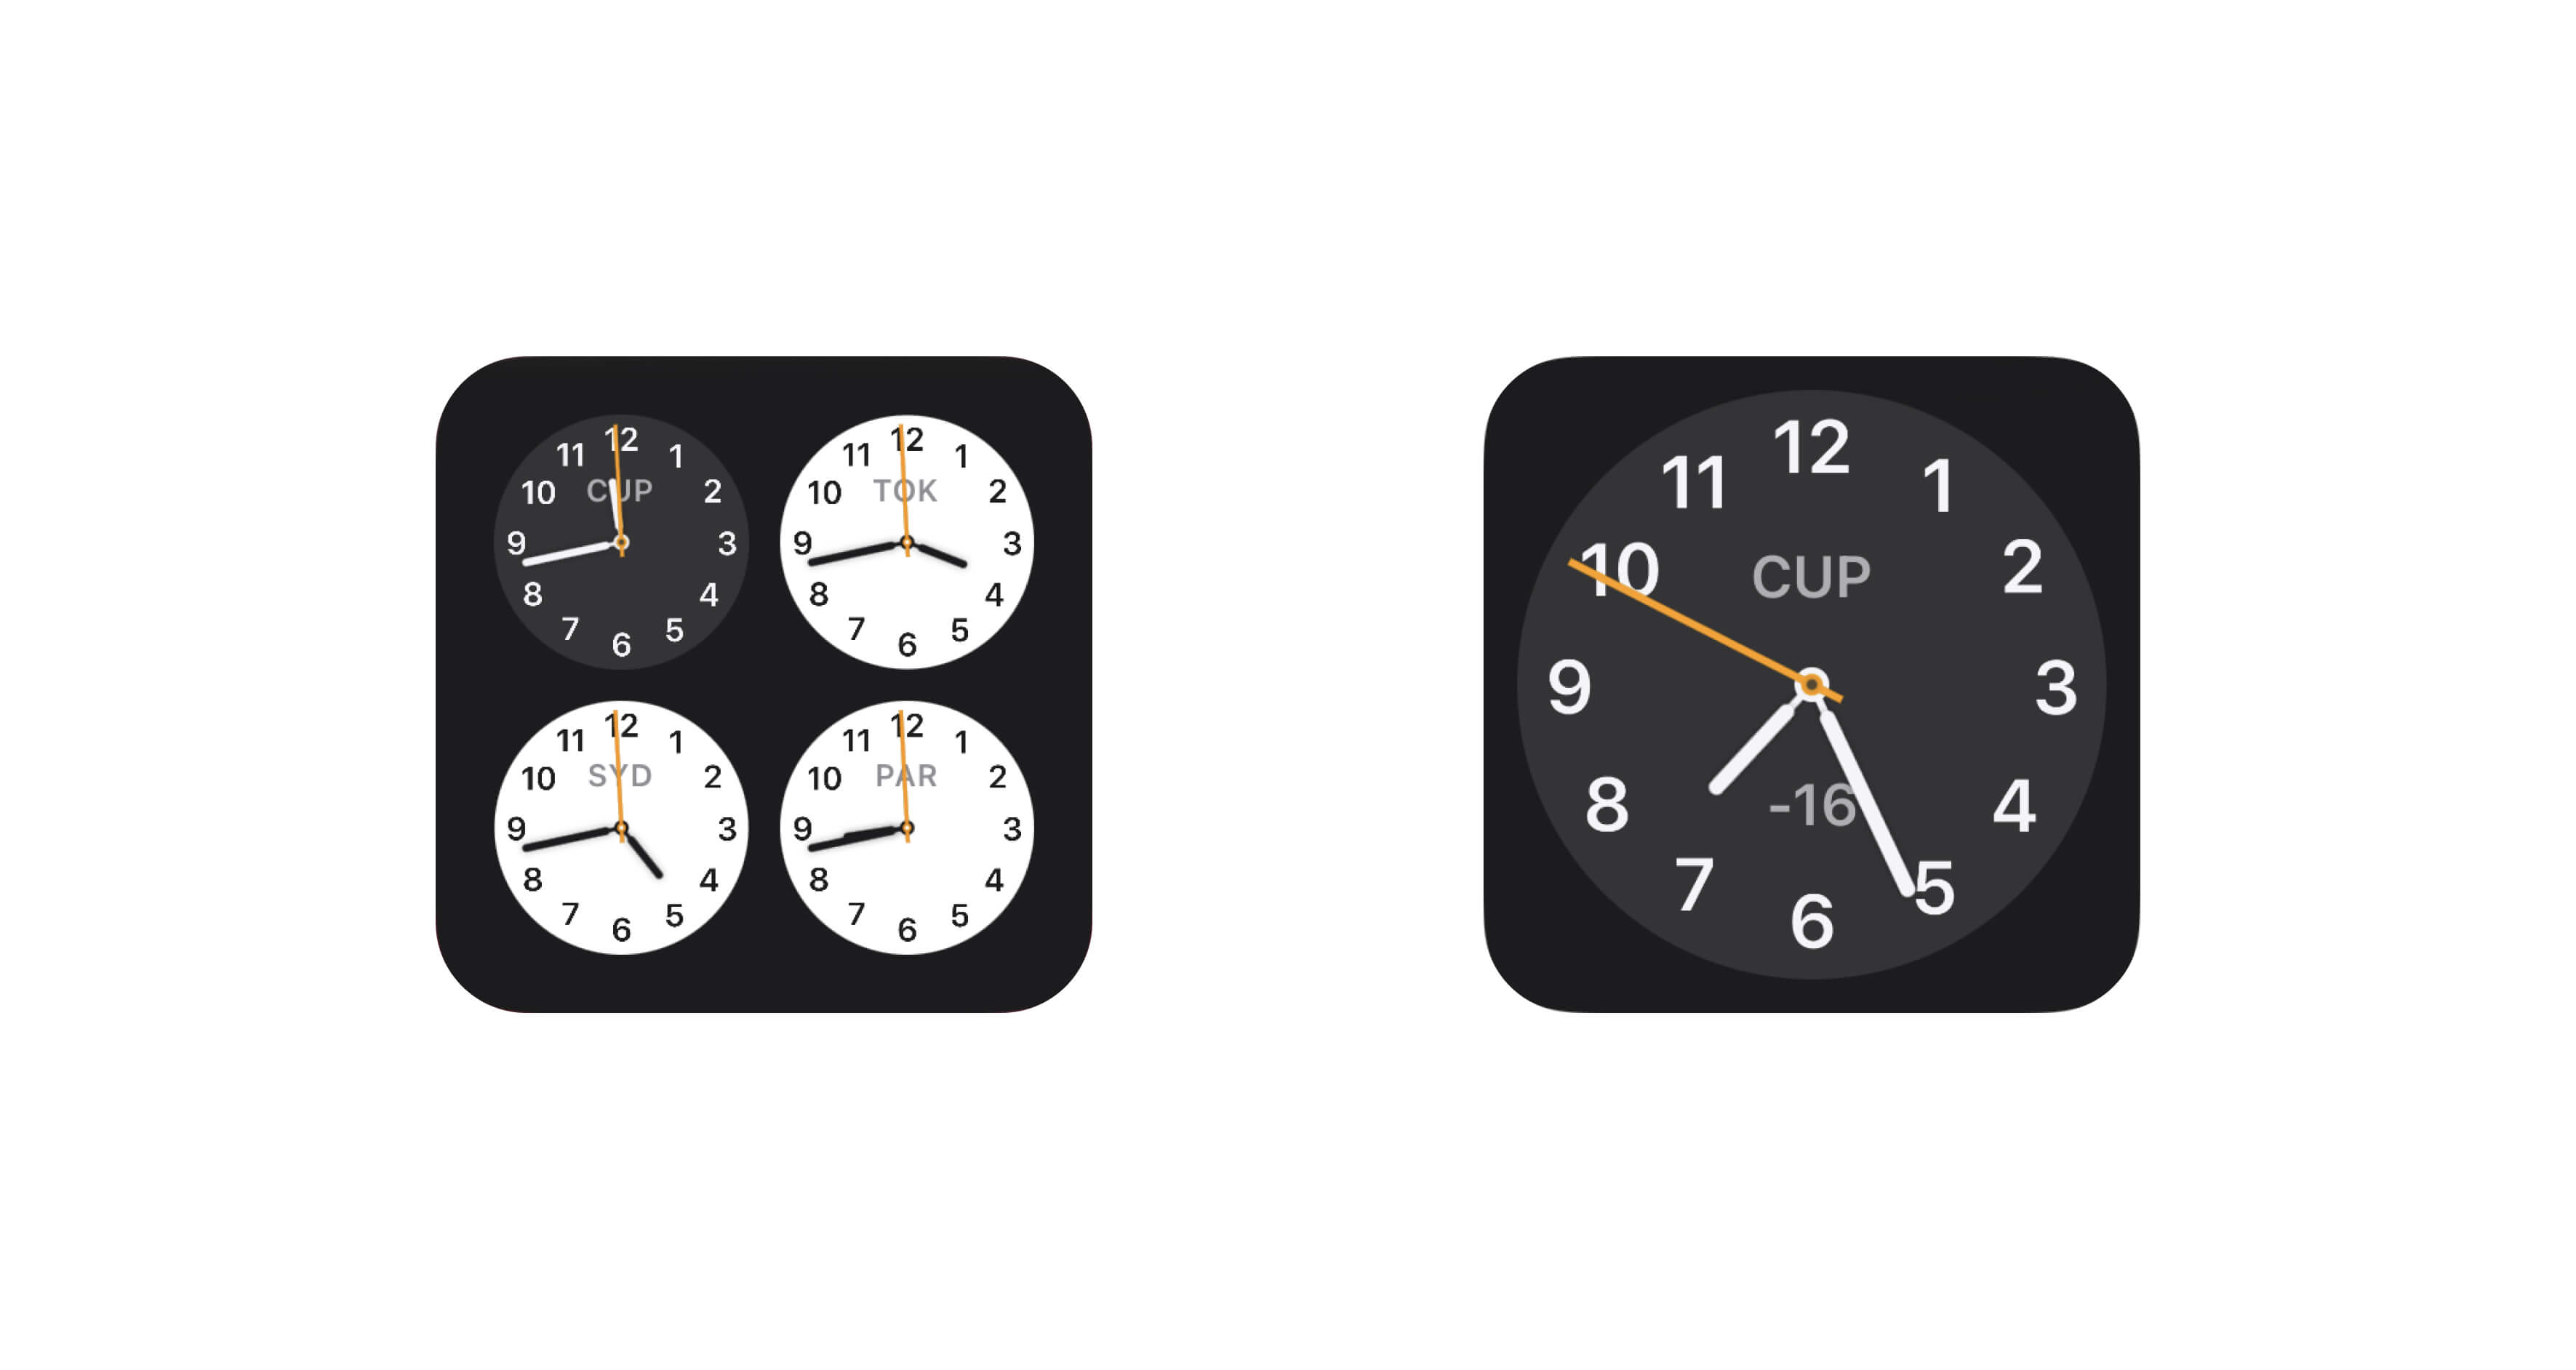
There are three types of styles - fill, cell, and content. Fill style works better when you want to target a particular piece of content. Cell style is when you need to group different content, a good example is the files app Widget. And content style is when you need to show different data types like the stocks, your daily schedule, among others.

Multiple Widgets
You can offer multiple Widgets so that your users have more options in the same size and they can choose the one that fits better according to their needs and layout.
Widget Size
There are three sizes for a Widget - small, medium and large. You don't need to support all the sizes but try to support as many as possible. Remember that content is the focus.

Widget Customization
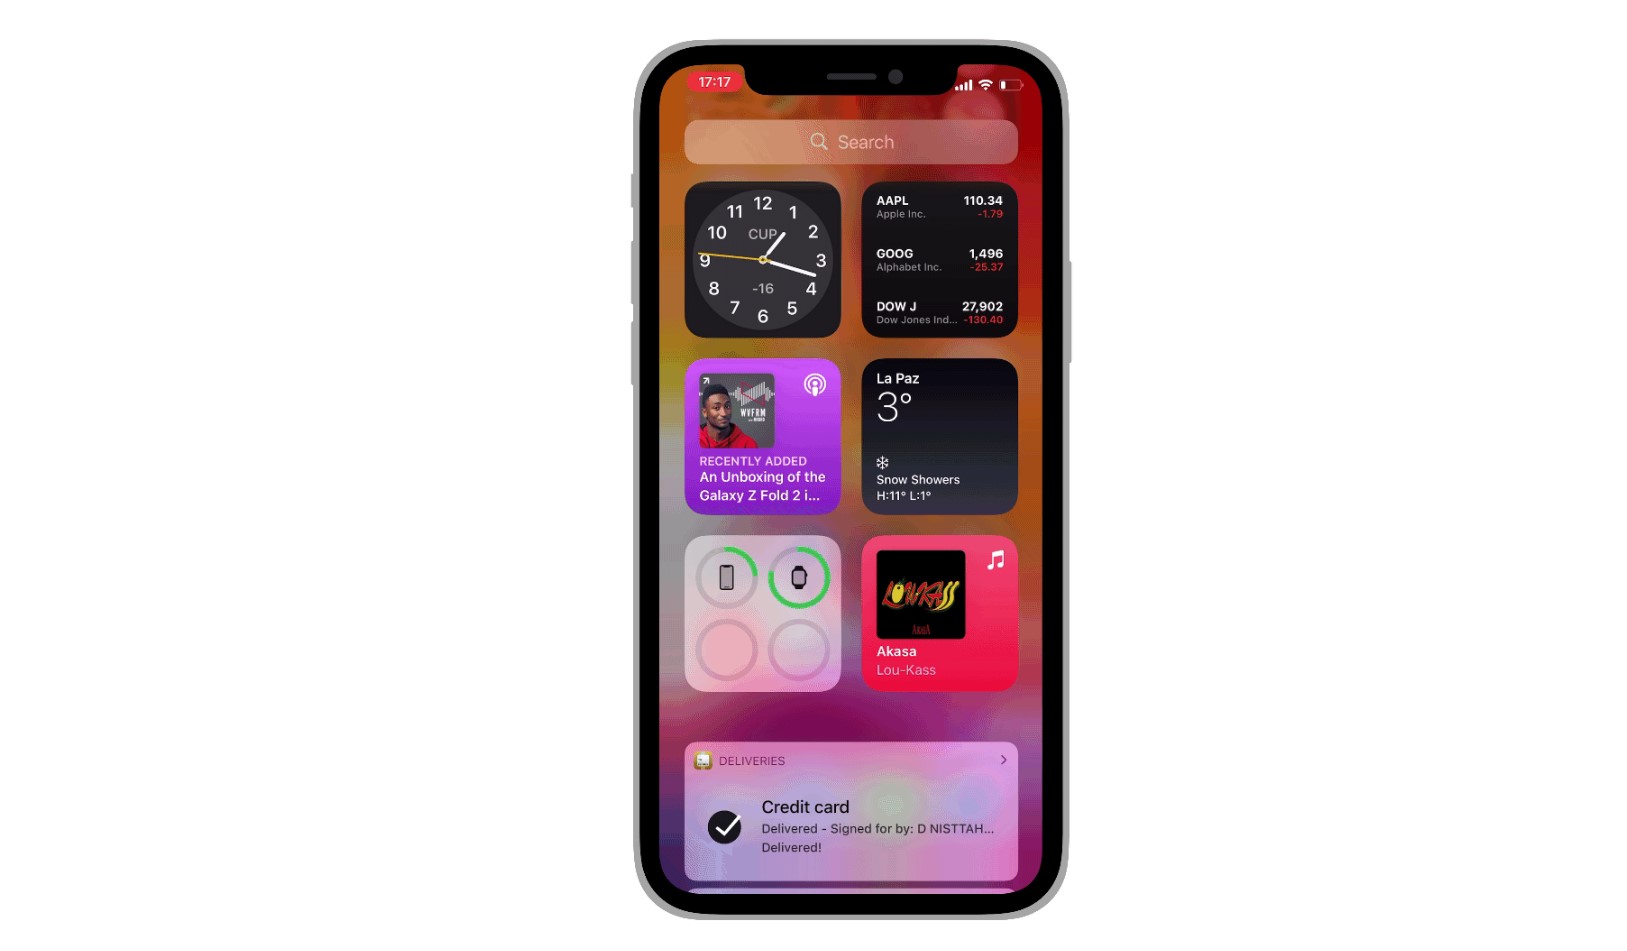
You can design your Widgets in a way that allows the user to configure it even further. Let's take the weather app as an example. By default, the weather app will show you the forecast of your location but you can edit the Widget to show you a specific location.
WidgetKit API
There's a specific WidgetKit API that helps developers build Widgets across different platforms like iOS, iPadOS and macOS. This framework is for SwiftUI and simplifies the creation of Widgets for developers.

Creating a Widget Extension
Apple made a Widget Extension template that you can access form Xcode. It is the first step to creating your Widget. Something you should remember is that a single Widget can contain multiple types of widgets, giving all kinds of options to your users. To learn more, you can refer to Apple's documentation. We also have a section in our SwiftUI course where we teach how to design widgets.

Further information
There are many exciting guides and videos in Apple's Human Interface Guidelines that explain the Widget's development and design process in detail. Videos like Design Great Widgets and Meet WidgetKit are perfect to start working on Widgets.

Prototyping Widgets in Principle
For this exercise we will use Figma and Principle. Let's start with opening our Figma file. Here, you will notice that we have some examples of widgets.

Now, we are ready to import the assets from Figma to Principle. To do so, go to Principle and click on import in the tab bar. Then, select the Figma tab and click on Import Page. Select Group 1 which includes all the widget cards. Then in the left side bar, select scroll for the vertical dropdown.

Check the box named Clip Sublayers. Then, reduce the area of action so it can be similar to the size of one widget.
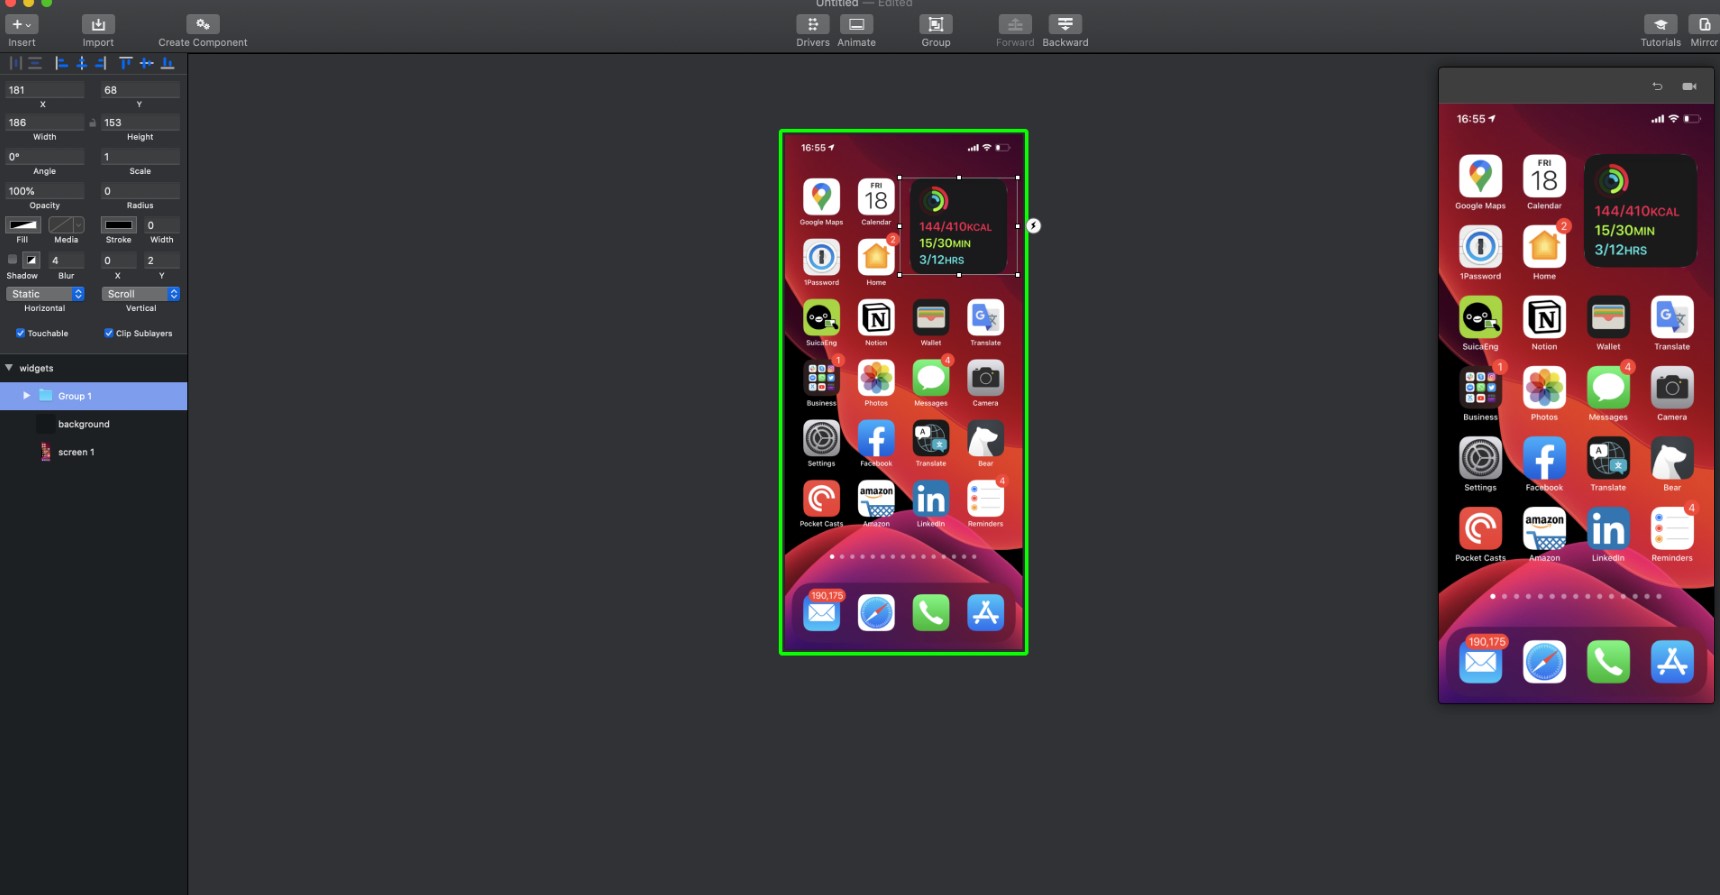
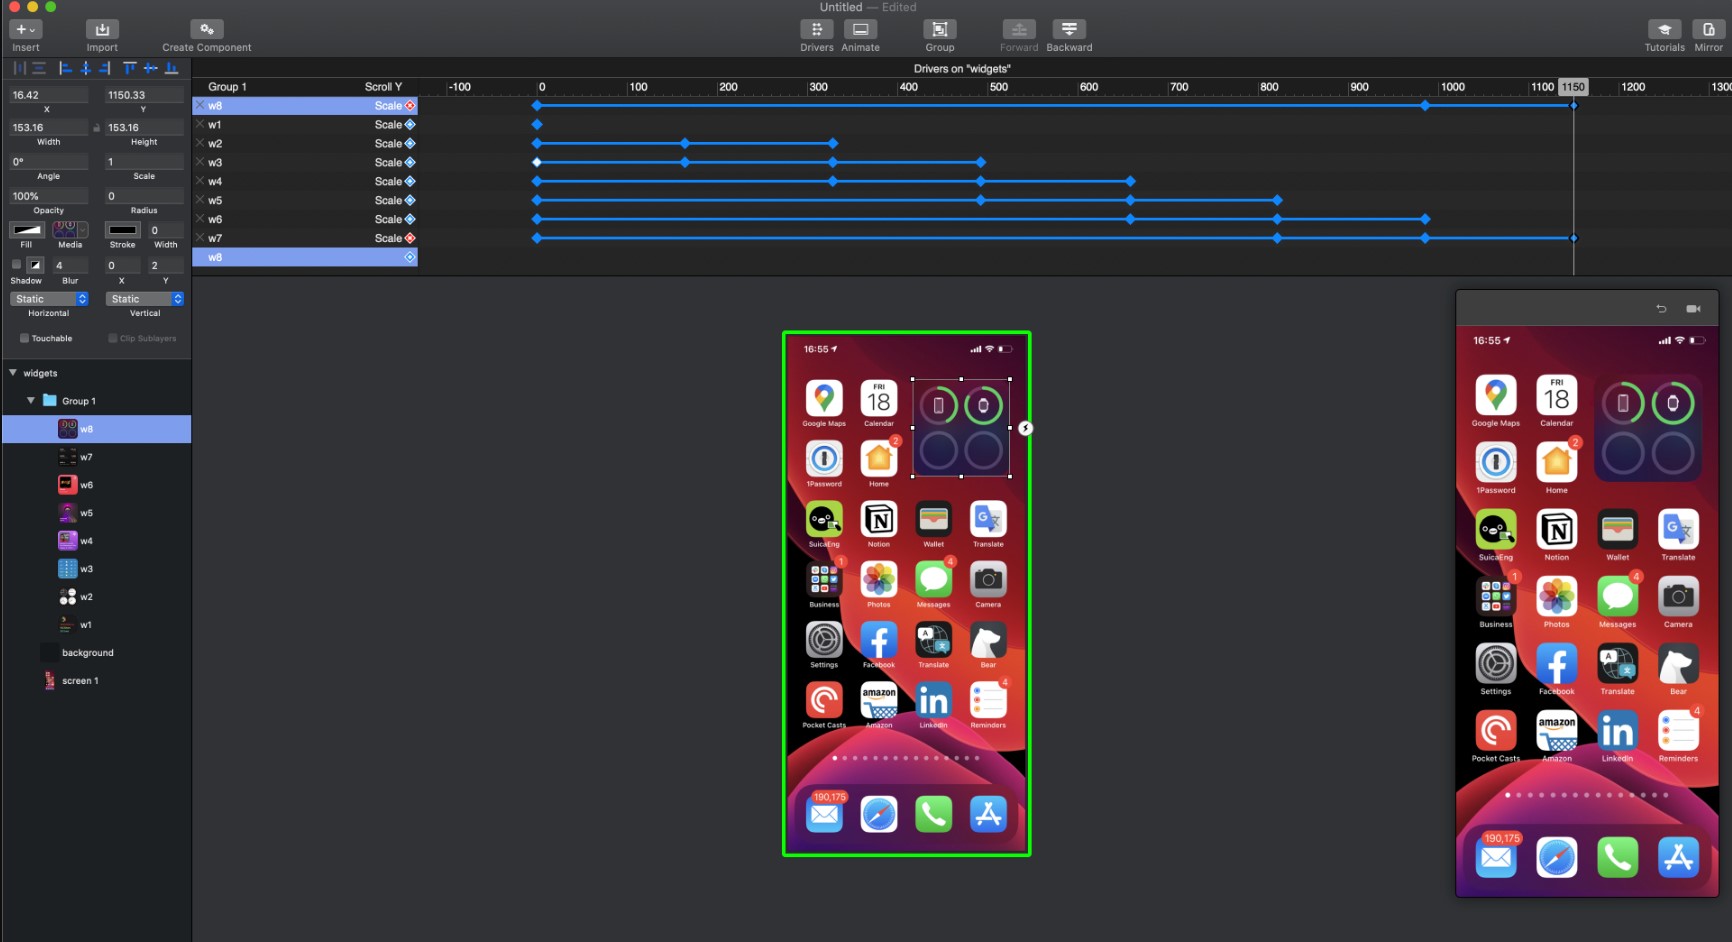
Next, let's add some drivers to all our widget images. Select all the assets inside Group 1 and in Drivers, select the Scale option.

It's time to focus on the timeline. In the left side bar, change the value for scale from 1 to 0.9 for all the widgets except for w1. For w1, add a keyframe on Scale with a value of 1 because this is the first widget that will show up.
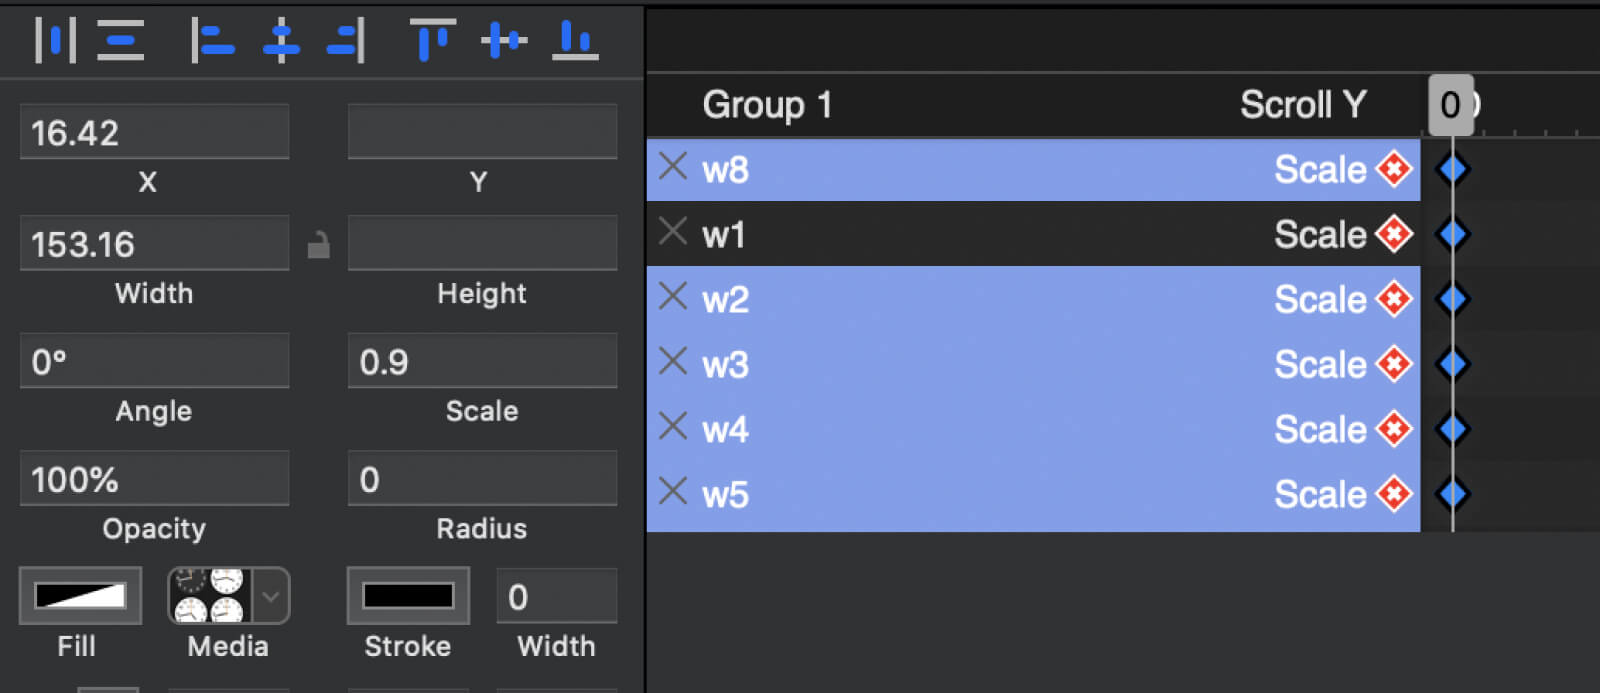
Move the timeline until the 164th frame. For w1, we will change its scale from 1 to 0.9, at the same time change the scale for w2 from 0.9 to 1. Also, add a keyframe to w3 so it can be ready for the transition. Please repeat the same steps for each one of the widgets sequentially. Each one of the steps will be performed in the following keyframes: 328 - 492 - 658 - 821 - 985 - 1150
Conclusion
Making a widget for your App will enhance the user experience; remember to keep it personal, to create a connection between the user and your App. Also, it needs to be relevant and informational. The widget needs to show just the things that matter to the user. The right information at the right time.
Learn with videos and source files. Available to Pro subscribers only.
Purchase includes access to 50+ courses, 320+ premium tutorials, 300+ hours of videos, source files and certificates.
Templates and source code
Download source files
Download the videos and assets to refer and learn offline without interuption.
Design template
Source code for all sections
Video files, ePub and subtitles
ui-design-handbook-designing-widgets
1
UI Design Aesthetic
Learn about UI design aesthetics.
3:52
2
Design for accessibility
Learn about accessibility in design.
1:59
3
Localization
Read more about the importance of localization.
1:14
4
Color Selection
Select colors for your projects
5:06
5
Pick Fonts
Select the most suitable fonts for your design.
3:35
6
Font Managers
Manage your fonts more efficiently.
2:06
7
Icon Organizer
Organize your icons in a better way.
2:59
8
UI Sound Design
Importance of sound in UI design
4:25
9
Stock Images
Find the right images for your UI
1:29
10
Image optimization
Optimize your images to improve performance.
1:46
11
Illustrations
Add illustrations to your design project
1:38
12
Realistic Mockups
Resources to add realistic mockups to your design.
2:47
13
UI 3D Assets
Work with 3D assets in your design projects
2:29
14
Introduction to Animations
Learn about basic animations in UI design.
5:09
15
UI Animation Resources
List of tools and resources for UI animation.
1:45
16
Apple Watch Faces
Create customizable watch faces for the Apple watch
2:06
17
Designing for Apple Watch
Getting started with Apple Watch Design
4:24
18
Designing for Apple TV
Learn the basics steps to design for Apple TV
1:58
19
Design for Game Center
Learn how to design for Game Center
3:43
20
Designing for CarPlay
Learn the basics of designing for CarPlay
1:37
21
Designing App Clips
Learn how to design app clips for iOS
7:05
22
Designing Widgets
Design widgets for your applications.
3:29
23
Design Systems
Create design systems for a better workflow.
1:27
24
UI Kits
Learn more about UI Kits and where to find them.
3:33
25
Prototyping Tools
Learn about prototyping tools.
3:22
26
Voice prototyping
Take a look at voice prototyping.
2:14
27
Prototyping with Code
Read more about prototyping with code.
3:01
28
Turn your Designs into Code
Learn how to turn your Designs into Code.
2:18
29
Version Control Tools
Share and synchronize your files with your team
2:12
30
Developer Handoff
Learn more about developer handoff.
1:05
31
Color Theory
Understand color theory to select the best color themes for your application.
10:35
32
Dark Interfaces
Add dark mode to your application.
3:53
33
Icons
Learn more about UI icons.
10:32
34
Background Patterns
Create beautiful background patterns.
5:41
35
Typographic Scales
Learn more about typographic scales.
2:40
Meet the instructor
We all try to be consistent with our way of teaching step-by-step, providing source files and prioritizing design in our courses.
Daniel Nisttahuz
Senior Product Designer at Design+Code
Motion Designer @Design+Code
7 courses - 12 hours

UX Design Handbook
Learn about design thinking, with exercises. Free tutorials for learning user experience design.
2 hrs

UI Design Handbook
A comprehensive guide to the best tips and tricks for UI design. Free tutorials for learning user interface design.
2 hrs

Create a Promo Video in After Effects
In this course we will show you how to create a promo video using After Effects.
2 hrs

Animating in Principle
Learn how to animate interactive user interfaces from Figma to Principle. Get to design the app flow for multiple screens, interactions, and animations. At the end of the course, you will have a beautiful prototype that you can share with stakeholders.
1 hrs

Video Editing in ScreenFlow
Learn different techniques, transitions actions and effects to edit a video using Screeflow
1 hrs

Motion Design in After Effects
Learn animation and motion design with After Effects
3 hrs

Learn iOS 11 Design
Learn colors, typography and layout for iOS 8
1 hrs
