Learn Sketch
Add to favorites
Introduction to Sketch Basic Tools
Play video
Learn Sketch
1
Learn Sketch
23:28
2
Powerful Start in Sketch
22:49
3
Design for iOS 11
31:30
4
Design for iPhone X
28:23
5
Designing for iPad
11:36
6
Design for Web
25:12
7
Design for Web Part 2
25:11
8
Tricks and Keyboard Shortcuts
20:43
9
Sketch Plugins
12:09
10
Nested Symbols
9:14
11
Sketch Libraries
7:00
12
Version Control
18:53
13
Working with Data
10:29
14
Adaptive Layouts
7:33
15
Working with Vector
20:12
16
Exporting Assets
13:44
17
Styleguide and Handoff
9:11
18
Advanced Techniques
12:40
19
Intro to Framer
27:51
20
Previewing and Sharing
7:22
21
Prototyping in Keynote
3:33
Introduction to Sketch
Sketch is the ultimate tool for iOS, Android and Web design. It barely weights 45MB in disk space, compared to Photoshop's 2.17GB. As soon as you open it, you are greeted with an infinite canvas. Just like native Mac apps, you have a familiar user interface with a Toolbar, Navigator and Inspector. As a result, new users will find Sketch far more approachable because it doesn’t get in the way of producing simple designs.

Customizing Your Toolbar
Consistent with the MacOS's design language, the Toolbar is customizable when you right-click on it. You can set all your favorite tools by dragging in the ones that you want. Since I’m a big proponent of Keyboard Shortcuts, I suggest keeping the ones that are hard to remember, yet frequently used. Some of them only activate when it’s possible to use them, so having them in the Toolbar is helpful. Some of my favorites tools are: Symbols, Scissors, Outlines, Round to Pixel.

Artboards
Artboards are the Screens of your app. Each Artboard represents a screen or an interaction within a screen. Having an efficient workflow is crucial to a modern designer. We can no longer afford to spend all our time on visual design, because prototyping, delivering assets and coding can truly make our designs come alive instead of being stuck in a vacuum, at the mercy of others.
Before, designers used to save a file for each screen that they designed, resulting in dozens of files to manage. Now, thanks to Artboards, you can have your entire app, with dozens of screens, exist inside a single Sketch file.

Create an Artboard
It’s easy to Create an Artboard, just press A. Then, on the top right, you can select from a large list of screens, for iOS, Android, Web and Print Additionally, and even you can customize one.

Using Artboards
With Artboards, you no longer have to hide interactions, dialogs and states, since you can just put all your screens next to each other. Instead, it is recommended to show all your layers so that you can easily preview everything on your iPhone. You can easily rearrange, duplicate (⌘ D) or export them. I recommend the Artboard Manager plugin to keep Artboards organized.
Artboard Background
To select the Artboard, you must select the title above it. Your Artboard should have a background color, otherwise the resulting screen will show a transparent background instead of what seems to be white.
Artboard within Artboard
When you work with dozens of screens, you can have a great overview of the whole experience by creating an Artboard covering all your Artboards. Like this, you can export an image of the entire flow.
Pages
Each Page represents a platform or a completely different resolution. For most projects, you’ll have twenty something Artboards for a platform like iOS. Then, you’d create another Page for Android, Web, Apple Watch, tvOS, and so on. That way, you can have an entire project within a single Sketch file, saving you a ton of time switching between screens and platforms.
You can open the Pages by clicking on the arrow next to the page name. Also, you can quickly switch between pages by using the dropdown. The keyboard shortcut is Fn ↑ and ↓.

UI Templates
Sketch comes preloaded with a number of user interface templates for iOS, Material Design and Responsive Web. To access them, you simply have to go File, New From Template. The iOS and Material Design templates are particularly comprehensive. They’ll be a great starting point for any designer, beginners and experts alike.

iOS UI Kit
For the iOS UI Kit, it already comes preloaded as a Library. It has a number of important elements such as status bar, navigation bar and tab bar to get your started. Start using them by going to Symbols, iOS UI Design.

Material Design UI Kit
If you’re designing for Android, you’ll love the Material Design UI Kit. It has all the elements you need to follow Google’s own design guidelines.

More Templates
You can also download your own templates from the Web, such as the iOS 11 GUIor the Facebook Resources. To save them to the list of Templates, Open the file, then go to File, Save as Template….
Designing at 1x
For iOS, I recommend designing at 1x with the iPhone 8 (375 x 667 pt), since that is currently by far the most popular resolution. Also, custom Artboards can be created by clicking the ** +** button.
Designing for Screens
In Sketch, you work with pixels. Since we’re designing at 1x, your pixel units will be equivalent to points. So, 1 px = 1 pt.
Alignment, Distances and Guides
There are many tools in Sketch that will help you design with incredible precision. You can never have too much precision. Designers would have a hard time working without rulers and grids, because they’re essential to keeping the composition organized and clean.
Smart Guides
Smart Guides are intrinsic to the experience of using Sketch. In fact, it’s an essential feature in most apps where drawing is involved. As soon as you start dragging in a layer, red lines will appear to indicate if it's well-aligned or centered properly. Unique to Sketch, you’ll see Smart Guides appearing even before you start drawing, enabling incredible precision.
Distances
Holding the Alt key will show the distances between the selected layer against other ones in the same Group or Artboard. It also measures the distances to the Artboard itself. It’s important to mouse over different elements to see the distances.
Tip: Distances can work against Rulers as well.
Rulers
Rulers can be enabled by pressing Ctrl R. They’re good for setting persistent guides that can be snapped or measured against your layers. To create a guide, simply click within the Ruler regions. Hold Shift to jump by 10 px.
In the Editor, You can even get the distances between a layer and a Ruler guide by holding the Alt key and hovering the guide.
Align and Distribute Objects
As you create new shapes, you can instantly align them horizontally or vertically within the Artboard. When two layers are selected, they can also align with each other. Distribute Objects allows you to normalize the distances between multiple layers.

Layout Settings
If you open Layout Settings, you’ll find a way to set up your own Layout Grid system, such as the famous 960grid. With this, setting up 2, 3 or 4 columns proportionally is as easy as snapping the layers to the grids. Layout Grids are particularly useful for bigger screens that occupy multiple columns and call for clean divisions. Examples are Web, iPad and tvOS interfaces.

Grids
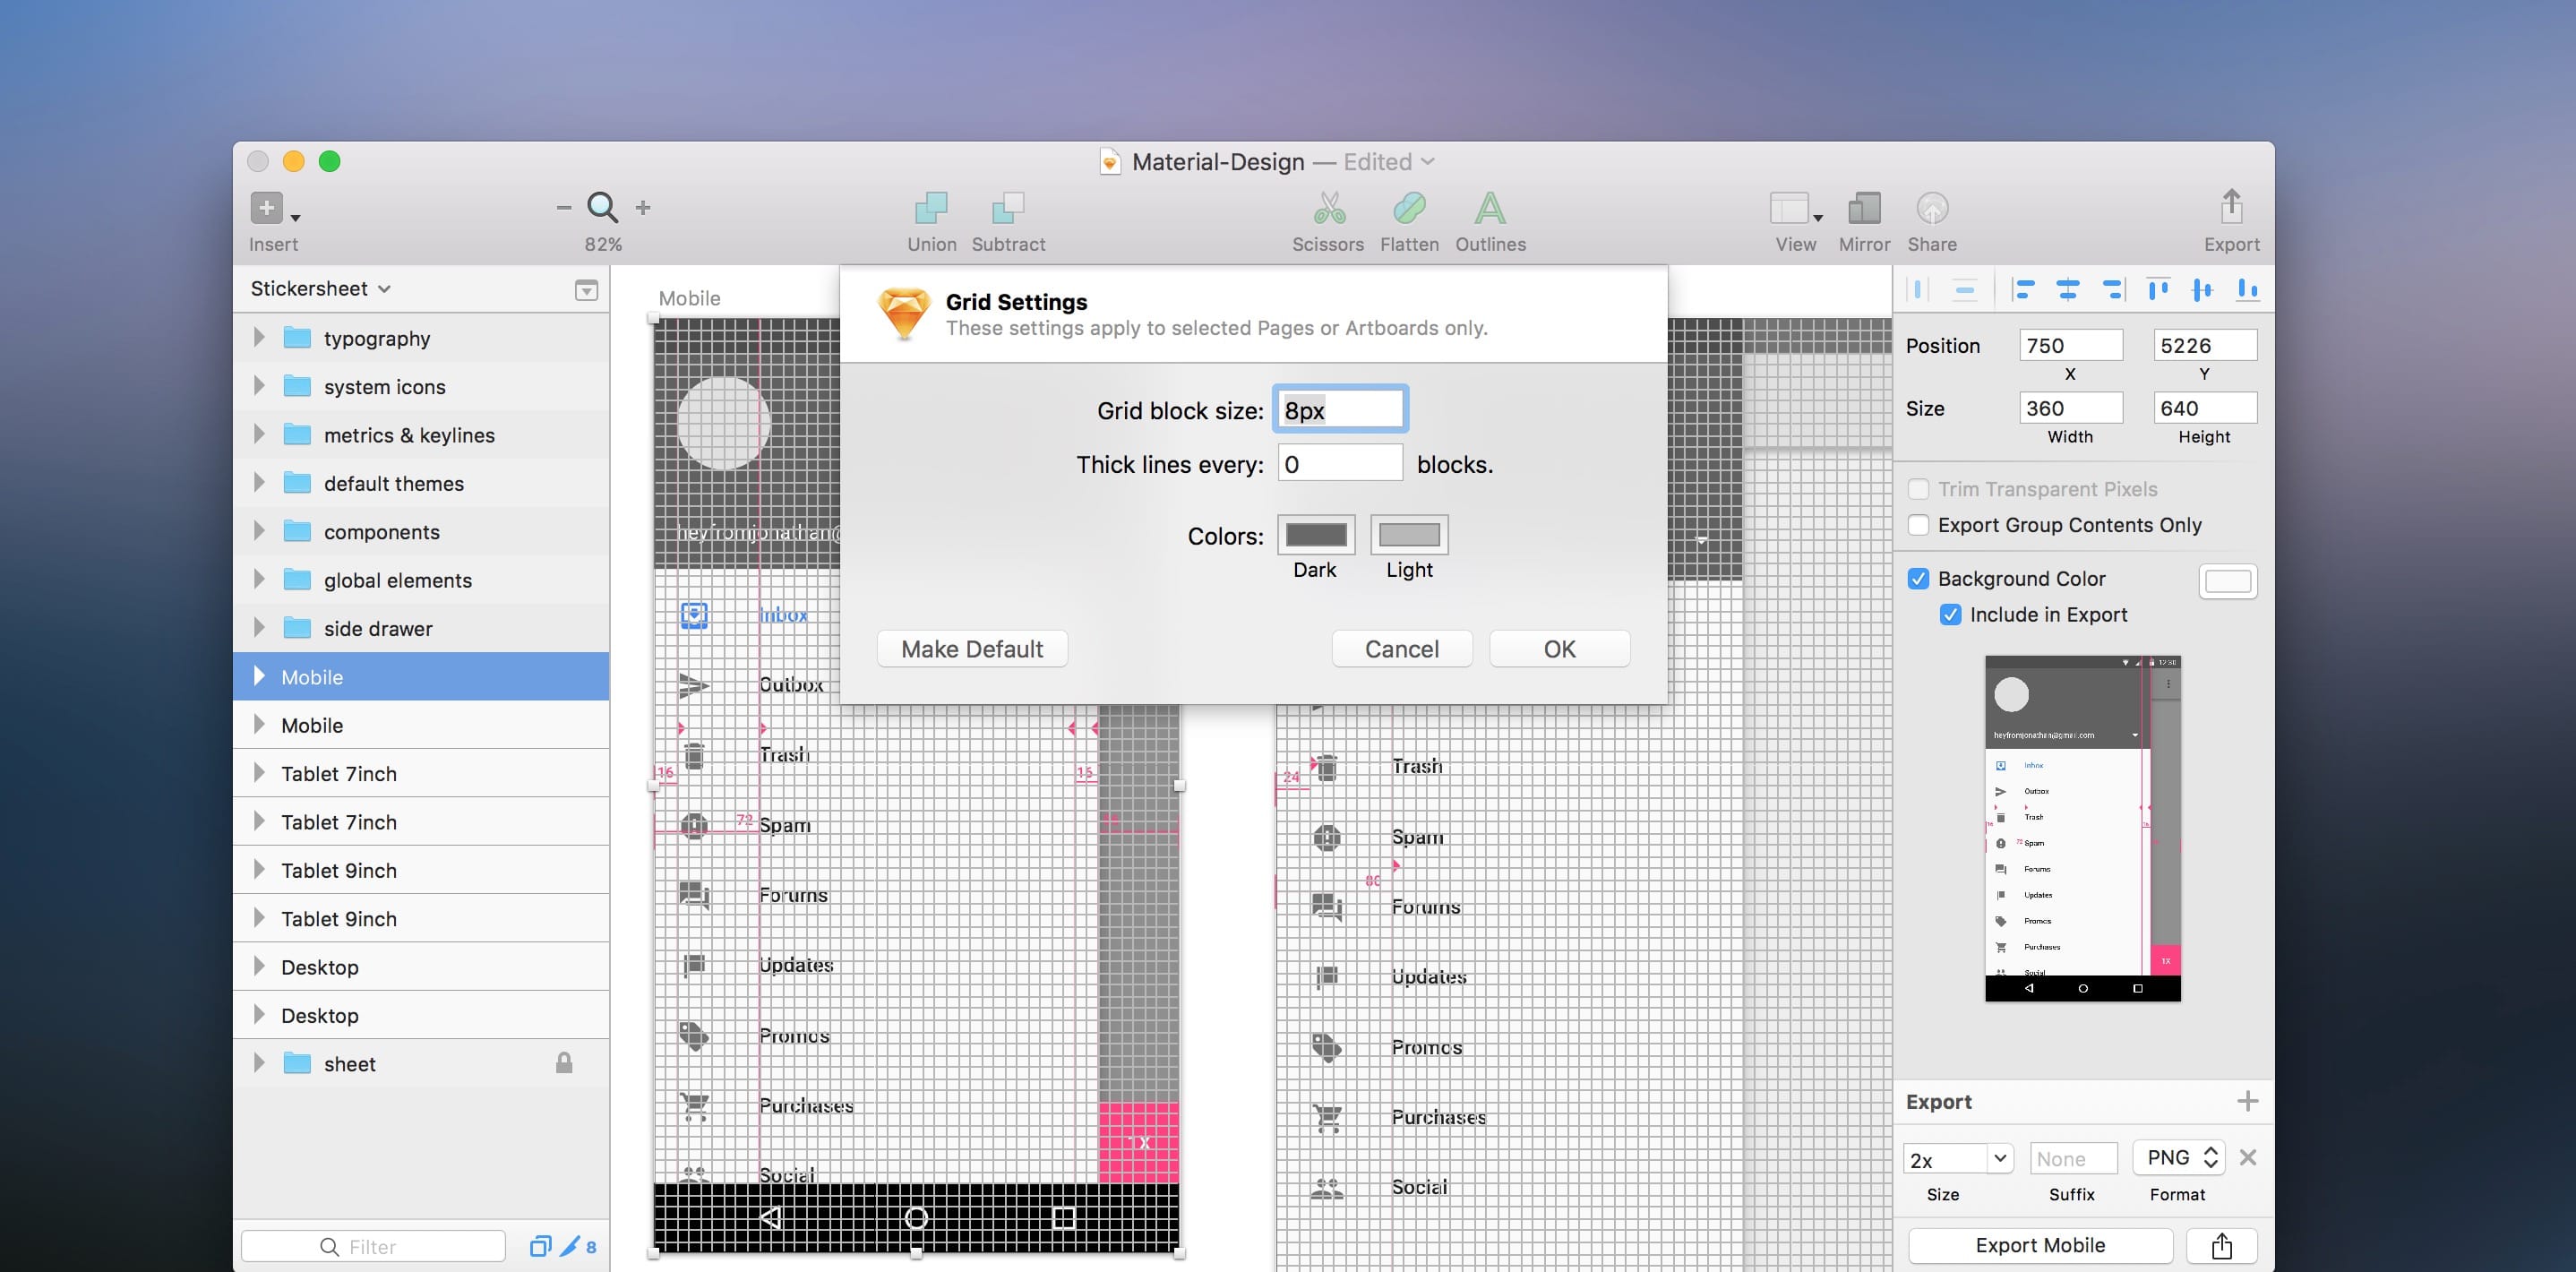
Enable Grids (Ctrl G) to divide your canvas perfectly. For instance, Material Design encourages a 8 dp grid system in order for shapes, text and baselines to fall perfectly into those lines. This promotes better spacing and cleanly divided layouts. For iOS, the guidelines are not as strict. Mostly, you are encouraged to have a minimum padding and margin of 8 pt.
Pixels Grid
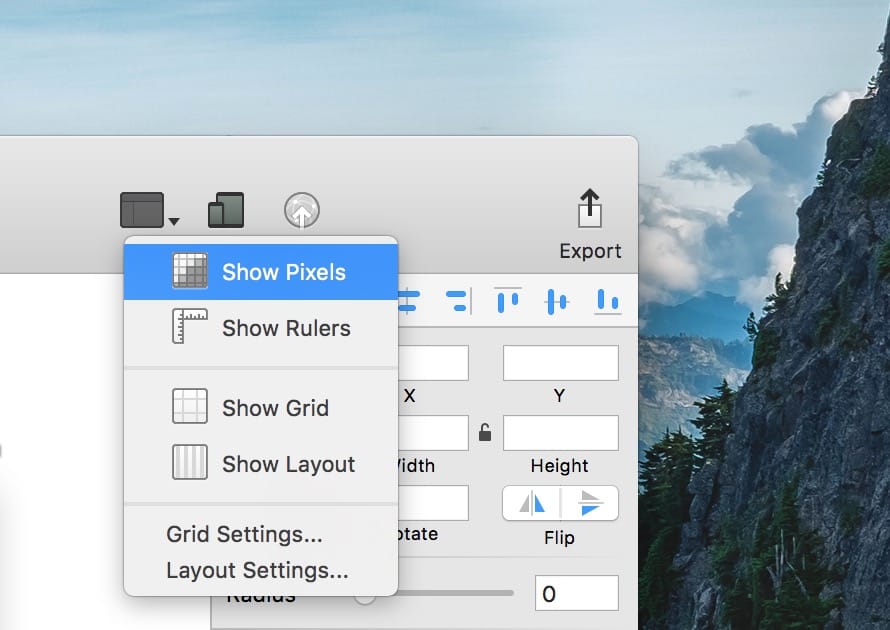
Use Show Pixels (Ctrl P) to make sure that your design is pixel perfect. Pixels will only be visible at more than 100% zoom if enabled. If you zoom at 1000% or more, you can see the Pixels Grid automatically.

Scale Tool
One of my favorite tools in Sketch is the Scale tool (Cmd K). Note that this isn’t the same as resizing, since it actually scales every property: Size, Radius, Border, Shadow and Inner Shadow. For instance, a 1 px border scaled at 200% will be 2 px. By only resizing, it’ll remain 1 px. This will be indispensable for converting @1x UI Kits to @2x or @3x, as it even works with Artboards.
Working With Text
If you're new to typography, I suggest heading to the Typography section and start downloading a few modern fonts. The good ones that comes with MacOS or free on Google Fonts are: San Francisco, Avenir Next, Open Sans and Roboto. If you have a subscription to Typekit, download Museo and Proxima Nova.
To create a new text layer, press T. In the inspector, you can choose the font and edit the styles. What’s more, you can use Text Styles to re-use the same style across multiple text layers. It works similarly to CSS, which allows you to have a global style for h1, h2, h3 and so on.
Preferences
You may want to customize some preferences. Here are the key options that will likely affect your workflow later on.
Auto-Save
I highly recommend Auto-Save. It will automatically save all your changes as you design, preventing you from losing precious work in case of crashes, power outage or accidental quitting. Please note that Auto-Save may be dangerous if fonts are missing or team mates open your files and make changes to them. That may lead to unintended modifications. Also, be wary of the disk space cost, especially if you happen to work with large bitmaps.

Reverting To Old Versions
With Auto-Save enabled, Sketch will create a version history of your documents. In case mistakes happen (and they will happen), you can revert back to an older version of your Sketch file. Note that you can disable this feature by unchecking it.
Pixel Fitting
As a result of working with vectors, new shapes may not always land on the pixel grid as you create them, making them not as sharp as they should be (to enable Show Pixels, press Ctrl + P). As you align or resize, this option will make sure that your pixels stay sharp.
Colors
A lot of people struggle with colors, that’s why I think it’s important to have a solid starting palette. Sketch’s Color tool lets you store colors globally or for a specific document. Use the Eyedropper tool to pick any color inside or outside of Sketch. With this technique, you can quickly start your own palette. Good starting palettes are: iOS, Material Design and Flat UI.
Color Picker
Colors are easy to work with in Sketch. As explained in the Colors section, you can switch from RGB to HSB, a more intuitive way to manipulate colors. Like this, you are in control of how much Hue, Saturation and Brightness you need.
Quick Eyedropper
The Eyedropper tool (shortcut: Ctrl + C) allows you to quickly pick colors within the document, or even outside the bounds of the application. The magnifying glass will increase the precision.
Frequently Used Colors
Sketch will automatically detect the colors used inside your document. To access it, click on the color itself. Colors will be ordered by how many times they were used.
Color Palettes
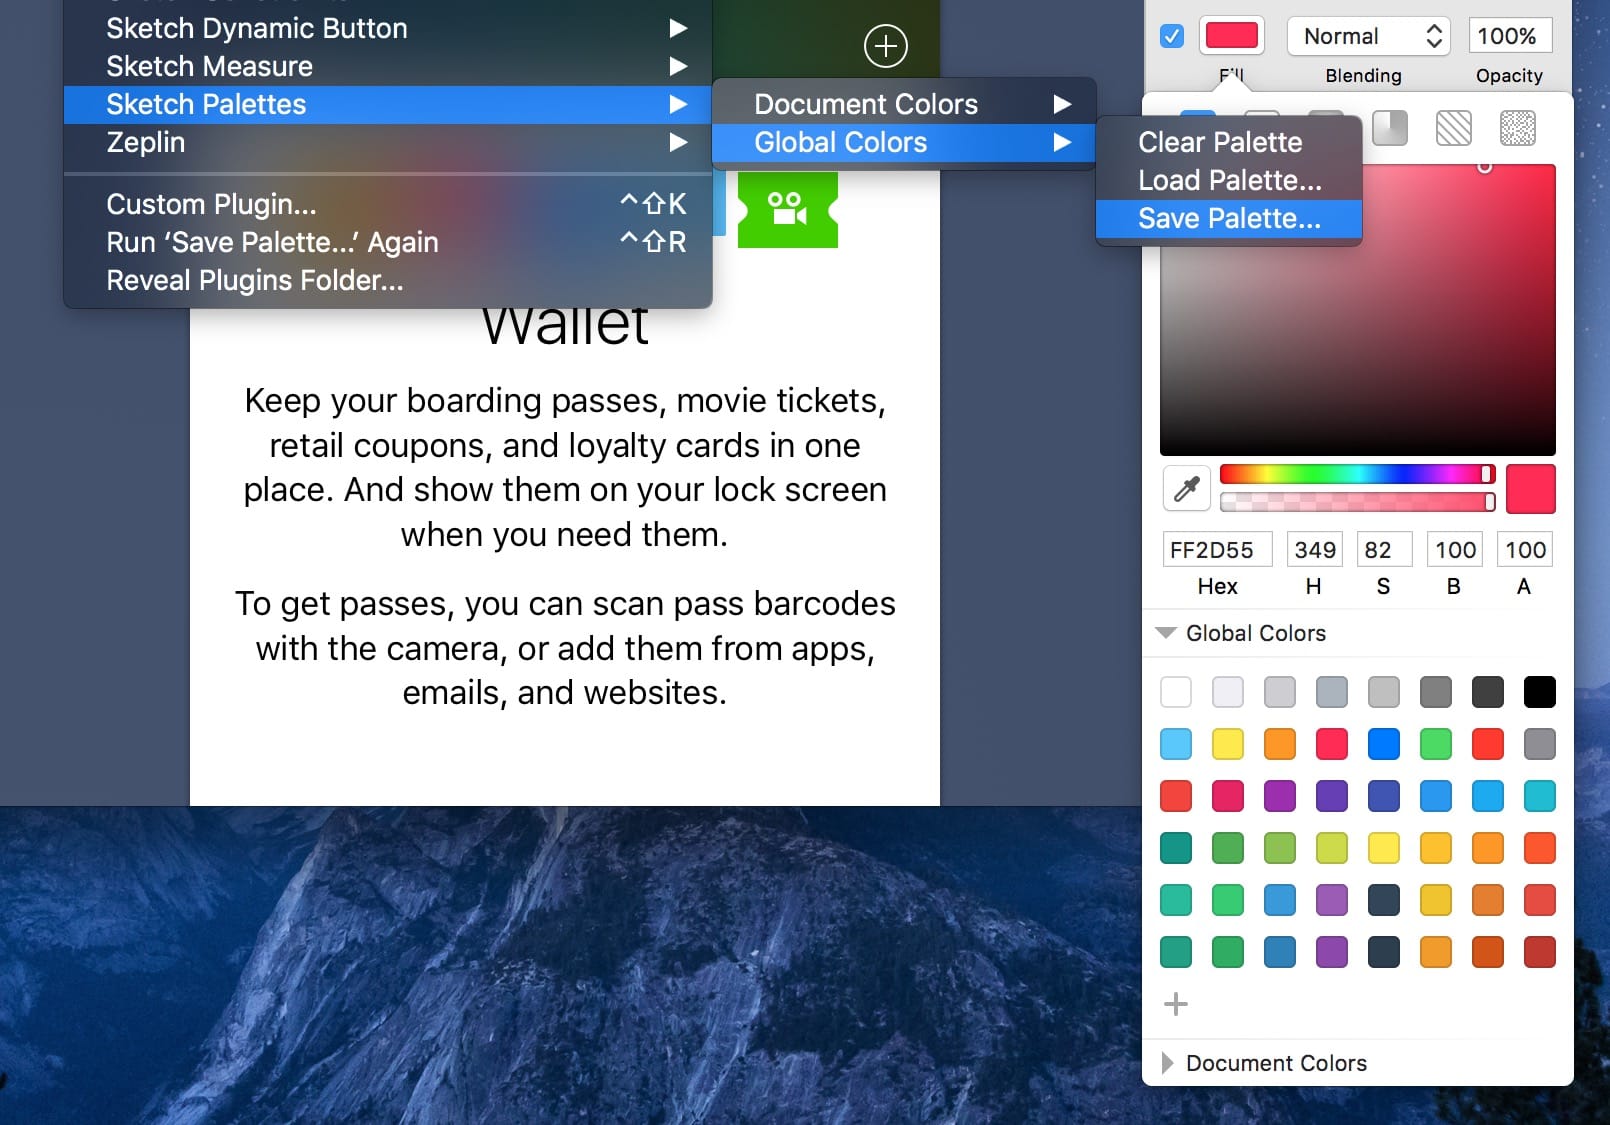
Global Colors are shared across all your Sketch documents. On the other hand, Document Colors are document-specific. There’s a good plugin for saving your own palettes, or download from other designers. I made one using iOS, Material Design and FlatUI. You can download it here.
Gradients
In the same window as the Color Picker, you can switch to the Gradients Tab. In iOS, gradients are often used for app icons, backgrounds and buttons (combined with blur and vibrancy) to add a sense of depth. On the Mac, they’re even more prevalent.

Editing Gradients
You can edit your gradient by dragging the ends of the sliders. You can also rotate, or add new gradient points by double-clicking in the slider.
Radial Gradients
Radial Gradients are typically used for large backgrounds to give a more realistic spotlight. You can achieve interesting results by dragging the points outside the bounds of the canvas.
Angular Gradients
**Angular Gradients ** are especially handy for circular shapes’s backgrounds like those on the Apple Watch.
Importing Gradients
Gradients can’t be as easily imported, but you can add them manually like in this video. Download the Gradients Sketch file to follow the demo.
Patterns
Patterns can be used to repeat a Tile design and create interesting backgrounds by using a tiny image. I often use this feature in combination with the Content Generator Plugin to quickly set up avatars and image backgrounds by using the Fill option.
There's this great site lets you use their library of gorgeous patterns.
Noise
If you want to replicate dust, paper or aluminum textures for presentations or to serve as an image background, then use the Noise fill at a very low opacity. Additionally, you can use Overlay or Soft Light to blend the colors even better.
Layers and Groups
It is recommended to always name your layers, and group (⌘ G) similar layers together. When you do, it is much easier to manage and organize your document. You can drag outside to export 1x PNG asset based on Layer, Group or Artboard. You may override that setting by using Make Exportable.
Copy and Paste
One of the convenient things about Sketch is that it plays really well with other Mac apps like Finder, Keynote, Pages and Mail. Copy any image or text to the Clipboard will allow you to paste them to Sketch. Command + V to Paste your image or text. Command + Shift + V to Paste in Place at position 0, 0 of selected layer. Right-Click > Paste Here to Paste at the mouse cursor from center position.
Vice versa, you can copy any image or text Sketch to other apps. For apps like Keynote or Pages, it’ll copy the vector format, which makes it infinitely scalable.
Symbols
Symbols makes it easy to share the same elements across multiple Artboards. This is especially useful when you re-use the same elements multiple times like for Status Bar, Navigation bar or Tab Bar. You won’t need to go back and edit those elements one by one. As you update one, it’ll synchronize to all the other ones that share the same Symbol.
Version Control, Autosave and iCloud
When you forgot to save your document and accidentally close your computer, you’d normally run into the risk of losing all your changes. That’s where Autosave comes in. It regularly saves multiple versions of your file, so that you don’t have to think about it. You can even revert back to a previous version. This can be useful when for example, colleagues don’t have the font files that you used, thus changing all the text layers to a default font. Autosaving will work without having a backup, but I still suggest that you set up a Time Machine for extra security.
Autosave Tip
If you work with really large files, Autosaving can really take up a lot of disk space. That’s when you need to clean your backups with this little trick.
iCloud works great with Sketch. Every save not only stores the file on your Hard Drive but also on Apple’s servers. If your computer breaks down, you can always retrieve a backup of it.
Background Blur
iOS uses blur everywhere, from the Lock screen to the Notifications center. Background Blur is a feature unique to Sketch, and it’s extremely convenient. The blur is a dynamic sheet placed on top of multiple layers in the background. It updates in real-time as everything changes.
Creating the exact same effect only requires you to create a Shape, set the Fill opacity to less than 100%, and change the blur to Background Blur. From there, you can customize the Blur strength. As you move the Blur layer, the layers underneath blur automatically. You can use Soft Light or Overlay to add interesting effects that replicate the Vibrancy in iOS.
In addition to Background Blur, you have the usual Gaussian, Motion and Zoom blurs. Background Blur can be an expensive feature to the performance of Sketch, so don’t overuse it. Flatten to Bitmap whenever possible.
Migrating from Photoshop and Illustrator
As a UI designer, the things you'll be missing are your hard-earned libraries of icons and logos. There's a solution for that. As long as you know how to export them to SVG, the process of migrating to Sketch is painless.
PSD Shapes to Sketch
If you happen to have a set of icons that is exclusively made for Photoshop, you just need to suck the SVG out of them. This process requires Photoshop and Illustrator.
What about my PSD files?
Consider two things: 1) you should work in vector, and 2) always work from scratch, except for your libraries. Recycling old work is a bad habit for any designer. Instead of jumping to Sketch in a middle of a project, consider getting the team together and experiment with Sketch for a Hackathon or small project.
Clients and Photoshop Legacy
The biggest reason why designers are reluctant to switch to Sketch is because of the expectations of their co-workers. It's a fair assessment. There is no direct solution to that, but I will say a few things. I've worked with Sketch at 3 different places and with a number of clients. In all of them, I've successfully converted every designer, engineer and manager. The trick? Be convincing. The cost of staying in Photoshop is far greater than the cost of switching to a tool tailor-made for your work. If legacy was an issue, I would never have switched to the Mac 10 years ago. As Steve Jobs put it perfectly: "Why join the navy if you can be a pirate?". Become the change you want to see.
Templates and source code
Download source files
Download the videos and assets to refer and learn offline without interuption.
Design template
Source code for all sections
Video files, ePub and subtitles
Videos
ePub
Assets
Subtitles
1
Learn Sketch
Introduction to Sketch Basic Tools
23:28
2
Powerful Start in Sketch
Strong Foundations for your Sketch Workflow
22:49
3
Design for iOS 11
Designing an iOS App from scratch in Sketch
31:30
4
Design for iPhone X
Designing and adapting for iPhone X in Sketch
28:23
5
Designing for iPad
Designing an iPad app from Scratch
11:36
6
Design for Web
Designing a Website from Scratch
25:12
7
Design for Web Part 2
Designing a Website from Scratch 2
25:11
8
Tricks and Keyboard Shortcuts
Boost your productivity in Sketch
20:43
9
Sketch Plugins
Essential Sketch Plugins for Designers and Developers
12:09
10
Nested Symbols
Design with More Flexibility by Nesting Symbols
9:14
11
Sketch Libraries
Share Symbols with Other Designers
7:00
12
Version Control
The Github for Designers
18:53
13
Working with Data
Make your design meaningful with real content
10:29
14
Adaptive Layouts
Working with Multiple Resolutions
7:33
15
Working with Vector
Vector Techniques in Sketch
20:12
16
Exporting Assets
Delivering Assets to Multiple Devices in Sketch
13:44
17
Styleguide and Handoff
Consistent design language in your team
9:11
18
Advanced Techniques
Master Sketch with these Tricks
12:40
19
Intro to Framer
Design and Code animations with Framer
27:51
20
Previewing and Sharing
Test drive on your devices
7:22
21
Prototyping in Keynote
Prototyping in Keynote Using Magic Move
3:33
Meet the instructor
We all try to be consistent with our way of teaching step-by-step, providing source files and prioritizing design in our courses.
Meng To
I design, code and write
Meng To is the author of Design+Code. Meng started off his career as a self-taught designer from Montreal and eventually traveled around the world for 2 years as his US VISA was denied. During his travels, he wrote a book which now has 35,000 readers.
40 courses - 194 hours

Master AI Prompting for Stunning UI
Learn how to leverage AI tools like Aura for creating beautiful designs, working with templates, and experimenting with advanced prompts. A concise guide for designers and developers to level up their skills.
10 hrs

Build SwiftUI apps for iOS 18 with Cursor and Xcode
In this course, we'll explore the exciting new features of SwiftUI 6 and Xcode 16 for building iOS 18 apps. From mesh gradients and text animations to ripple effects, you'll learn how to create polished, highly custom apps using the latest workflows. We'll also dive into using Cursor and Claude AI for AI-driven coding, helping you start strong and customize your apps.
5 hrs

Create your Dream Apps with Cursor and Claude AI
Learn to build your dream web apps from the ground up using Cursor, Claude AI, and a suite of powerful AI tools. This course covers everything you need, including React for frontend development, Firebase for backend integration, and Stripe for handling payments. You’ll also dive into advanced AI tools like Claude Artifacts, Galileo AI, v0.dev for UI, Ideogram for design generation, and Cursor Composer for full-scale development.
6 hrs

Build a React Site from Figma to Codux
In this course, you'll learn to build a website from scratch using Codux, starting with a Figma template. You’ll master responsive design, collaborate with developers on a real React project, export CSS from Figma using Locofy, set up breakpoints with media queries, add CSS animations, improve SEO, create multiple pages with React Router, and publish your site. By following best practices, you’ll bridge design and development, improve your web design skills.
2 hrs

Create 3D UI for iOS and visionOS in Spline
Comprehensive 3D Design Course: From Basics to Advanced Techniques for iOS and visionOS using SwiftUI
3 hrs

Master No-Code Web Design with Framer
In this free Framer course, you'll learn to create modern, user-friendly interfaces. Start with dark mode and glass designs, then move from Figma to Framer, using vectors and auto layout for responsive websites. Add animations, interactive buttons, and custom components with code. Finally, you'll craft a design system suitable for teamwork or solo projects, all in a straightforward and practical approach.
4 hrs

Build SwiftUI Apps for iOS 17
In this course, we’ll be exploring the fresh and exciting features of SwiftUI 5! As we craft a variety of iOS apps from the ground up, we'll delve deep into the treasure trove that is SwiftUI's user interface, interactions, and animations.
4 hrs

Build Beautiful Apps with GPT-4 and Midjourney
Design and develop apps using GPT-4 and Midjourney with prompts for SwiftUI, React, CSS, app concepts, icons, and copywriting
4 hrs

Build SwiftUI apps for iOS 16
Create animated and interactive apps using new iOS 16 techniques using SwiftUI 4 and Xcode 14
5 hrs

Build a 3D Site Without Code with Framer
Design and publish a responsive site with 3D animation without writing a single line of code
3 hrs

Create 3D Site with Spline and React
Design and code a landing page with an interactive 3D asset using Spline and CodeSandbox
1 hrs

Build an Animated App with Rive and SwiftUI
Design and code an iOS app with Rive animated assets, icon animations, custom layouts and interactions
3 hrs

Build a SwiftUI app for iOS 15 Part 3
Design and code a SwiftUI 3 app with custom layouts, animations and gestures using Xcode 13, SF Symbols 3, Canvas, Concurrency, Searchable and a whole lot more
4 hrs

Build a SwiftUI app for iOS 15 Part 2
Design and code a SwiftUI 3 app with custom layouts, animations and gestures using Xcode 13, SF Symbols 3, Canvas, Concurrency, Searchable and a whole lot more
3 hrs

Build a SwiftUI app for iOS 15
Design and code a SwiftUI 3 app with custom layouts, animations and gestures using Xcode 13, SF Symbols 3, Canvas, Concurrency, Searchable and a whole lot more
4 hrs

React Livestreams
Learn how we can use React Hooks to build web apps using libraries, tools, apis and frameworks
4 hrs
Design Founder Livestreams
A journey on how we built DesignCode covering product design, management, analytics, revenue and a good dose of learning from our successes and failures
2 hrs

SwiftUI Advanced Handbook
An extensive series of tutorials covering advanced topics related to SwiftUI, with a main focus on backend and logic to take your SwiftUI skills to the next level
4 hrs
iOS Design Handbook
A complete guide to designing for iOS 14 with videos, examples and design files
2 hrs

SwiftUI Handbook
A comprehensive series of tutorials covering Xcode, SwiftUI and all the layout and development techniques
7 hrs

Build a web app with React Hooks
Learn how we built the new Design+Code site with React Hooks using Gatsby, Netlify, and advanced CSS techniques with Styled Components.
4 hrs

UI Design Handbook
A comprehensive guide to the best tips and tricks for UI design. Free tutorials for learning user interface design.
2 hrs

Figma Handbook
A comprehensive guide to the best tips and tricks in Figma. Not affiliated with or endorsed by Figma, Inc.
6 hrs

SwiftUI for iOS 14
Build a multi-platform app from scratch using the new techniques in iOS 14. We'll use the Sidebar and Lazy Grids to make the layout adaptive for iOS, iPadOS, macOS Big Sur and we'll learn the new Matched Geometry Effect to create beautiful transitions between screens without the complexity. This course is beginner-friendly and is taught step-by-step in a video format.
3 hrs

SwiftUI Livestreams
This is a compilation of the SwiftUI live streams hosted by Meng. Over there he talks and teaches how to use design systems, typography, navigation, iOS 14 Design, prototyping, animation and Developer Handoff.
19 hrs

UI Design Livestreams
This is a compilation of the UI live streams hosted by Meng. Over there he talks and teaches how to use design systems, typography, navigation, iOS 14 Design, prototyping, animation and Developer Handoff.
26 hrs

UI Design for Developers
In this course we'll learn how to use design systems, set up break points, typography, spacing, navigation, size rules for adapting to the iPad, mobile and web versions, and different techniques that translate well from design to code.
3 hrs

Build an app with SwiftUI Part 3
This course was written for designers and developers who are passionate about design and about building real apps for iOS, iPadOS, macOS, tvOS and watchOS. SwiftUI works across all of those platforms. While the code is not a one-size-fits-all, the controls and techniques involved can apply to all platforms. It is beginner-friendly, but it is also packed with design tricks and cool workflows about building the best UIs and interactions.
4 hrs

Build an app with SwiftUI Part 2
This course was written for designers and developers who are passionate about design and about building real apps for iOS, iPadOS, macOS, tvOS and watchOS. SwiftUI works across all of those platforms. While the code is not a one-size-fits-all, the controls and techniques involved can apply to all platforms. It is beginner-friendly, but it is also packed with design tricks and cool workflows about building the best UIs and interactions.
4 hrs

Build a full site in Webflow
Webflow is a design tool that can build production-ready experiences without code. You can implement CSS-driven adaptive layouts, build complex interactions and deploy all in one tool. Webflow also comes with a built-in content management system (CMS) and Ecommerce for creating a purchase experience without the need of third-party tools.
3 hrs

Advanced Prototyping in ProtoPie
ProtoPie is a cross-platform prototyping tool that creates prototypes nearly as powerful as those made with code, with half of the efforts, and zero code. It's perfect for designers who want to quickly experiment with advanced interactions using variables, conditions, sensors and more.
3 hrs

Build an app with SwiftUI Part 1
This course was written for designers and developers who are passionate about design and about building real apps for iOS, iPadOS, macOS, tvOS and watchOS. SwiftUI works across all of those platforms. While the code is not a one-size-fits-all, the controls and techniques involved can apply to all platforms. It is beginner-friendly, but it is also packed with design tricks and cool workflows about building the best UIs and interactions.
4 hrs

React Native for Designers Part 2
React Native is a popular Javascript framework that builds on top of React by using native components to create a real mobile app indistinguishable from one made using Xcode or Android Studio. The main difference with native development is that you get to use CSS, hot-reload, Javascript and other familiar techniques that the Web has grown over the past decades. Most importantly, you're building for both iOS and Android using the same codebase.
3 hrs

React Native for Designers
React Native is a popular Javascript framework that builds on top of React by using native components to create a real mobile app indistinguishable from one made using Xcode or Android Studio. The main difference with native development is that you get to use CSS, hot-reload, Javascript and other familiar techniques that the Web has grown over the past decades. Most importantly, you're building for both iOS and Android using the same codebase.
5 hrs

Design System in Figma
Learn how to use and design a collaborative and powerful design system in Figma. Design Systems provide a shared library of reusable components and guidelines and that will let you build products much faster
3 hrs

React for Designers
Learn how to build a modern site using React and the most efficient libraries to get your site/product online. Get familiar with Grid CSS, animations, interactions, dynamic data with Contentful and deploying your site with Netlify.
3 hrs

Swift Advanced
Learn Swift a robust and intuitive programming language created by Apple for building apps for iOS, Mac, Apple TV and Apple Watch
9 hrs

Learn Swift
Learn Swift a robust and intuitive programming language created by Apple for building apps for iOS, Mac, Apple TV and Apple Watch
4 hrs

Learn Sketch
Learn Sketch a design tool entirely vector-based and focused on user interface design
5 hrs

Learn iOS 11 Design
Learn colors, typography and layout for iOS 8
1 hrs
