
Push Notifications Part 2
Add to favorites
Create an AppDelegate to ask permission to send push notifications using Apple Push Notifications service and Firebase Cloud Messaging
SwiftUI Advanced Handbook
1
Firebase Auth
8:18
2
Read from Firestore
8:01
3
Write to Firestore
5:35
4
Join an Array of Strings
3:33
5
Data from JSON
5:08
6
HTTP Request
6:31
7
WKWebView
5:25
8
Code Highlighting in a WebView
5:11
9
Test for Production in the Simulator
1:43
10
Debug Performance in a WebView
1:57
11
Debug a Crash Log
2:22
12
Simulate a Bad Network
2:11
13
Archive a Build in Xcode
1:28
14
Apollo GraphQL Part I
6:21
15
Apollo GraphQL Part 2
6:43
16
Apollo GraphQL Part 3
5:08
17
Configuration Files in Xcode
4:35
18
App Review
5:43
19
ImagePicker
5:06
20
Compress a UIImage
3:32
21
Firebase Storage
11:11
22
Search Feature
9:13
23
Push Notifications Part 1
5:59
24
Push Notifications Part 2
6:30
25
Push Notifications Part 3
6:13
26
Network Connection
6:49
27
Download Files Locally Part 1
6:05
28
Download Files Locally Part 2
6:02
29
Offline Data with Realm
10:20
30
HTTP Request with Async Await
6:11
31
Xcode Cloud
9:23
32
SceneStorage and TabView
3:52
33
Network Connection Observer
4:37
34
Apollo GraphQL Caching
9:42
35
Create a model from an API response
5:37
36
Multiple type variables in Swift
4:23
37
Parsing Data with SwiftyJSON
9:36
38
ShazamKit
12:38
39
Firebase Remote Config
9:05
Create your AppDelegate
The AppDelegate is an object that manages your app. It listens to when your app is launched, when it's receiving data, or the state of the app - if it's in the background or in the foreground, for example. The AppDelegate is useful for notifications as there are methods, like didReceiveRemoteNotification, that will tell the app that a remote notifications has arrived.
To start off, let's import these three elements at the top of our ProjectNameApp.swift file:
import SwiftUI
import Firebase
import UserNotifications
Then, we'll need to create our AppDelegate. Create it below your App structure.
class AppDelegate: NSObject, UIApplicationDelegate {
    let gcmMessageIDKey = "gcm.message_id"

    func application(_ application: UIApplication, didFinishLaunchingWithOptions launchOptions: [UIApplication.LaunchOptionsKey : Any]? = nil) -> Bool {
        FirebaseApp.configure()

        Messaging.messaging().delegate = self

        if #available(iOS 10.0, *) {
          // For iOS 10 display notification (sent via APNS)
          UNUserNotificationCenter.current().delegate = self

          let authOptions: UNAuthorizationOptions = [.alert, .badge, .sound]
          UNUserNotificationCenter.current().requestAuthorization(
            options: authOptions,
            completionHandler: {_, _ in })
        } else {
          let settings: UIUserNotificationSettings =
          UIUserNotificationSettings(types: [.alert, .badge, .sound], categories: nil)
          application.registerUserNotificationSettings(settings)
        }

        application.registerForRemoteNotifications()
        return true
    }

    func application(_ application: UIApplication, didReceiveRemoteNotification userInfo: [AnyHashable: Any],
                     fetchCompletionHandler completionHandler: @escaping (UIBackgroundFetchResult) -> Void) {

      if let messageID = userInfo[gcmMessageIDKey] {
        print("Message ID: \(messageID)")
      }

      print(userInfo)

      completionHandler(UIBackgroundFetchResult.newData)
    }
}
Here, we created two functions. The first one is executed once the app finished launching. We are configuring Firebase, then asking the user for permission to send them push notifications. The second function listens to remote notifications and will alert the app when a new push notification comes in.
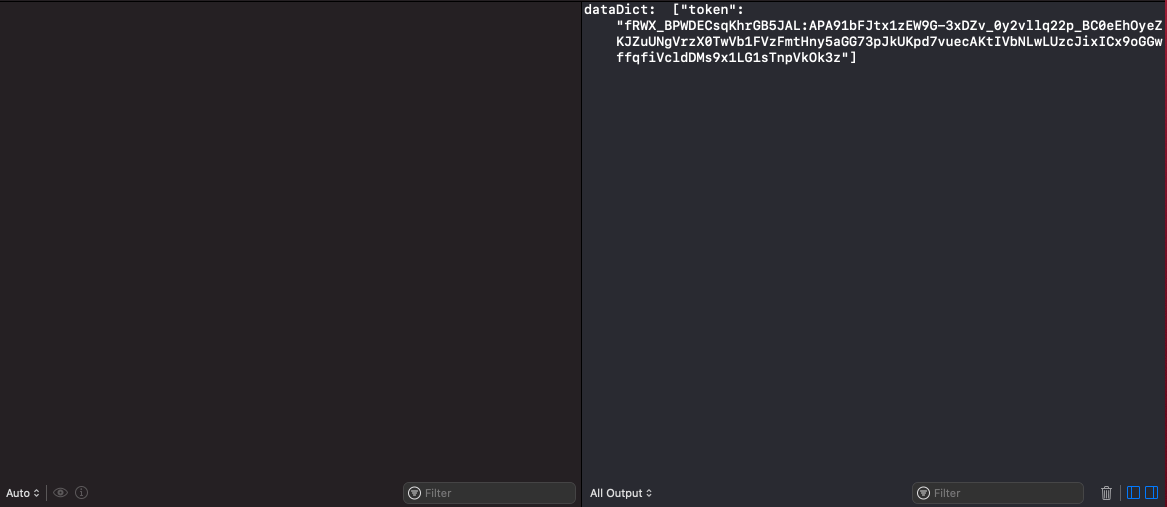
Next, let's create an extension on AppDelegate. The messaging() function inside of this extension will print the device token. It'll be useful when we'll be sending a test notification through the Firebase Cloud Messaging Console to our device.
extension AppDelegate: MessagingDelegate {
    func messaging(_ messaging: Messaging, didReceiveRegistrationToken fcmToken: String?) {

      let deviceToken:[String: String] = ["token": fcmToken ?? ""]
        print("Device token: ", deviceToken) // This token can be used for testing notifications on FCM
    }
}
Finally, we'll create one last extension on AppDelegate. It's a UNUserNotificationCenterDelegate and you can think of it as a Notification Center. This is where all the notification actions are handled. Don't forget to add @available(iOS 10, *) before the extension as it's only available after iOS 10.
@available(iOS 10, *)
extension AppDelegate : UNUserNotificationCenterDelegate {

  // Receive displayed notifications for iOS 10 devices.
  func userNotificationCenter(_ center: UNUserNotificationCenter,
                              willPresent notification: UNNotification,
    withCompletionHandler completionHandler: @escaping (UNNotificationPresentationOptions) -> Void) {
    let userInfo = notification.request.content.userInfo

    if let messageID = userInfo[gcmMessageIDKey] {
        print("Message ID: \(messageID)")
    }

    print(userInfo)

    // Change this to your preferred presentation option
    completionHandler([[.banner, .badge, .sound]])
  }

    func application(_ application: UIApplication, didRegisterForRemoteNotificationsWithDeviceToken deviceToken: Data) {

    }

    func application(_ application: UIApplication, didFailToRegisterForRemoteNotificationsWithError error: Error) {

    }

  func userNotificationCenter(_ center: UNUserNotificationCenter,
                              didReceive response: UNNotificationResponse,
                              withCompletionHandler completionHandler: @escaping () -> Void) {
    let userInfo = response.notification.request.content.userInfo

    if let messageID = userInfo[gcmMessageIDKey] {
      print("Message ID from userNotificationCenter didReceive: \(messageID)")
    }

    print(userInfo)

    completionHandler()
  }
}
Link AppDelegate to App
Add the var appDelegate to your app structure in order to link the AppDelegate to your App.
// ProjectNameApp.swift

@main
struct ProjectNameApp: App {
    @UIApplicationDelegateAdaptor(AppDelegate.self) var appDelegate

    var body: some Scene {
        WindowGroup {
            ContentView()
        }
    }
}
Run your app
Now, build and run (⌘ + R) you app. When you build your app and run it for the first time after adding the AppDelegate code above, you'll see an alert asking you for permission to send you push notifications. Click on Allow then head back to Xcode.
Note that it's best to test on a device connected to your Mac and not the Simulator, as the test notifications we'll send won't work on the Simulator.

In the console in Xcode, you'll see that a token has been printed. This token is a unique token that will allow Firebase Cloud Messaging to send a push notifications to your device. It's like an address to your device. Copy that token because we'll need it in the next step.
Send a test notification
Now, the coding part is done. Yay! Let's head back the the Firebase Console. Under Engage, click on Cloud Messaging. In the banner, click on Send your first message. It'll lead you to the Notifications Composer.

Fill in the Notification title and Notification text. You can fill in the other fields if you wish. On the right, you'll see a Send test message blue button. Click on that. In the Add an FCM registration token field, paste the token you copied from the Xcode console and click on +, then Test.

And ta-dah! Now you've just received your first push notification sent from Firebase Console! If you haven't, it can be tricky to debug and see what went wrong because you don't get any error message. Scroll down to the Debugging section below to have some leads as to why you're not receiving any notification.
 If everything is working fine, you can move on to the last section of this Push notifications series to configure sending notifications for production.
Debugging
You're not receiving any notification on your device? Here are some leads as to why you can't receive your notification:
- Stop the current build, and rebuild your project again on your device.
- Make sure that your Bundle Identifier (or BundleID) in Firebase is the same as the one in your Xcode project.
- Make sure you added the APNs authentication key in Firebase. If you haven't, go to the Push Notifications Part I of this series to learn how to create one and upload it to Firebase Cloud Messaging.
- Make sure that you copied all the AppDelegate code and added the two extensions.
- You are testing on the Simulator - notifications only work on an actual device, so connect a device to your Mac and test again.
- You didn't copy the exact device token - make sure you copy the entire token and paste it in Firebase Cloud Messaging.
- Your device doesn't have an activated SIM card - make sure you have an activated SIM card in your device or that you're connected to a mobile data service to receive push notifications.
- Your Wifi network is blocking the push notifications - connect to another Wifi network or to your mobile data service in order to receive notifications.
- As per Firebase's documentation, you need to make sure you app is in Background mode - that is, make sure your app is not open nor in the foreground. After your app has launched, simply click on the Home button once.
- You can also read this article on the Firebase Blog to help you debug further.
Learn with videos and source files. Available to Pro subscribers only.
Purchase includes access to 50+ courses, 320+ premium tutorials, 300+ hours of videos, source files and certificates.
Templates and source code
Download source files
Download the videos and assets to refer and learn offline without interuption.
Design template
Source code for all sections
Video files, ePub and subtitles
Videos
Assets
ePub
Subtitles
1
Firebase Auth
How to install Firebase authentification to your Xcode project
8:18
2
Read from Firestore
Install Cloud Firestore in your application to fetch and read data from a collection
8:01
3
Write to Firestore
Save the data users input in your application in a Firestore collection
5:35
4
Join an Array of Strings
Turn your array into a serialized String
3:33
5
Data from JSON
Load data from a JSON file into your SwiftUI application
5:08
6
HTTP Request
Create an HTTP Get Request to fetch data from an API
6:31
7
WKWebView
Integrate an HTML page into your SwiftUI application using WKWebView and by converting Markdown into HTML
5:25
8
Code Highlighting in a WebView
Use Highlight.js to convert your code blocks into beautiful highlighted code in a WebView
5:11
9
Test for Production in the Simulator
Build your app on Release scheme to test for production
1:43
10
Debug Performance in a WebView
Enable Safari's WebInspector to debug the performance of a WebView in your application
1:57
11
Debug a Crash Log
Learn how to debug a crash log from App Store Connect in Xcode
2:22
12
Simulate a Bad Network
Test your SwiftUI application by simulating a bad network connection with Network Link Conditionner
2:11
13
Archive a Build in Xcode
Archive a build for beta testing or to release in the App Store
1:28
14
Apollo GraphQL Part I
Install Apollo GraphQL in your project to fetch data from an API
6:21
15
Apollo GraphQL Part 2
Make a network call to fetch your data and process it into your own data type
6:43
16
Apollo GraphQL Part 3
Display the data fetched with Apollo GraphQL in your View
5:08
17
Configuration Files in Xcode
Create configuration files and add variables depending on the environment - development or production
4:35
18
App Review
Request an app review from your user for the AppStore
5:43
19
ImagePicker
Create an ImagePicker to choose a photo from the library or take a photo from the camera
5:06
20
Compress a UIImage
Compress a UIImage by converting it to JPEG, reducing its size and quality
3:32
21
Firebase Storage
Upload, delete and list files in Firebase Storage
11:11
22
Search Feature
Implement a search feature to filter through your content in your SwiftUI application
9:13
23
Push Notifications Part 1
Set up Firebase Cloud Messaging as a provider server to send push notifications to your users
5:59
24
Push Notifications Part 2
Create an AppDelegate to ask permission to send push notifications using Apple Push Notifications service and Firebase Cloud Messaging
6:30
25
Push Notifications Part 3
Tie everything together and test your push notifications feature in production
6:13
26
Network Connection
Verify the network connection of your user to perform tasks depending on their network's reachability
6:49
27
Download Files Locally Part 1
Download videos and files locally so users can watch them offline
6:05
28
Download Files Locally Part 2
Learn how to use the DownloadManager class in your views for offline video viewing
6:02
29
Offline Data with Realm
Save your SwiftUI data into a Realm so users can access them offline
10:20
30
HTTP Request with Async Await
Create an HTTP get request function using async await
6:11
31
Xcode Cloud
Automate workflows with Xcode Cloud
9:23
32
SceneStorage and TabView
Use @SceneStorage with TabView for better user experience on iPad
3:52
33
Network Connection Observer
Observe the network connection state using NWPathMonitor
4:37
34
Apollo GraphQL Caching
Cache data for offline availability with Apollo GraphQL
9:42
35
Create a model from an API response
Learn how to create a SwiftUI model out of the response body of an API
5:37
36
Multiple type variables in Swift
Make your models conform to the same protocol to create multiple type variables
4:23
37
Parsing Data with SwiftyJSON
Make API calls and easily parse data with this JSON package
9:36
38
ShazamKit
Build a simple Shazam clone and perform music recognition
12:38
39
Firebase Remote Config
Deliver changes to your app on the fly remotely
9:05
Meet the instructor
We all try to be consistent with our way of teaching step-by-step, providing source files and prioritizing design in our courses.
Stephanie Diep
iOS and Web developer
Developing web and mobile applications while learning new techniques everyday
7 courses - 36 hours
Build Quick Apps with SwiftUI
Apply your Swift and SwiftUI knowledge by building real, quick and various applications from scratch
11 hrs
Advanced React Hooks Handbook
An extensive series of tutorials covering advanced topics related to React hooks, with a main focus on backend and logic to take your React skills to the next level
3 hrs
SwiftUI Concurrency
Concurrency, swipe actions, search feature, AttributedStrings and accessibility were concepts discussed at WWDC21. This course explores all these topics, in addition to data hosting in Contentful and data fetching using Apollo GraphQL
3 hrs
SwiftUI Combine and Data
Learn about Combine, the MVVM architecture, data, notifications and performance hands-on by creating a beautiful SwiftUI application
3 hrs
SwiftUI Advanced Handbook
An extensive series of tutorials covering advanced topics related to SwiftUI, with a main focus on backend and logic to take your SwiftUI skills to the next level
4 hrs
React Hooks Handbook
An exhaustive catalog of React tutorials covering hooks, styling and some more advanced topics
5 hrs
SwiftUI Handbook
A comprehensive series of tutorials covering Xcode, SwiftUI and all the layout and development techniques
7 hrs