Waves Animation
Add to favorites
Mastering Wave Animation with the Spline 3D Tool
Play video
3D UI Interactive Web Design with Spline
1
Introduction to Spline
10:24
2
3D Shapes and Materials
9:45
3
Weather Icon and Sculpting
13:29
4
Icon Animation
9:27
5
Path Animation
9:35
6
Waves Animation
15:33
7
3D Card with Parallax
9:57
8
Button Components
11:41
9
Screen Resize Adaptive Layout
10:43
10
Tab Bar Animation
21:23
11
UI Charts and Variables
16:54
12
Scroll Interaction and Scenes
9:18
13
Export to USDZ and Optimizations
9:28
14
Publish to 3D Site
3:48

What Are Its Applications?
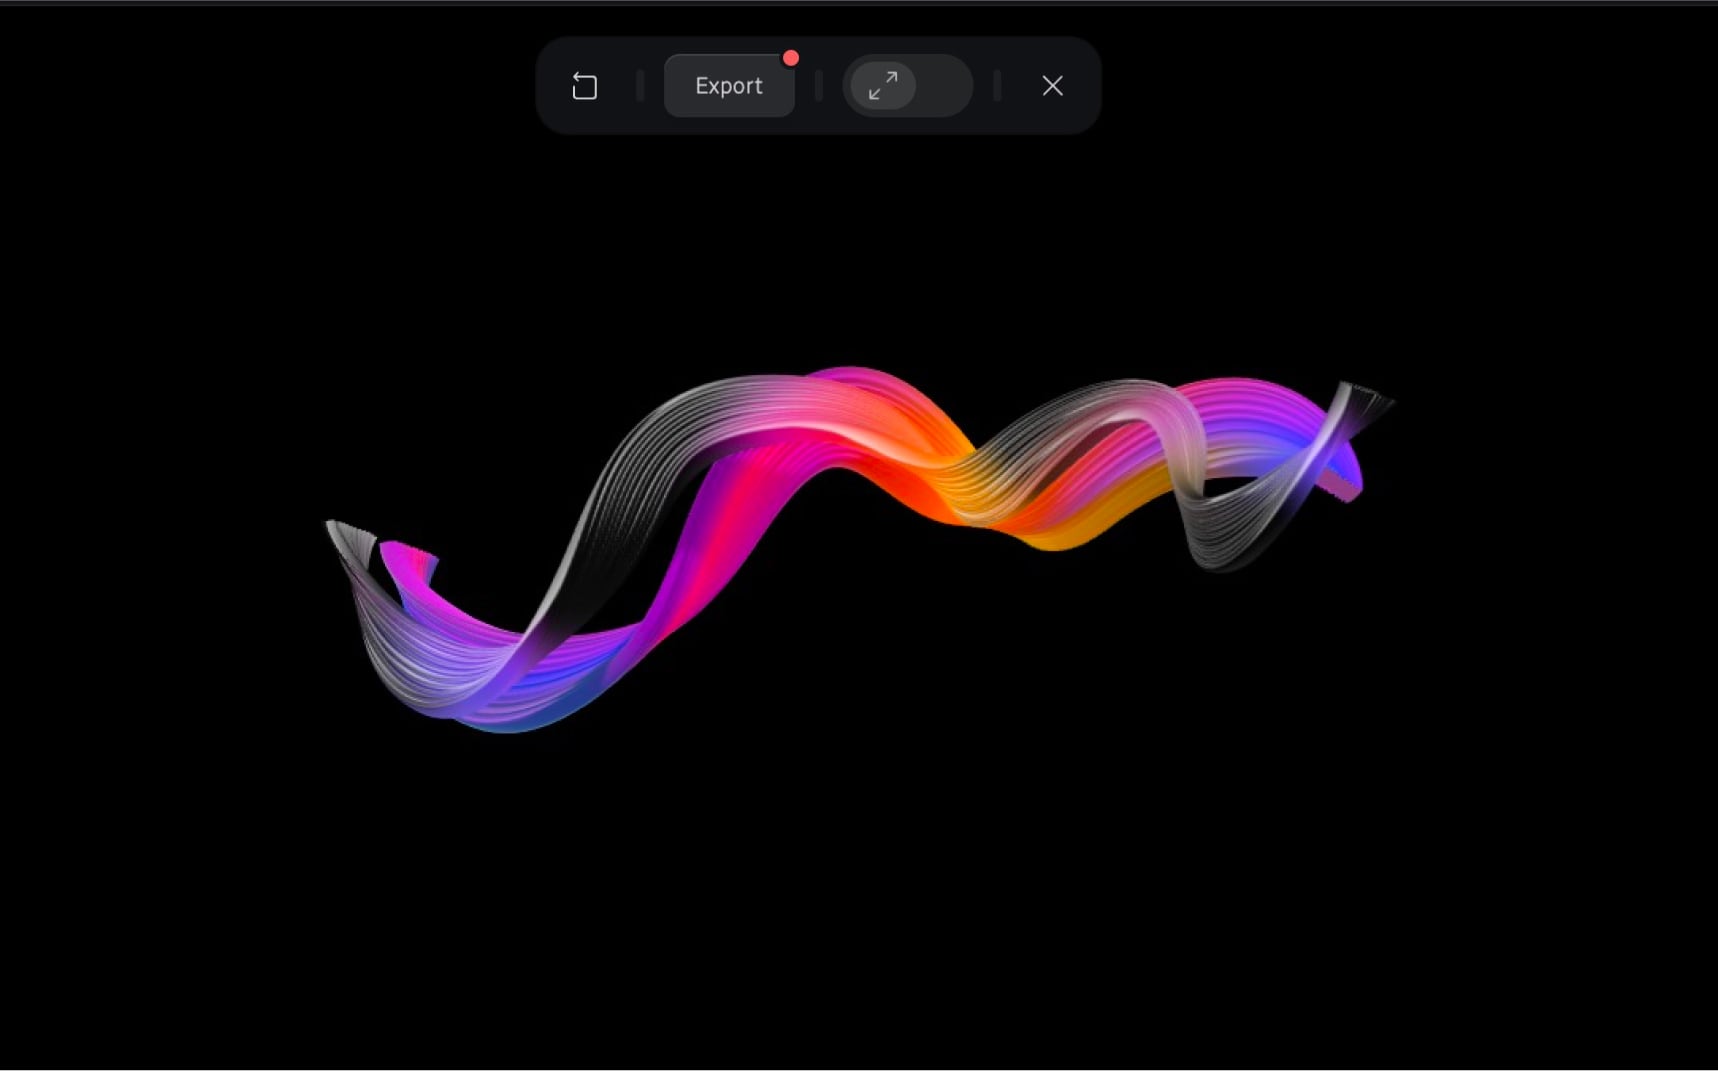
The wave animation can serve as a captivating backdrop for your website's hero section, immediately grabbing the attention of visitors. Alternatively, it can offer an elegant and straightforward product presentation, elevating its visual appeal with a dash of beauty and creativity.

New File
Open Spline in your browser or desktop app and create a new file. To stay organized, rename your design file by double-clicking on the default Untitled label and giving it a meaningful name, like Wave Animation or your preferred identifier. This ensures easy recognition and prevents file mix-ups.

Dark Background
For the best visual experience, choose any dark background, like black, for your scene. It offers excellent contrast, which is ideal for creating a vibrant, colorful wave with a nice glass effect. When you open a new file, it comes with a default rectangle layer that we won't need, so delete it.

Library
To expedite the process, you can access the library to acquire a sample. From there, you can customize it to suit your needs.
- To access the library, press the button with your name to go back to the dashboard.
- Navigate to the Library in the left navigation bar. Here, you can access a variety of free materials.
- Under the Scene section, select 3D Paths and choose the desired wave. For instance, let's opt for Lines 1, which features a pink wave.
- Next, select all the layers and copy them using the keyboard shortcut Command+C.
- Now, return to My Files and choose the file you just created. To paste the wave from the library, use the shortcut Command+V.

Personalizing Waves from the Library
As you can see, there are numerous path layers at your disposal. To make the customization process more manageable and avoid any confusion, you can focus on one layer at a time while temporarily hiding the others. Depending on your creative vision, you can even delete certain layers to tailor the animation to your preference. This decision might revolve around whether you want a simple, single wave or multiple waves in your project.
Moreover, each of these layers can be individually customized to achieve the exact look you desire. You have the flexibility to alter the shape of each wave, whether you'd like them to be unique or maintain a consistent design.
Additionally, you can experiment with gradient colours, allowing you to add your preferred hues and bring your vision to life. The Spline tool empowers you to customize to your heart's content, enabling you to create animations that align perfectly with your creative ideas

Designing from Scratch
If you're eager to delve deeper into the process of crafting this wave animation, let's start from the very beginning.
- Begin by choosing the vector tool, which allows you to create a custom path. Click anywhere on the canvas to establish the first point, and then skillfully shape your wave. Add the necessary anchor points and click and drag to make a curve. Once your wave is precisely as you want, you can simply press the Escape key to finish.
- Now, direct your attention to the Shape section within the Property Panels on the right sidebar. Here, you will find two options: Edit and Convert to Path. Opt for Convert to Path, and you'll notice that the fill colour turns into defined outlines. This step marks a significant transformation in the appearance of your wave.


Custom Shape Options
Within the Spline environment, you're not limited to predefined shapes like rectangles, circles, polygons, or stars. Instead, the power of creativity is in your hands. If you wish to shape something unique and fully express your creativity, you have the freedom to craft your own custom designs by selecting the custom option.

Creating a Custom Vector Shape
When you're looking to craft a unique custom shape, it's important to create a corresponding custom vector shape that will connect seamlessly with the original shape. Any alterations made to the custom shape will reflect on the original shape, essentially making it a clone.
- Choose the vector tool, then click to establish the first point of your desired custom shape. Continue by adding more points as needed, closing the path by clicking on the initial point. By transforming your personalized shape into the original path, both sides will mirror the same design.
- For clarity, consider renaming your custom shape to "Base Shape." This simple adjustment aids in the identification of layers.
- Next, select the original Shape and navigate to the Path Extrusion section on the right sidebar. Here, choose "Object" and then select "Base Shape" to establish the connection from the base shape to the original shape.
- Voilà, the original shape now adopts the exact form of the "Base Shape," resulting in a synchronized design.
- Let’s rename the original Shape to Colorful Path instead for our first wave.
![Waves Animation image 10]()
Path Colorful
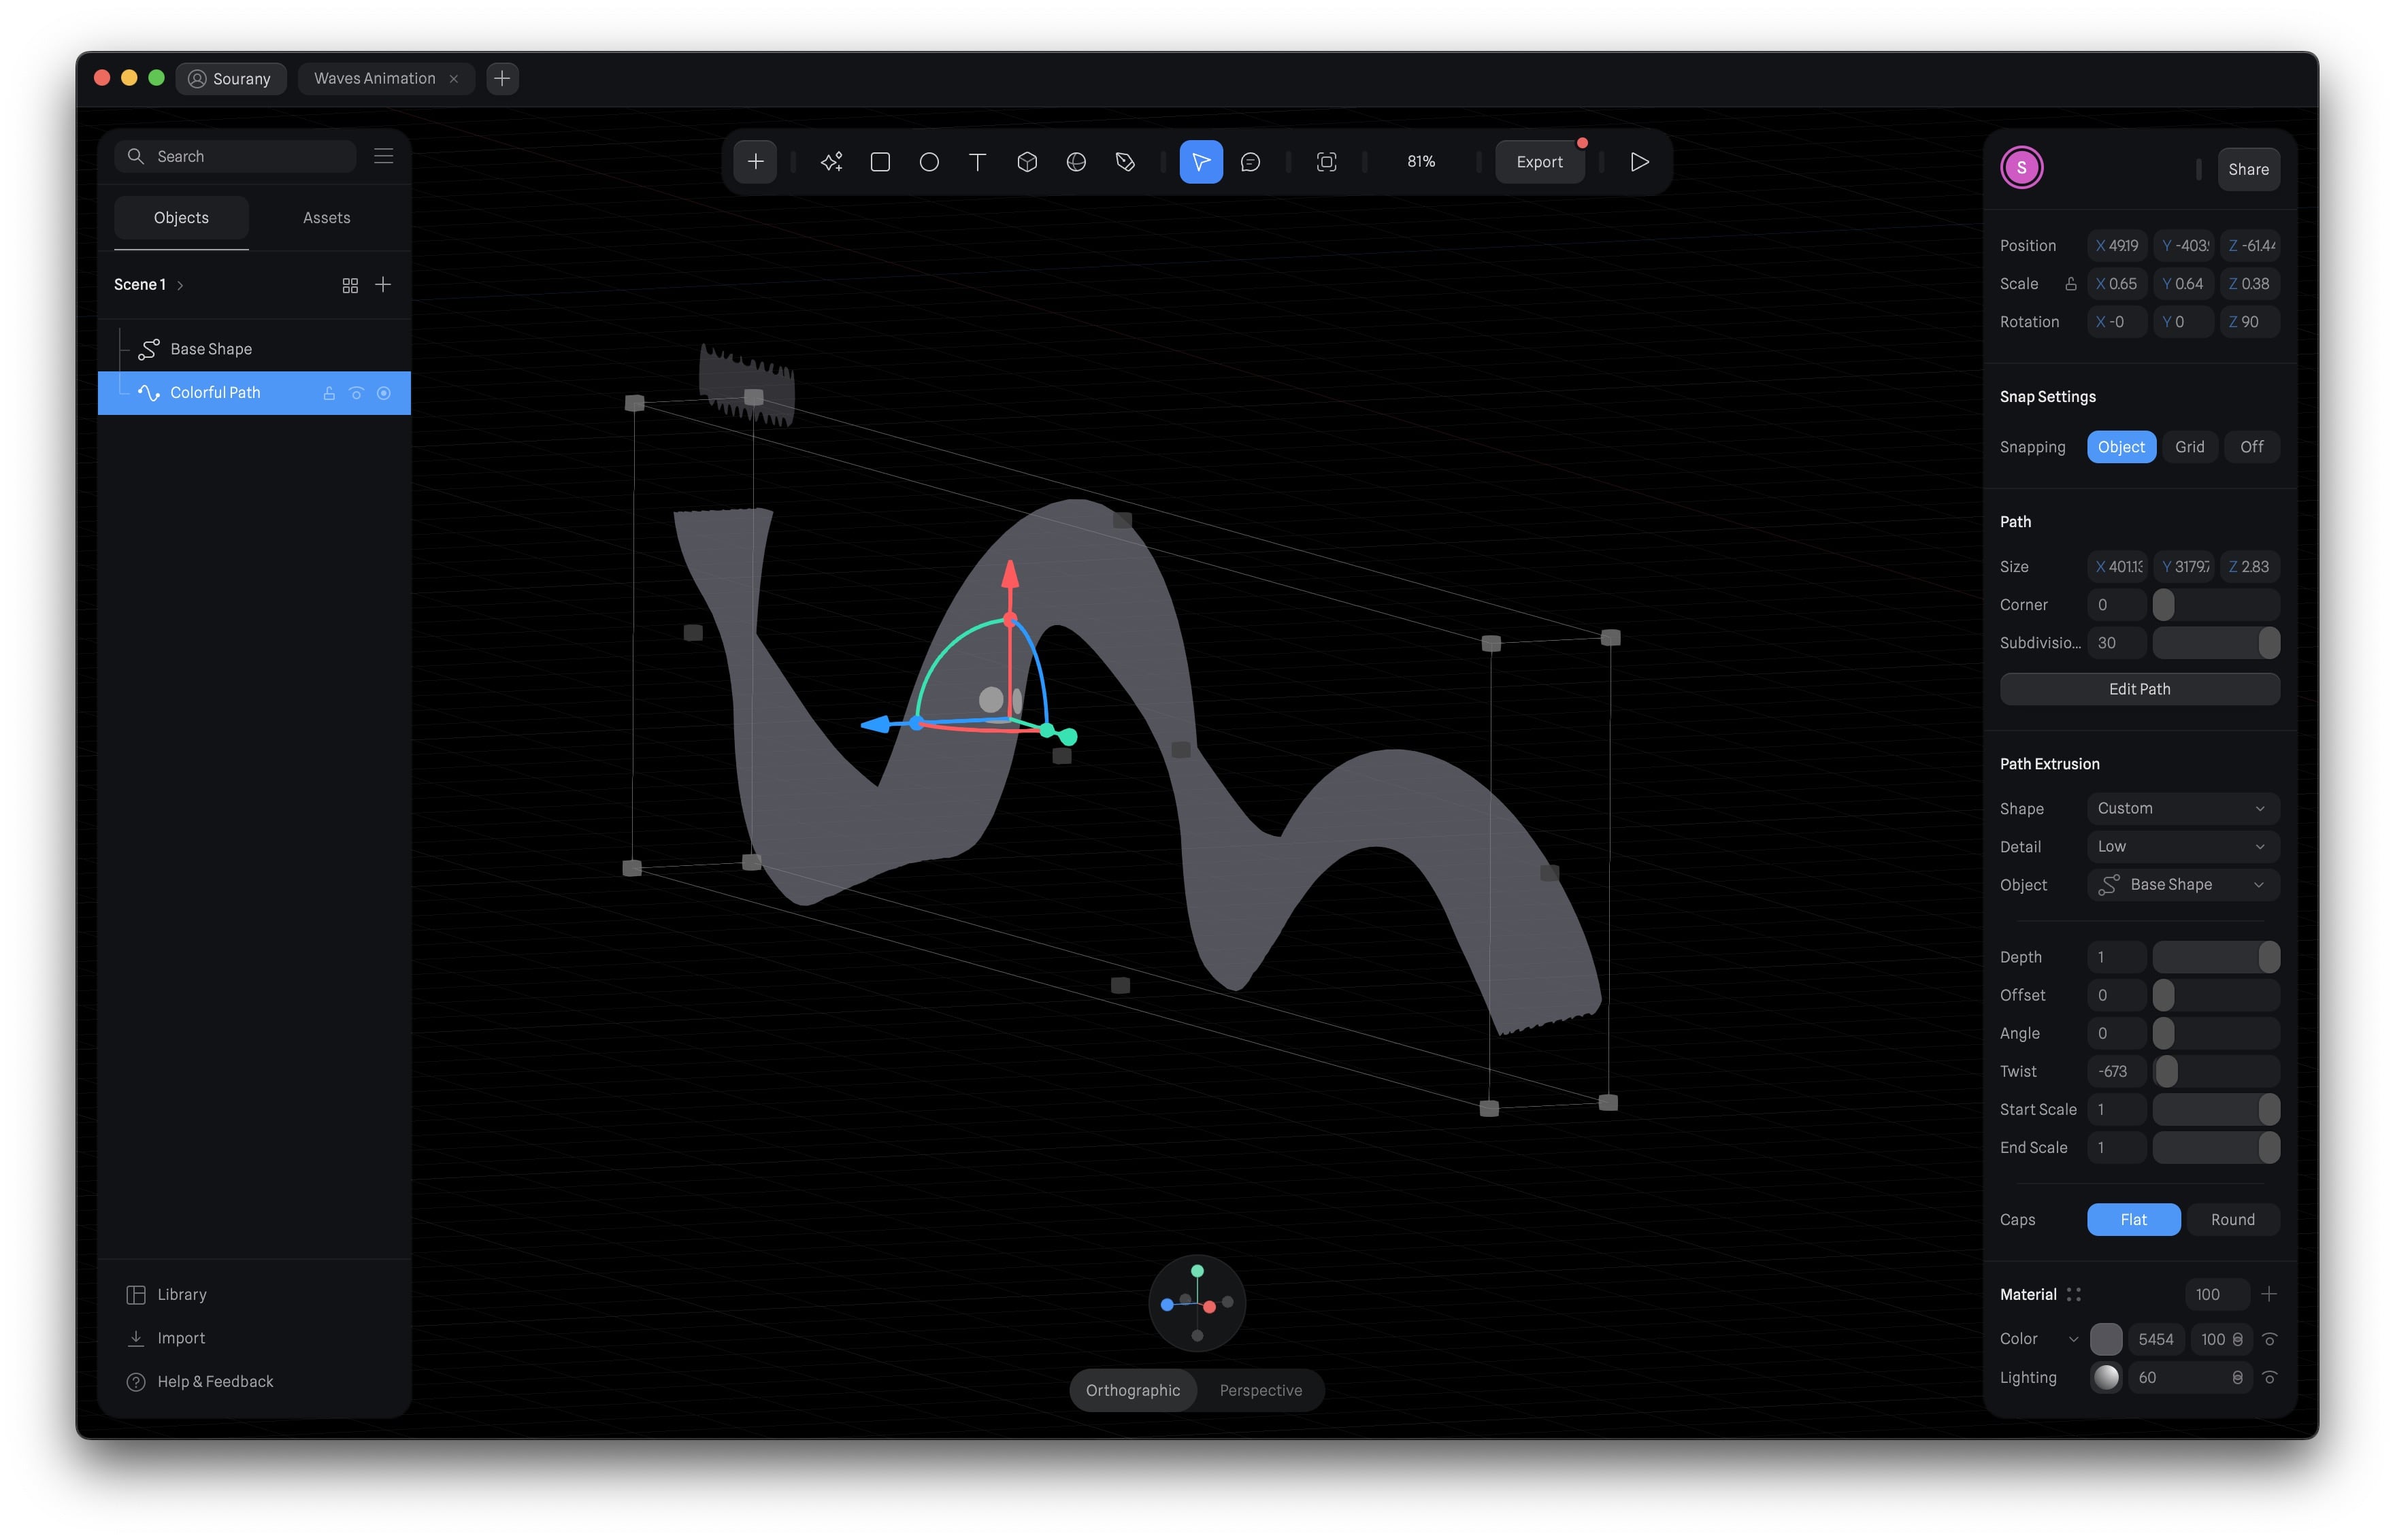
For clarity and organization, let's rename the original shape to Colorful Path since we're creating two separate paths - one for the colorful wave and the other for the glass effect.
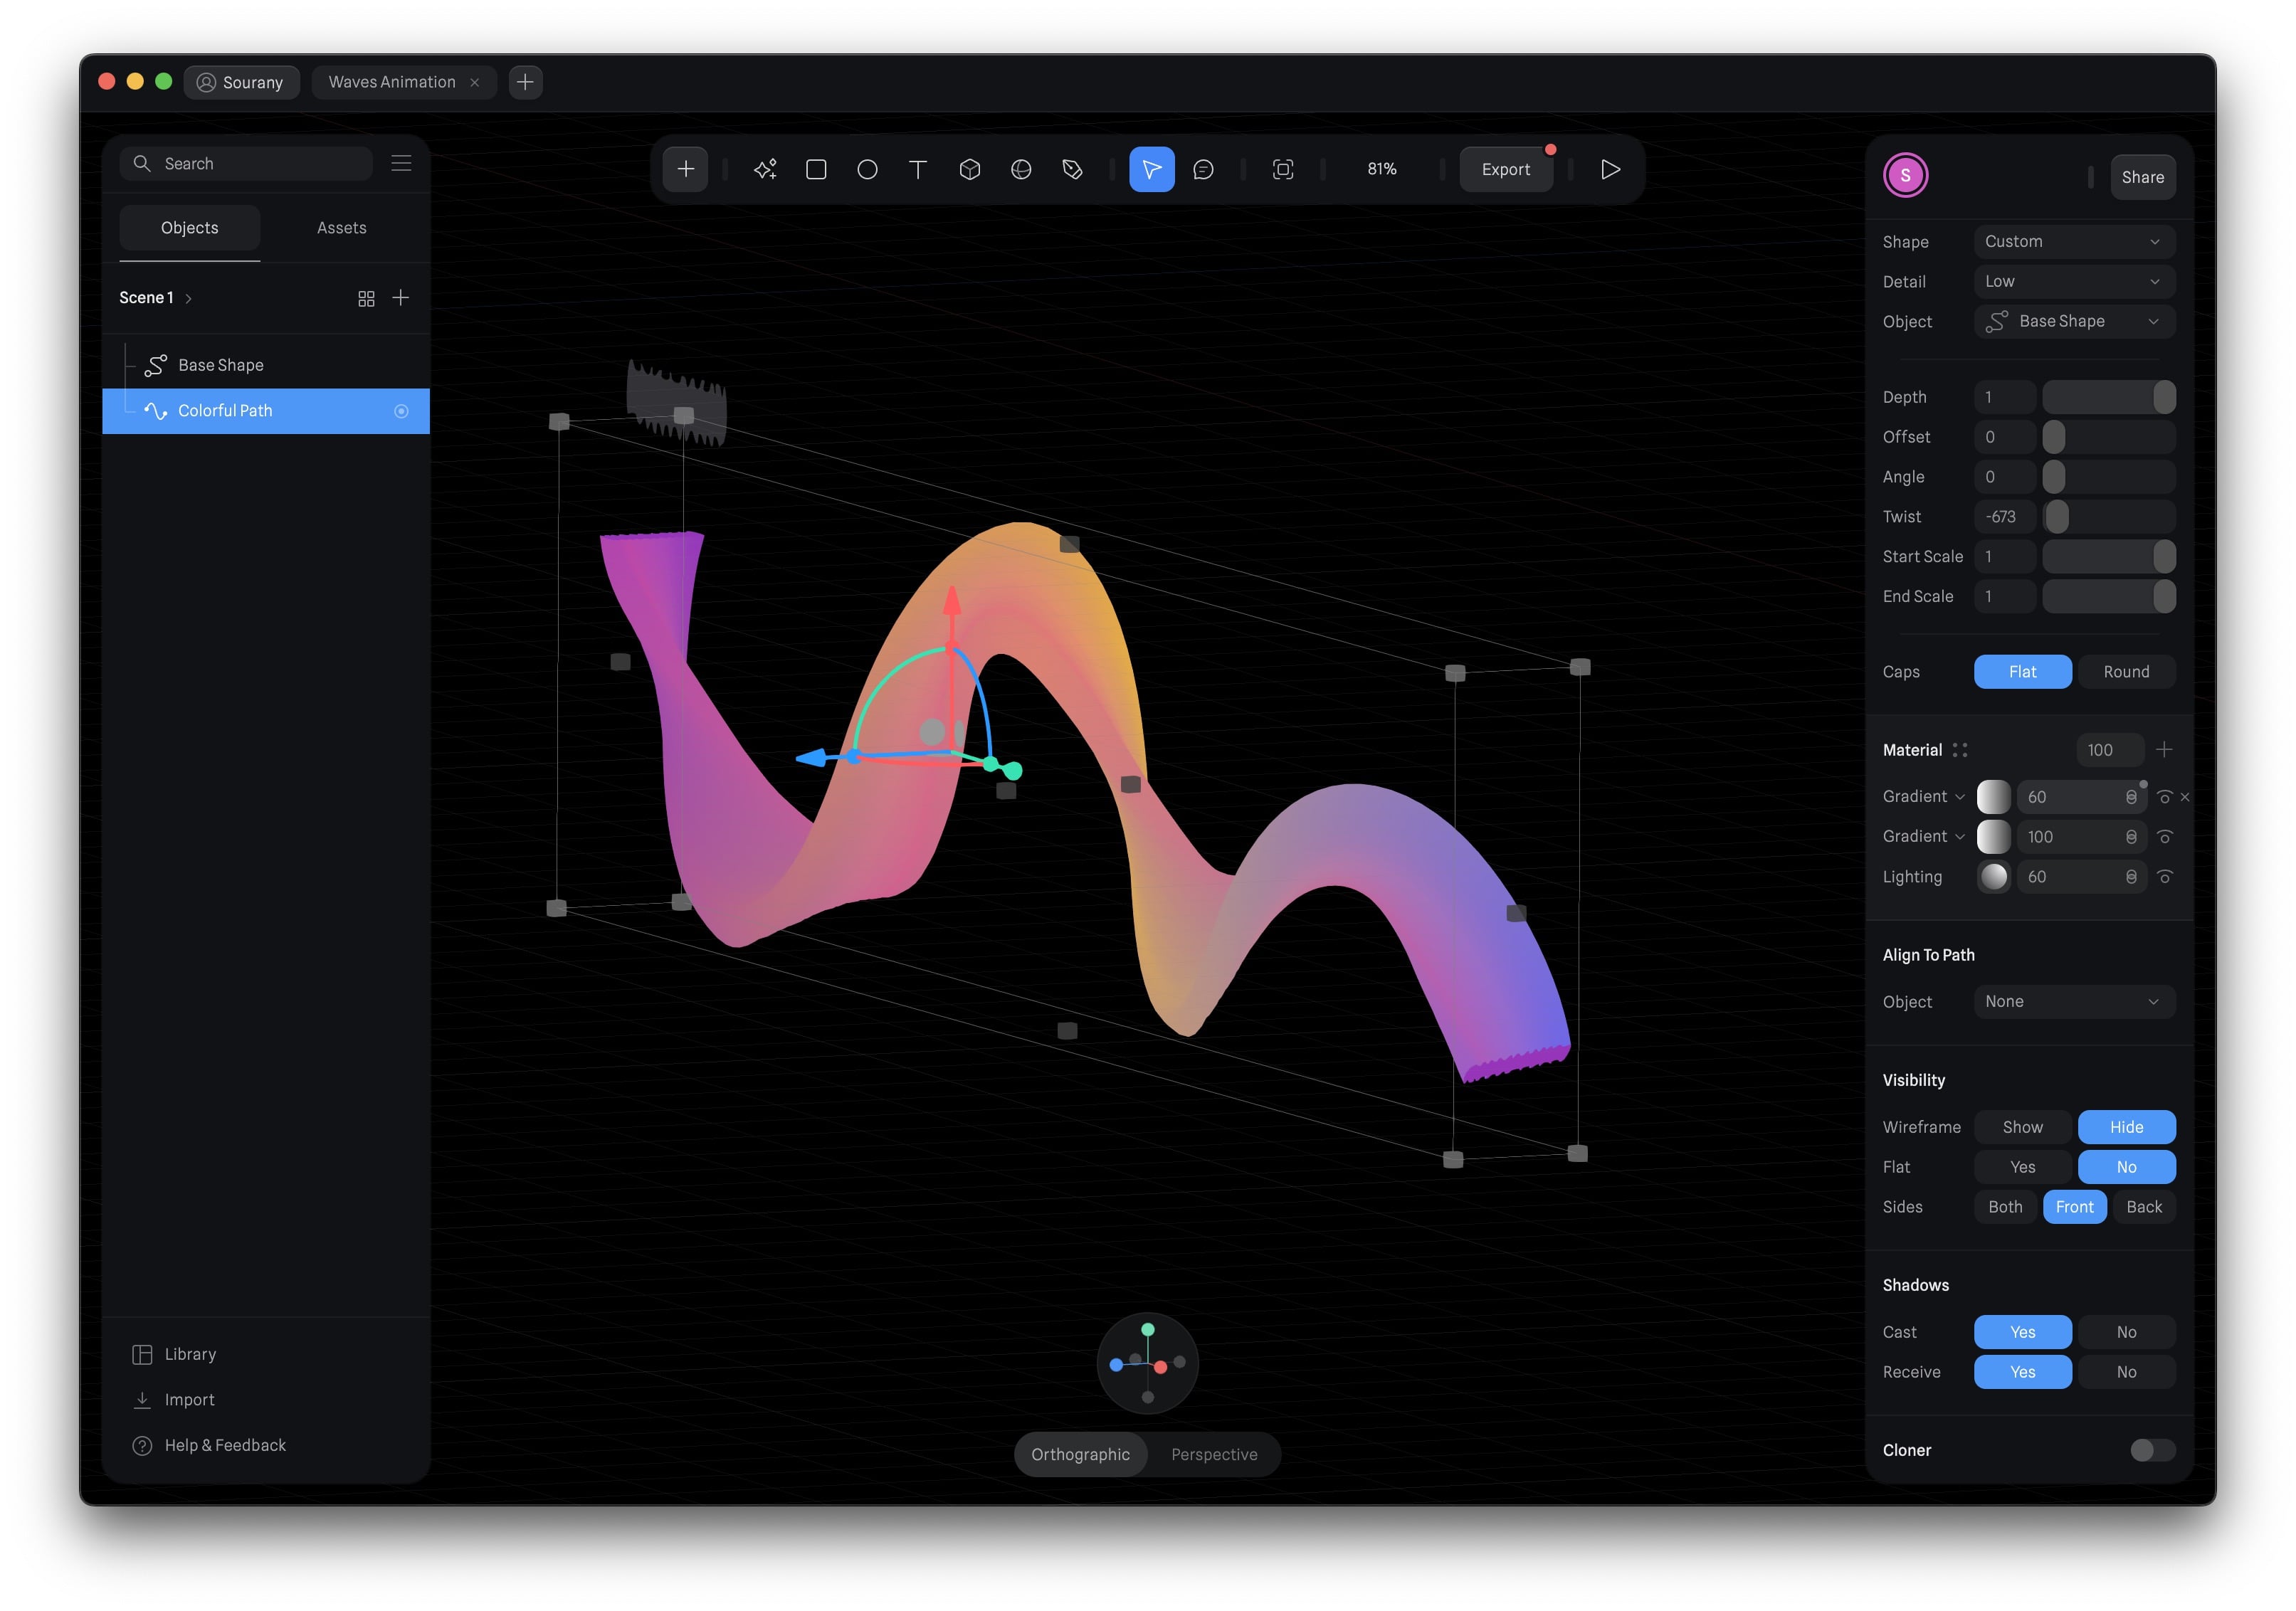
- Position, Scale, and Rotation: Detailed instructions for positioning the wave (X:147.7, Y:211.33, Z:46.40), scaling (X:0.65, Y:0.64, Z:0.56), and rotating (X:0, Y:0, Z:90) will be provided, allowing participants to precisely place and orient their wave animations.
- Path Details: The size of the path (X:401.13, Y:3179.70, Z:2.83) and subdivision settings (30) will be explained, offering insights into how to control the wave's shape and complexity.
- Path Extrusion: A comprehensive exploration of path extrusion will encompass shape customization, detail settings (Low), and the association of the object with 'Base Shape' to achieve the desired 3D wave effect.
- Depth and Caps: Further aspects such as depth (1), twist (-673), start and end scale (1), and caps (Flat) will be discussed, empowering participants to add depth and character to their wave animations."
Customizing Material Effect
To give our wave a truly stunning appearance, we're going to introduce a series of material effects. Let's start with colors.
Although we've already created a custom gradient color, you have the option of choosing your own color palette. For this particular section, we'll incorporate three gradients into our design. This creative freedom allows you to infuse the project with your own unique style.
Gradient 1
- In the Material section located on the right sidebar, initiate the process of adding your personalized color. You can either click the plus icon for your own selection or, alternatively, click the four dots on the left to explore the color styles available in the Spline library or your personal library. For this demonstration, we'll craft a custom gradient.
- Next, click the chevron beside the Color category and opt for Gradient. Following this, select the color picker tool and ensure that the type remains set to Linear. To add further depth to the gradient, include one more color at the midpoint of your selection. Here are the specified color codes: Color 1: #9634BA, Color 2: #EDB23B, Color 3: #6C68EA.
- Finally, adjust the angle to 90 degrees for the desired gradient effect.
![Waves Animation image 12]()
Gradient 2
Now, let's proceed by adding a second gradient. You can either click the + icon and follow the same simple process or, for a faster approach, right-click the existing gradient, duplicate it, and make color modifications. This time, we're expanding the palette with four colors.
- Include one more color at the midpoint of your selection. Begin with the first color, a regal purple #7755CC, and set its opacity to 0%. Move on to the second color, #CC66B0. The third color, #D6539D, should be added with a 90% opacity. Finally, the last color,#9770C3 with a 0% opacity.
- For this second gradient, there's no need to adjust the angle, so simply set it to 0.
- Now, decrease the opacity of the second gradient group to 60%.
![Waves Animation image 13]()
Gradient 3
Now, let's proceed to add the final gradient to our project.
- Duplicate the second gradient.
- The only modifications needed are the colors 2 and 3, while other aspects remain the same. Here are the specified color codes: Color 1 and 4: #7755CC, Color 2: #FF6500, Color 3: #002DFF.

Introducing the Displace Effect
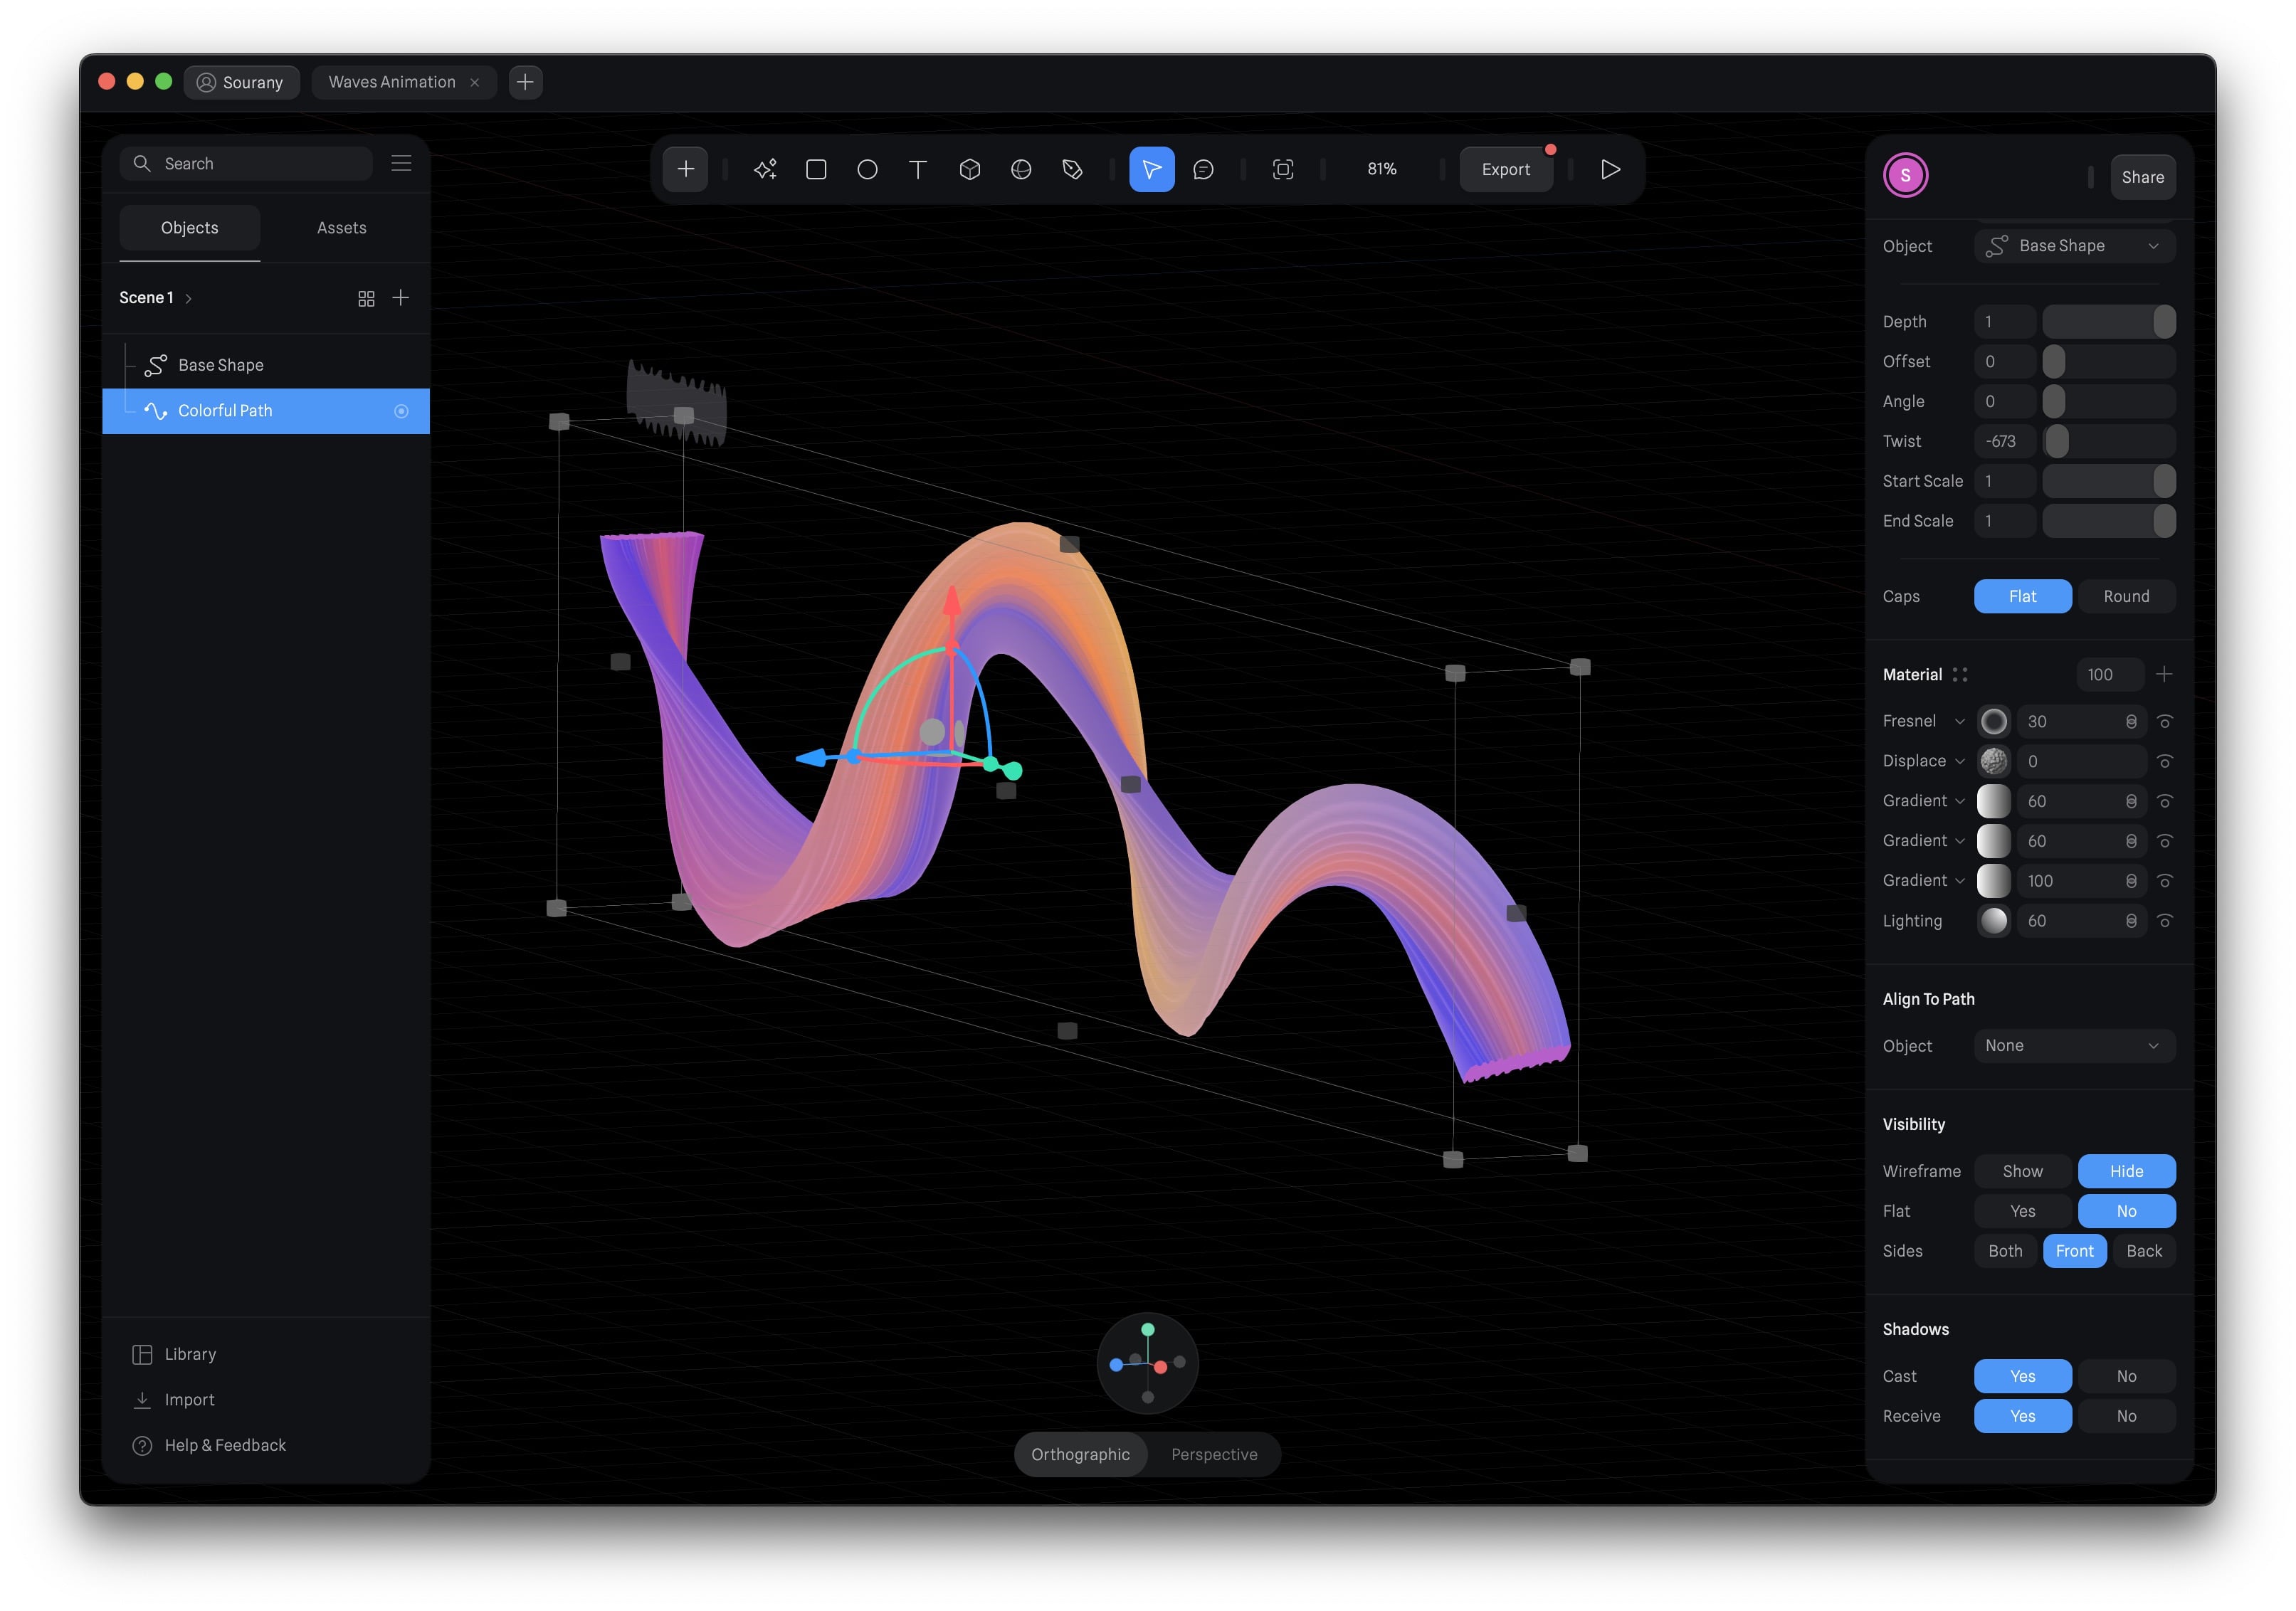
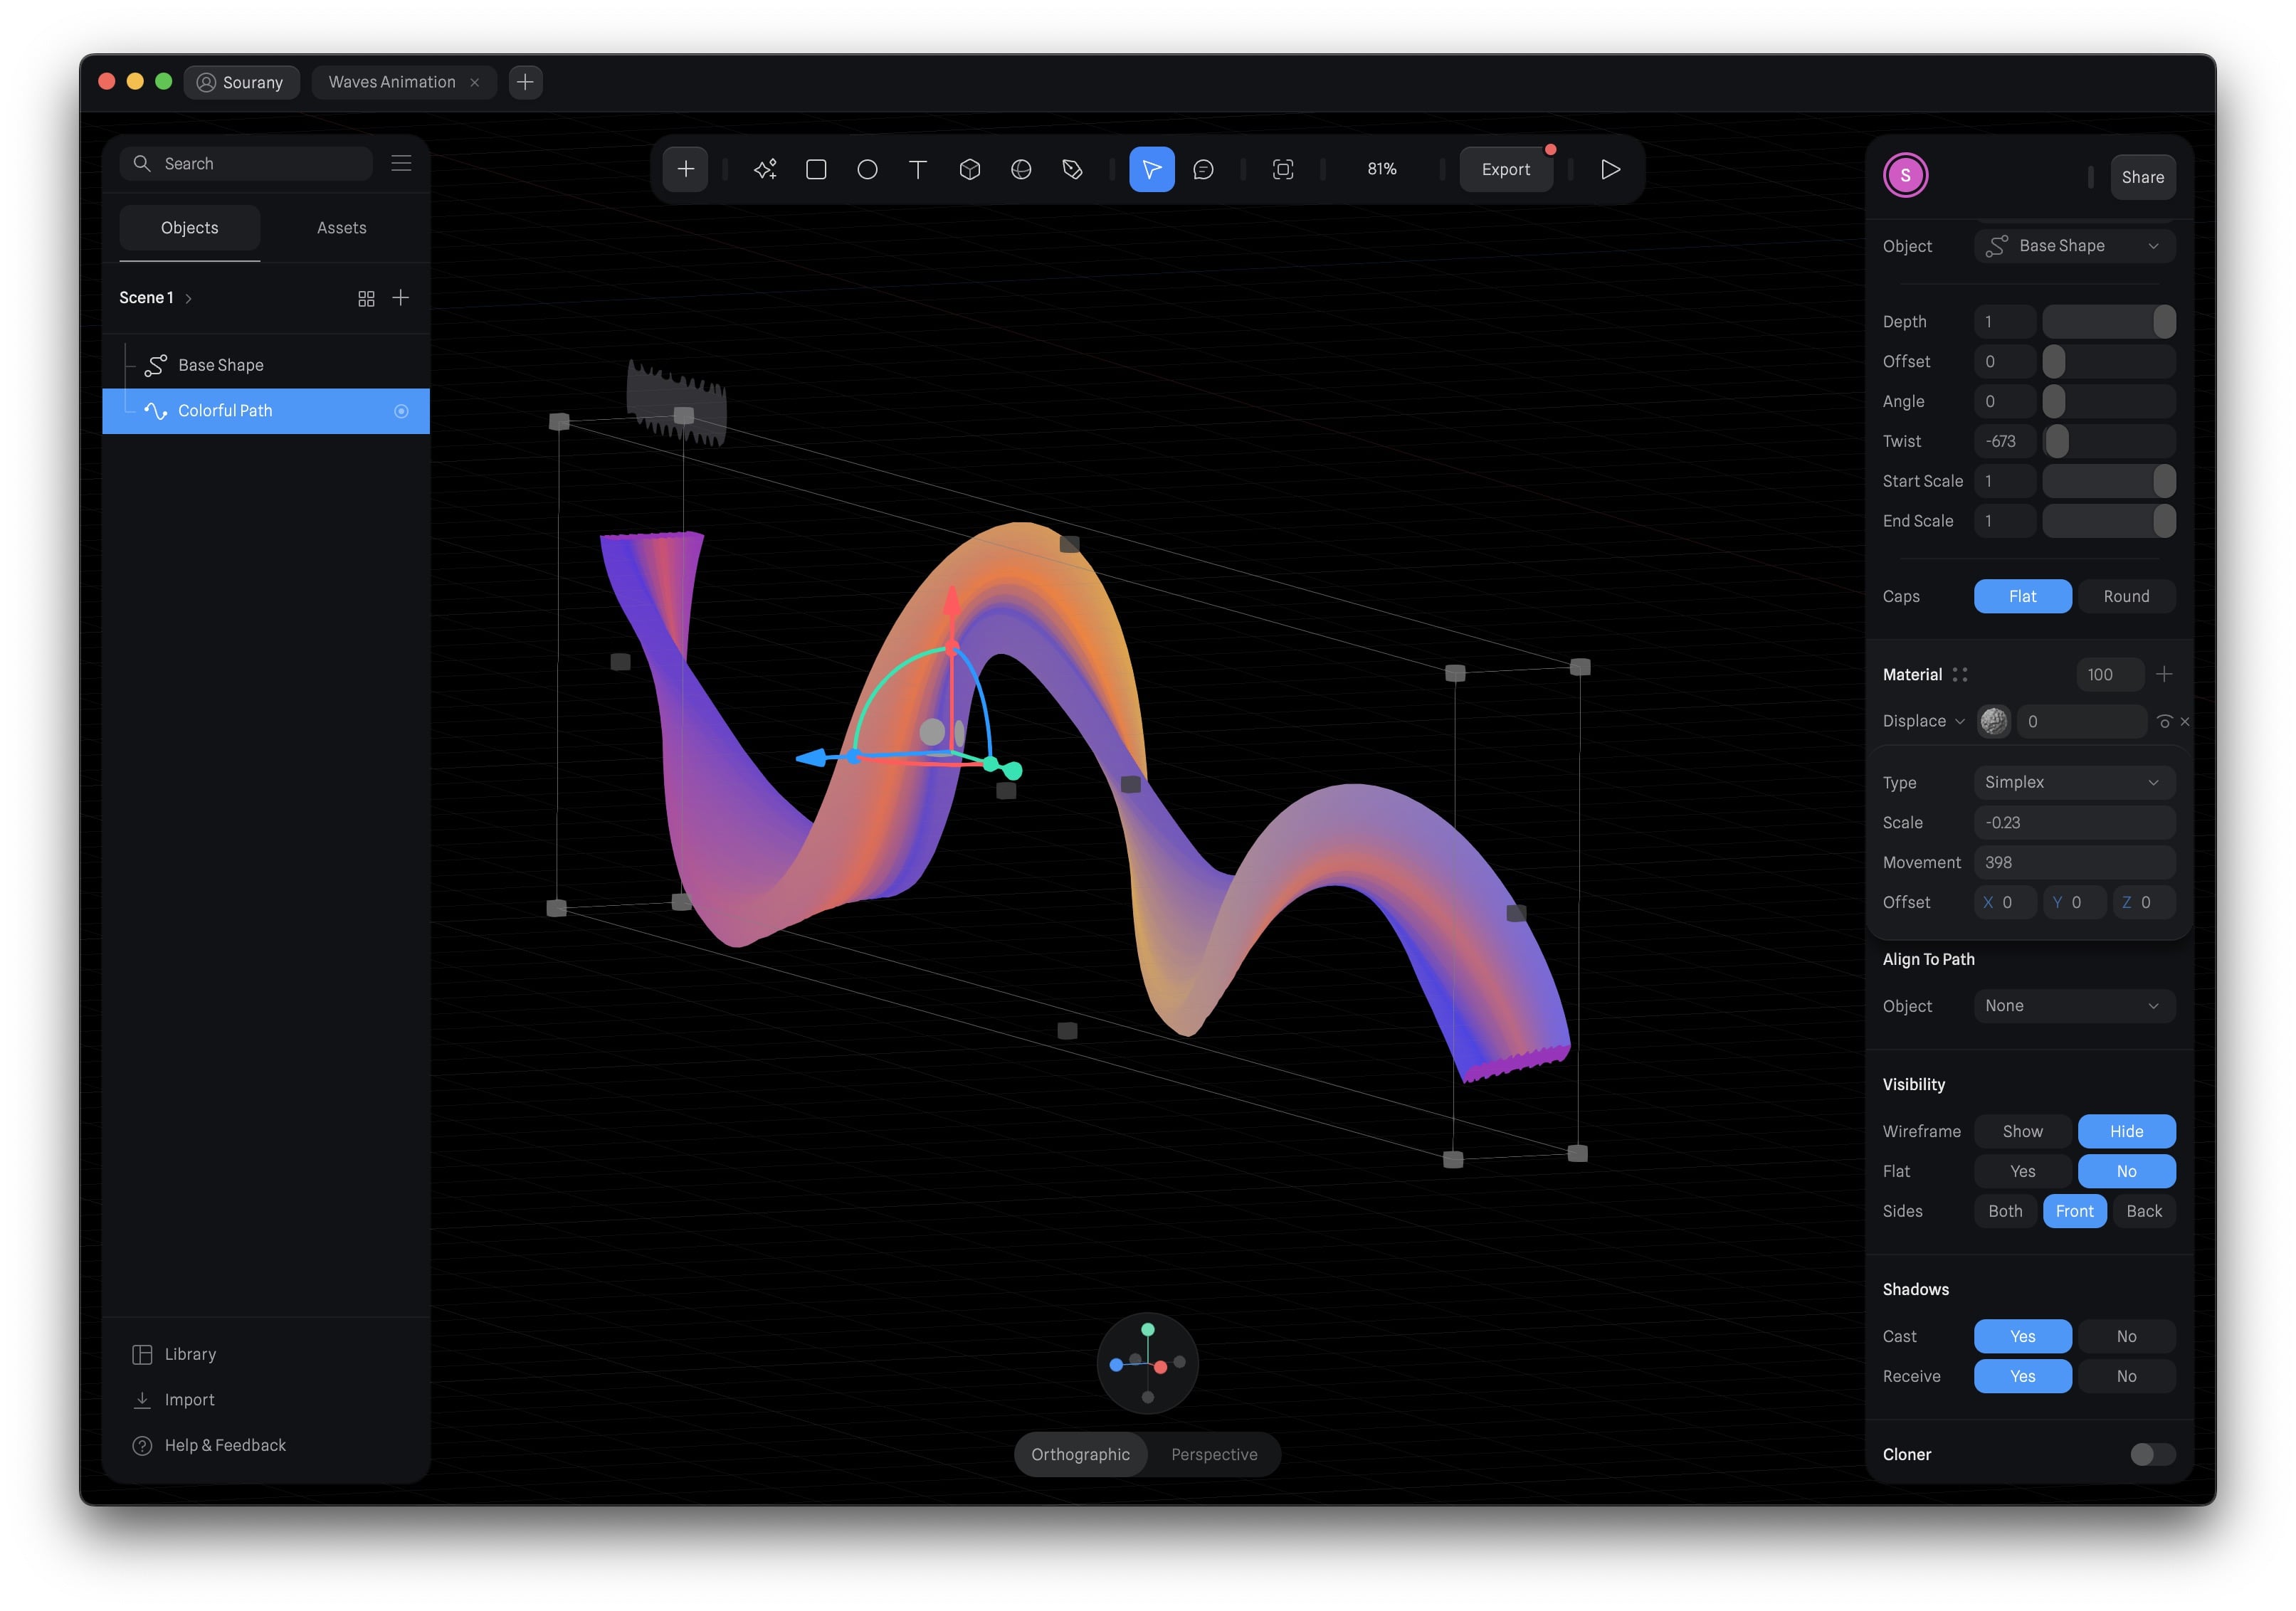
To enhance your project, let's incorporate another material effect. Begin by clicking the + icon once more and choose the Displace type. This effect gives a kind of bumpy texture, like a Martian landscape, for example.
Specify the settings as follows:
- Type: Simplex
- Scale: -0.23
- Movement: 398
For a subtle touch, set the opacity to 0%. This effect will add depth and character to your design, creating an engaging visual experience.
Introducing the Fresnel Effect
Now, let's introduce another effect, the Fresnel effect, which creates a beautiful light reflection:
- Configure the settings as follows: Set the main color to a lovely pink shade, #FFC4F2, while keeping the rest of the settings, including Scale, Intensity, and Factor, unchanged.
- Adjust the opacity to 30% for the desired effect.
![Waves Animation image 16]()
Introducing the Depth Effect
In the final section, we'll be looking at the complexities of the depth effect, which adds an extra dimension to the animation of our waves:
- Origin: Vector: The depth originates from the vector, ensuring that the wave's appearance remains coherent.
- Blending: Smooth: This blending mode guarantees a seamless integration of the depth effect with the overall animation, creating a polished visual result.
-
Ramp: A carefully selected color ramp is employed to imbue the animation with depth. Three specific colors are used in the ramp, each adding unique shading and dimensionality to the wave:
- Color 1: #24DF30, Color 2: #6A2C2C, Color 3: #626A00
- Type: Linear: The type of depth effect chosen is 'Linear,' which contributes to a linear progression of the depth.
- Position: World: The depth's position within the world space ensures that it is integrated seamlessly with the animation.
-
Origin: The specific coordinates for the origin of the depth are set as follows:
- X: -33, Y: 152, Z: 515
-
Direction: The direction in which the depth effect is applied is established with these coordinates:
- X: 1, Y: 0, Z: 0
- Near: The near depth value is set at 243.84, determining the closest point at which the depth effect begins to take effect.
- Far: The far depth value is specified as 200, defining the point at which the depth effect fades away, creating a gradual transition. This comprehensive adjustment of the depth effect ensures that the final animation is not only visually stunning but also exhibits a compelling sense of depth and dimensionality.

Glass Wave
Now, it's time to shift our attention to the captivating glass wave effect, where we will create another shape or duplicate the existing colorful path layer with some key modifications:
- To create the glass wave, you can either generate a new shape using the path tool or expedite the process by duplicating the Colorful Path layer and manually adjusting the second path.
- Duplicate the Colorful Path layer by pressing the Command+D shortcut.
- Rename the duplicated layer to Glass Path or any other name you prefer.
- Remove the gradient and lighting from the duplicated path, but keep the Displace effect.
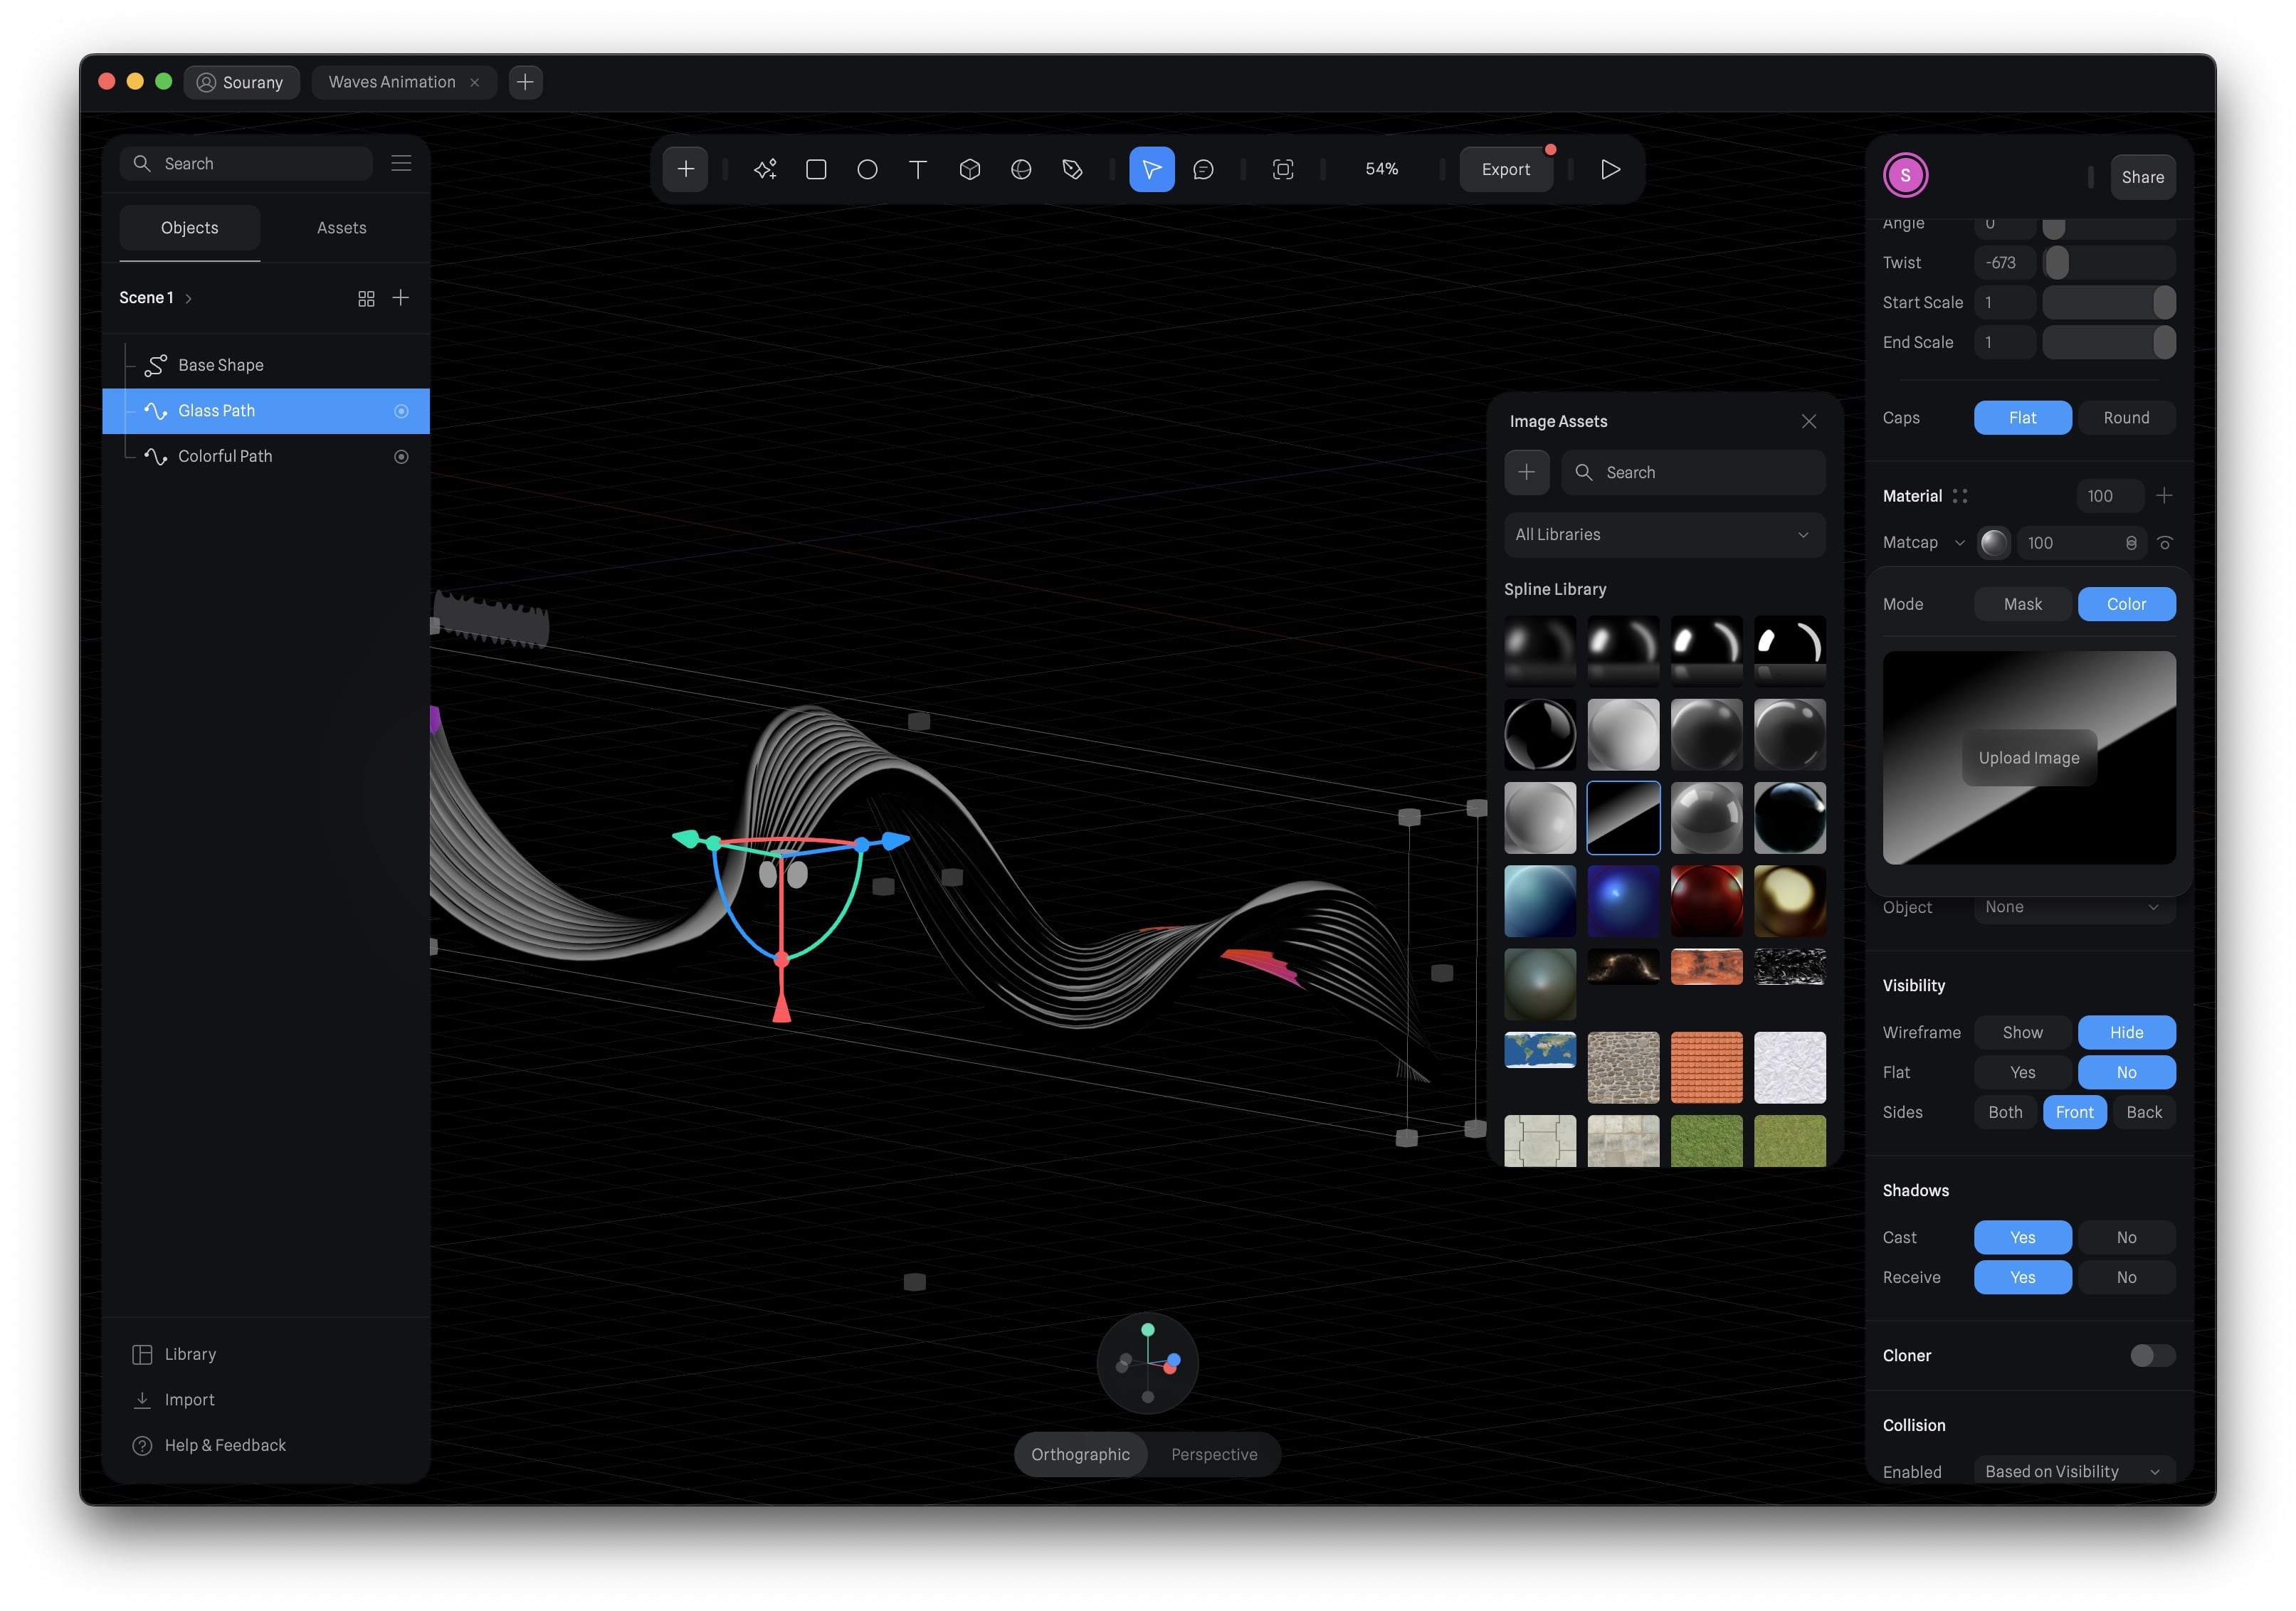
- Switch the Fresnel effect to Glass,
- Modify the depth setting to Matcap, and choose a glass-like option from the Spline Library or upload your own image.
- As you can observe, the glass wave should ideally be transparent, but it appears black, which is not the desired effect. In this case, let's apply a blending mode to the Matcap and choose the "Screen" effect to increase its brightness and transparency, allowing the background to become visible.
![Waves Animation image 2]()
Modifying the Glass Effect
Now, let's fine-tune the glass effect to create a convincing water-like appearance.
- Blur: Set the blur to 10. This adjustment softens the edges, creating a more fluid and natural appearance.
- Thickness: Define the thickness as 141, which contributes to the glass effect's visual weight and depth, enhancing the water-like appearance.
- Refraction: Adjust the refraction to 1.50, providing a visual distortion that mimics the behavior of light as it passes through water, adding to the realism of the glass wave effect.

Refining the Shape
In this phase, we will refine the shape of the glass wave, making specific adjustments for an enhanced visual effect.
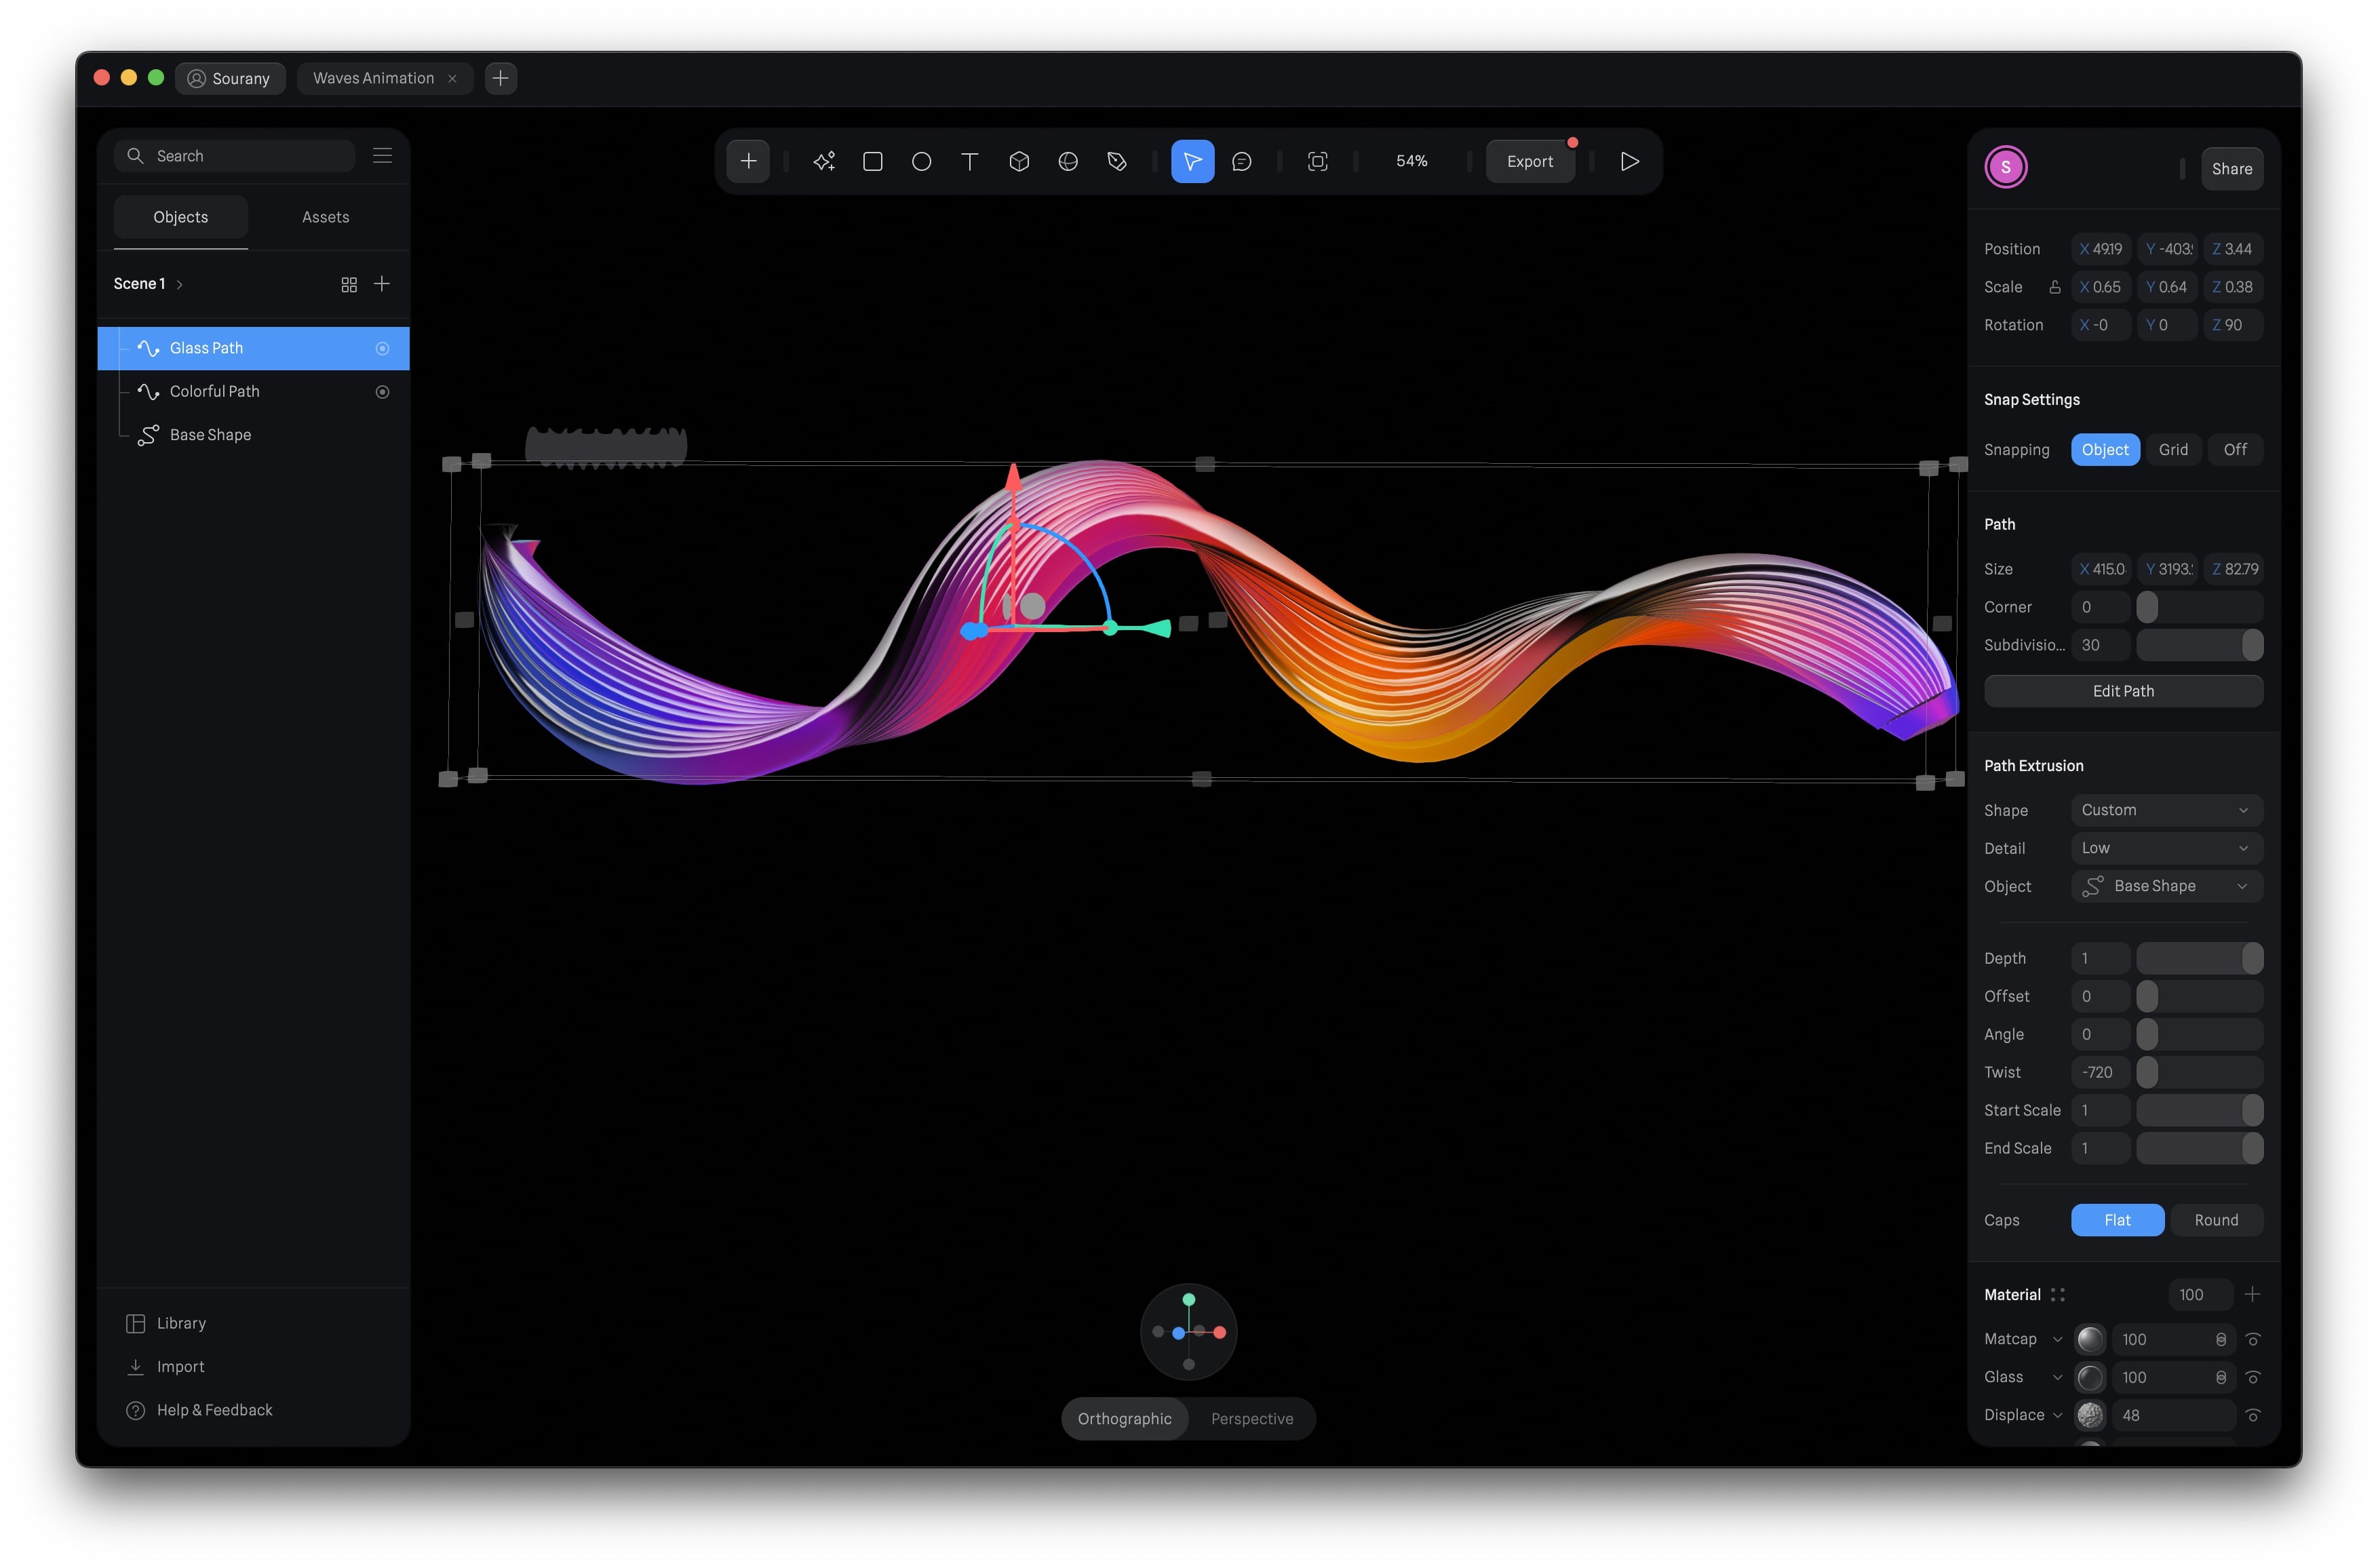
- Adjust the scale to X:0.49, Y:0.50, Z:0.42. These scaling modifications influence the wave's size and proportions, enhancing its overall appearance.
- Rotate the wave to X:0, Y:0, and Z:90. This rotation reorients the wave, achieving the desired visual effect.
- Size: Set the path's size to X:505.04, Y:4372.14, and Z:102.96. These size adjustments fine-tune the shape and proportions of the glass wave.
- Path Extrusion: The sole change made in the Path extrusion is the Twist, which is now set to -720. This adjustment impacts the twist of the glass wave, creating a more dynamic and engaging visual effect, akin to the flow and movement of water.
Configuring States for the Colorful Wave
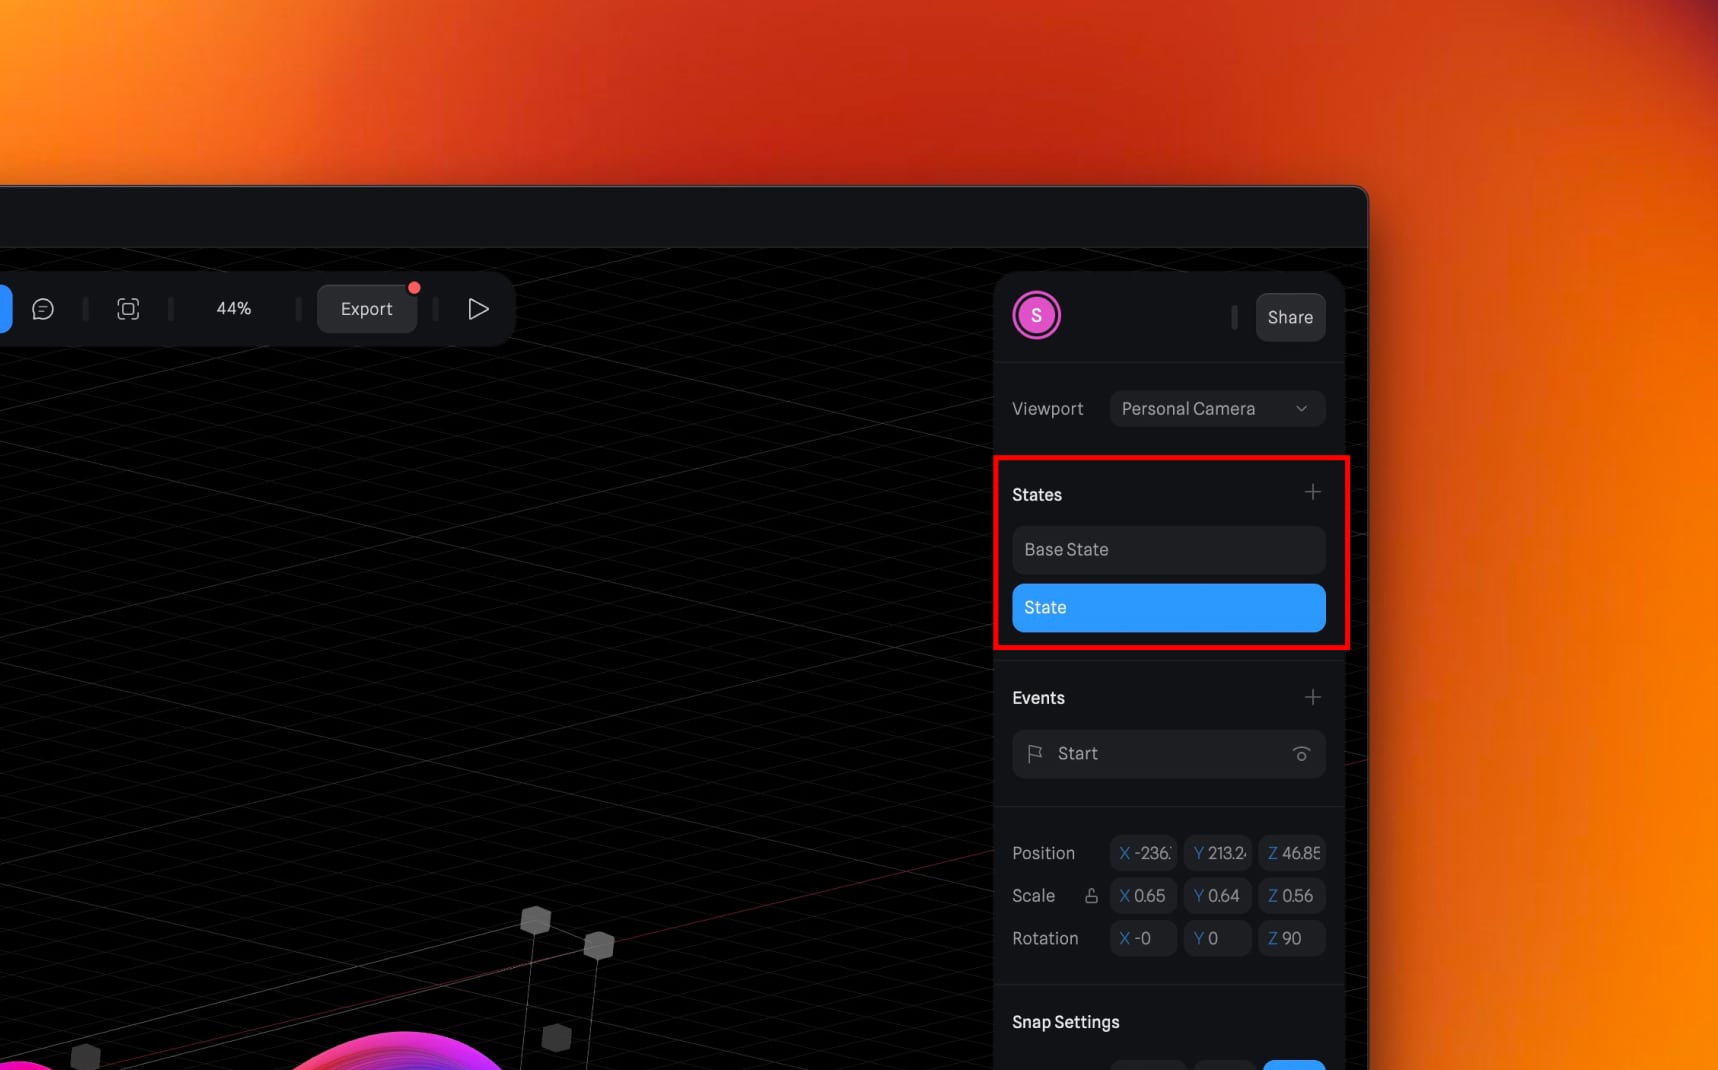
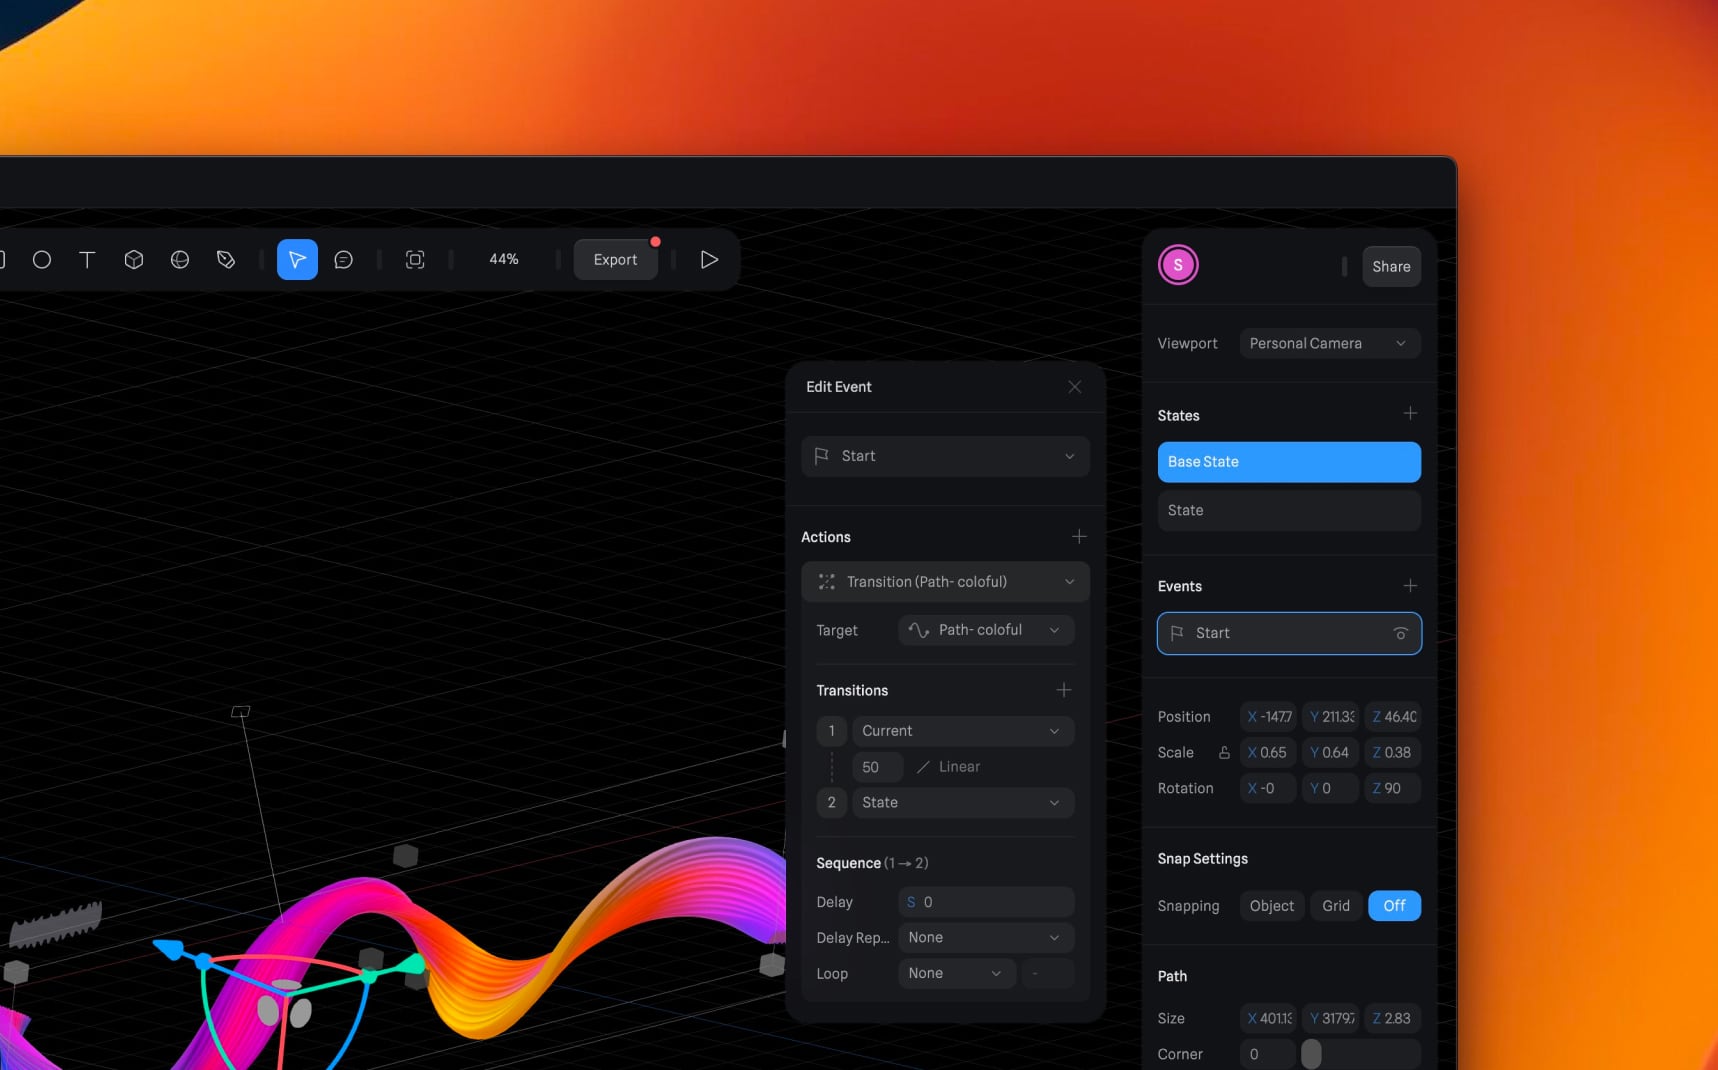
Fantastic! Now, it's time for the exciting part. We're going to animate the two waves by using the "States" and the "Events" properties.
Change
- Click on the + icon located next to the 'States' section on the right sidebar. This opens up two options: 'Base State,' which signifies where the animation begins, and 'State,' which defines the state of the animation at its conclusion. Since we want to make adjustments to the second state, select 'State.' This setting is pivotal in determining how the animation finishes.
- Angle: Increase the angle to 40. This alteration impacts the angle at which the colorful wave concludes its animation, adding a dynamic visual element.
- Twist: Elevate the twist to 313. This twist adjustment imparts a mesmerizing effect to the animation's conclusion, enhancing its visual appeal and intrigue.
 Configuring Animation Settings
In the animation phase, we're about to introduce a significant event to enhance the overall visual appeal.
- Click on the + icon to initiate the addition of an event. This event will introduce a dynamic element to your animation, making it more engaging.
- Select 'Transition' as the action for this event. This choice will define the type of animation that occurs.
- Ensure that you select the appropriate path as the target. In this case, you'll choose 'Colorful Path,' aligning the event with the correct element in your animation.
- Set the duration for the transition to 50. This determines how long the animation will take to complete.
- Configure the transition as 'Linear.' This option ensures a smooth and consistent animation flow.
- Delay: No delay is added, with a setting of 0 seconds. This means the animation event will begin immediately without any pause.
Configuring States for the Glass Wave
Now, let's apply the same process to the glass wave, ensuring a consistent and engaging animation:
- Angle Adjustment: Increase the angle to 6.28. This alteration will affect the angle at which the glass wave concludes its animation, maintaining harmony with the colorful wave.
- Twist Enhancement: Elevate the twist to 11.27. This twist adjustment imparts a captivating twist to the glass wave's animation conclusion, adding depth and visual intrigue.
- Animation Configuration: The animation settings remain consistent with those applied to the Colorful Path, ensuring a cohesive and coordinated animation experience.
- With these adjustments, your glass wave animation is now ready to complement the colorful wave. You can now play the complete animation to witness the dynamic and harmonious visual effect.
![Waves Animation image 7]()
Conclusion
Congratulations! You've successfully completed the journey of crafting a stunning and dynamic wave animation. I hope you thoroughly enjoy the process and find inspiration in your newfound abilities. This is just the beginning of your creative journey, and we look forward to witnessing the incredible projects you'll bring to life.
Templates and source code
Download source files
Download the videos and assets to refer and learn offline without interuption.
Design template
Source code for all sections
Video files, ePub and subtitles
Assets
1
Introduction to Spline
Learn 3D design, UI animations, icons, components, variables, screen resizing, scrolling, and optimize and publish 3D assets online
10:24
2
3D Shapes and Materials
Creating a 3D Icon in Spline: a step-by-step guide
9:45
3
Weather Icon and Sculpting
Master the art of 3D design with Spline's user-friendly interface, and learn how to create a stunning weather icon in a few easy steps.
13:29
4
Icon Animation
Learn to build a 3D animated weather icon using Spline's intuitive interface and powerful features
9:27
5
Path Animation
Learn how to create 3D paths with the path tool and to edit them
9:35
6
Waves Animation
Mastering Wave Animation with the Spline 3D Tool
15:33
7
3D Card with Parallax
Creating a 3D Card with Parallax Effect using a glass layer
9:57
8
Button Components
Simplify Your Design Workflow with Spline Components for Reusable and Dynamic Object Creation
11:41
9
Screen Resize Adaptive Layout
Creating adaptive layouts with Screen Resize Events using Breakpoints and Transitions
10:43
10
Tab Bar Animation
Crafting Futuristic UI: Designing a Glass Tab Bar with Crystal Floating Button using Spline
21:23
11
UI Charts and Variables
Exploring Variables Usage in Interactive UI Design
16:54
12
Scroll Interaction and Scenes
Crafting Scroll-Based Interactions and Scenes for Web Design
9:18
13
Export to USDZ and Optimizations
Creating immersive AR experiences on iOS devices using Spline's 3D models
9:28
14
Publish to 3D Site
Easily embed your 3D creations on web pages using Spline's native HTML component, the Spline Viewer
3:48
Meet the instructor
We all try to be consistent with our way of teaching step-by-step, providing source files and prioritizing design in our courses.
Akson Phomhome
UI Designer
Designer at Design+Code.
13 courses - 60 hours

AI Design with Ideogram
Meet Ideogram, an AI-powered image generation tool that takes your ideas and transforms them into stunning visuals. Whether you're a designer, marketer, or just a visual enthusiast, Ideogram simplifies the creative process. In this guide, we’ll walk you through step-by-step instructions to create beautiful logos, social media posts, and more.
1 hrs

Build a SwiftUI app with Claude AI
This comprehensive SwiftUI course combines cutting-edge AI assistance with hands-on development, guiding you through the process of transforming Figma designs into fully functional iOS applications. Leveraging Claude 3.5 Sonnet, you'll learn to efficiently generate and refine SwiftUI code, create reusable components, and implement advanced features like animations and responsive layouts.
9 hrs

Prototype and Code iOS apps in Figma and SwiftUI
Welcome to our course on designing a sleek wallet interface with Figma! You’ll learn to create a visually appealing and functional wallet interface using DesignCode and Apple UI Kits. Master prototyping, swipe gestures, carousel animations, overlays, and reusable components. Plus, explore a Figma plugin to easily transition from design to SwiftUI. By the end, you’ll create dynamic, user-friendly prototypes.
3 hrs

Create 3D UI for iOS and visionOS in Spline
Comprehensive 3D Design Course: From Basics to Advanced Techniques for iOS and visionOS using SwiftUI
3 hrs

3D UI Interactive Web Design with Spline
Learn to create 3D designs and UI interactions such as 3D icons, UI animations, components, variables, screen resize, scrolling interactions, as well as exporting, optimizing, and publishing your 3D assets on websites
3 hrs

Design and Prototype for iOS 17 in Figma
Crafting engaging experiences for iOS 17 and visionOS using the Figma design tool. Learn about Figma's new prototyping features, Dev Mode, variables and auto layout.
6 hrs

Design and Prototype Apps with Midjourney
A comprehensive course on transforming Midjourney concepts into interactive prototypes using essential design techniques and AI tools
8 hrs

Web App Design using Midjourney and Figma
Get UI inspirations from Midjourney and learn UI design, colors, typography as a beginner in Figma
2 hrs
UI Design for iOS 16 in Sketch
A complete guide to designing for iOS 16 with videos, examples and design files
3 hrs

UI Design Android Apps in Figma
Design Android application UIs from scratch using various tricks and techniques in Figma
2 hrs

UI Design Smart Home App in Figma
Design a Smart Home app from scratch using various tricks and techniques in Figma
2 hrs

UI Design Quick Apps in Figma
Design application UIs from scratch using various tricks and techniques in Figma
12 hrs

Figma Handbook
A comprehensive guide to the best tips and tricks in Figma. Not affiliated with or endorsed by Figma, Inc.
6 hrs


