
Path Animation
Add to favorites
Learn how to create 3D paths with the path tool and to edit them
Play video
3D UI Interactive Web Design with Spline
1
Introduction to Spline
10:24
2
3D Shapes and Materials
9:45
3
Weather Icon and Sculpting
13:29
4
Icon Animation
9:27
5
Path Animation
9:35
6
Waves Animation
15:33
7
3D Card with Parallax
9:57
8
Button Components
11:41
9
Screen Resize Adaptive Layout
10:43
10
Tab Bar Animation
21:23
11
UI Charts and Variables
16:54
12
Scroll Interaction and Scenes
9:18
13
Export to USDZ and Optimizations
9:28
14
Publish to 3D Site
3:48

New File
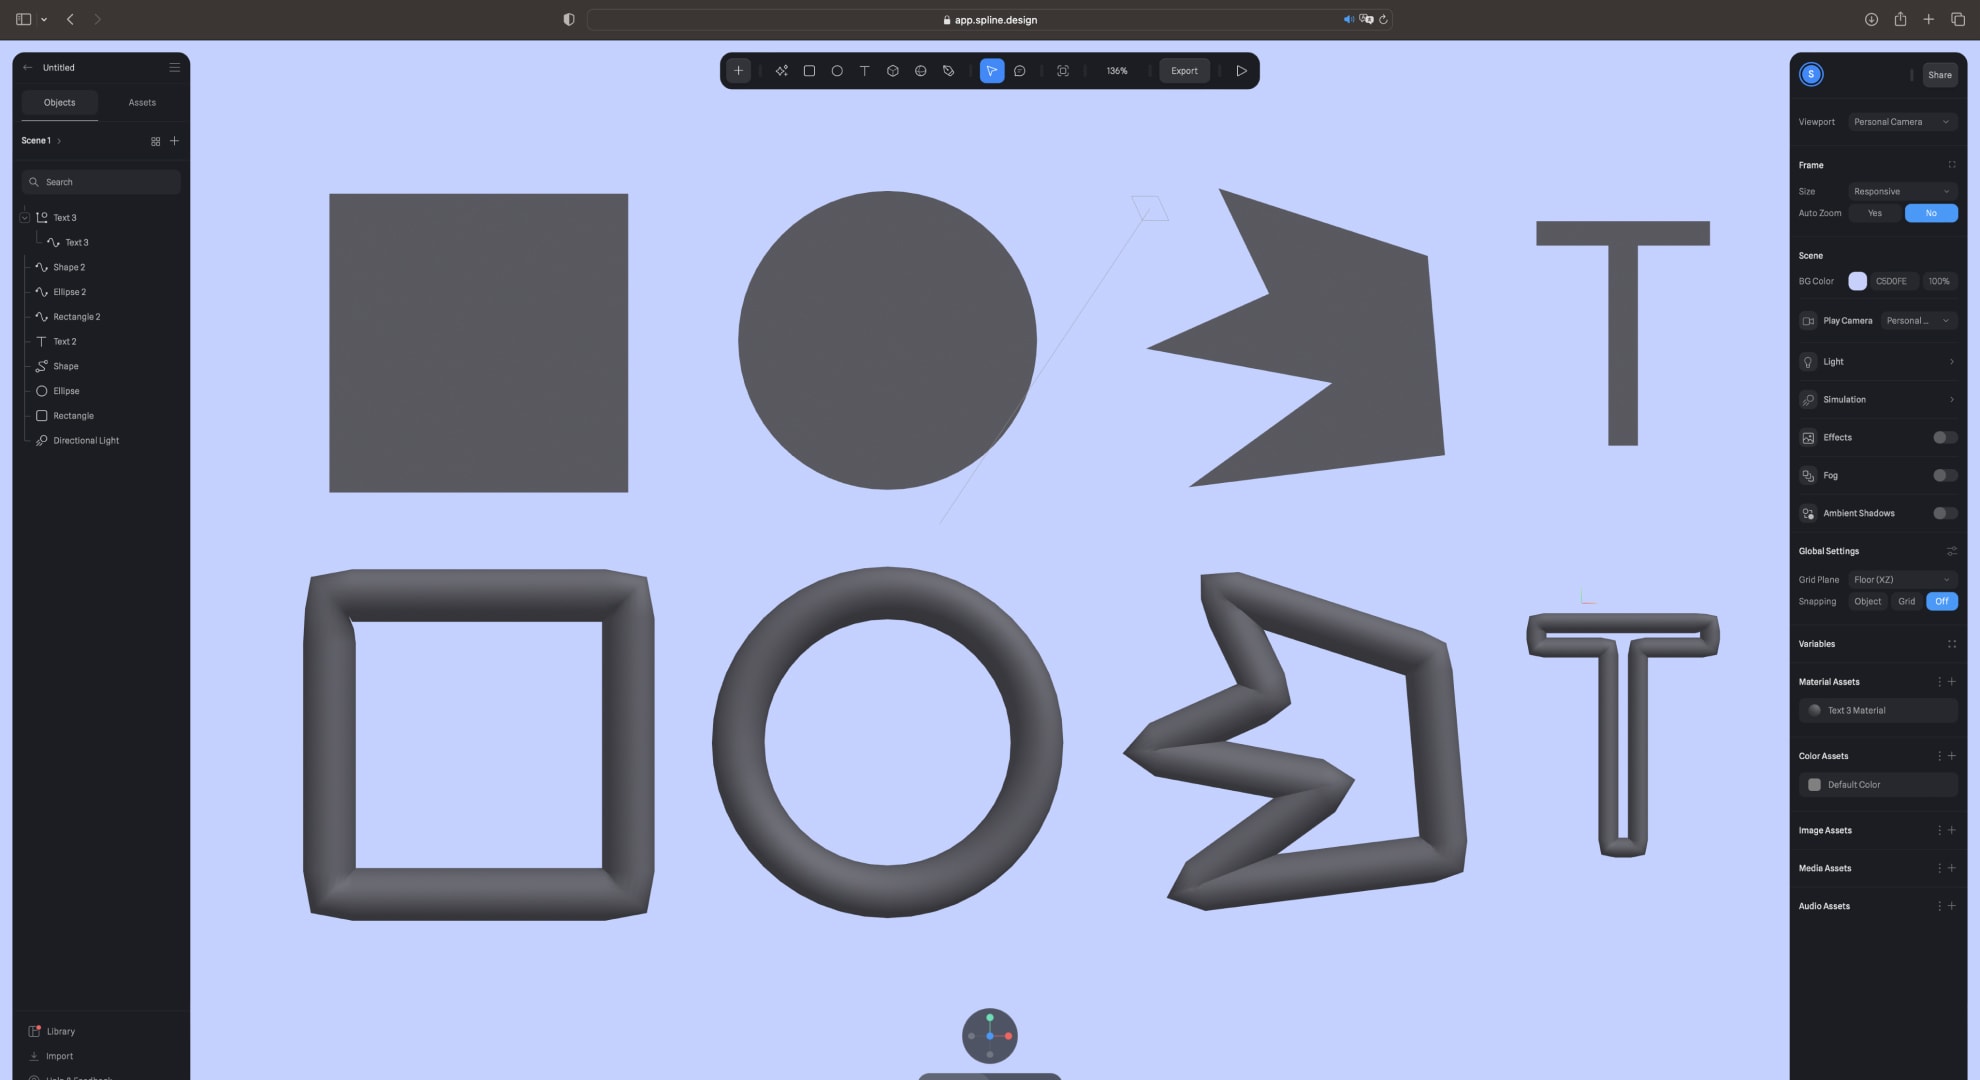
Open Spline in your browser or on your desktop app, and click on New File . Delete the default rectangle and choose any color for your background scene. The color used is #C5D0FE.

Adding Path
There are multiple ways to add a path to your scene. You can use shapes like Rectangle, Ellipse. Using Vector will let you create a custom shape. Once the shape is drawn, click on Convert to Path and the fill will turn into outlines.
You can also convert a text into a path. Type your text, click on Convert to Shape, then Convert to Path.
Purple Dots
In Edition, each edit points are represented by a purple dot which are sharp edges that can be move on the X and Y axis. You can round the corners of all purple dots simultaneously or the ones only selected. To round the corner, the purple dot must be connected to a purple dot from its left and right.

Blue Dots
Use the pen tool to add new edit point to reshape your path. Move the mouse cursor near the path, add a new point when the + sign appears. You can Edit the handles an drag the new blue point to update your path shape.
Select the bend tool to turn any purple dot into a Bézier curve. Drag the handle represented by the purple dot, this will move both handles together. Click on the purple dot and hold the option key on the Mac and it will move individually for more flexibility. With the bend tool still selected, click on the blue points and it will remove the handles, turning the Bézier curve back into sharp corners. Increase the subdivisions value for a smoother sculpting result.

Path Tool
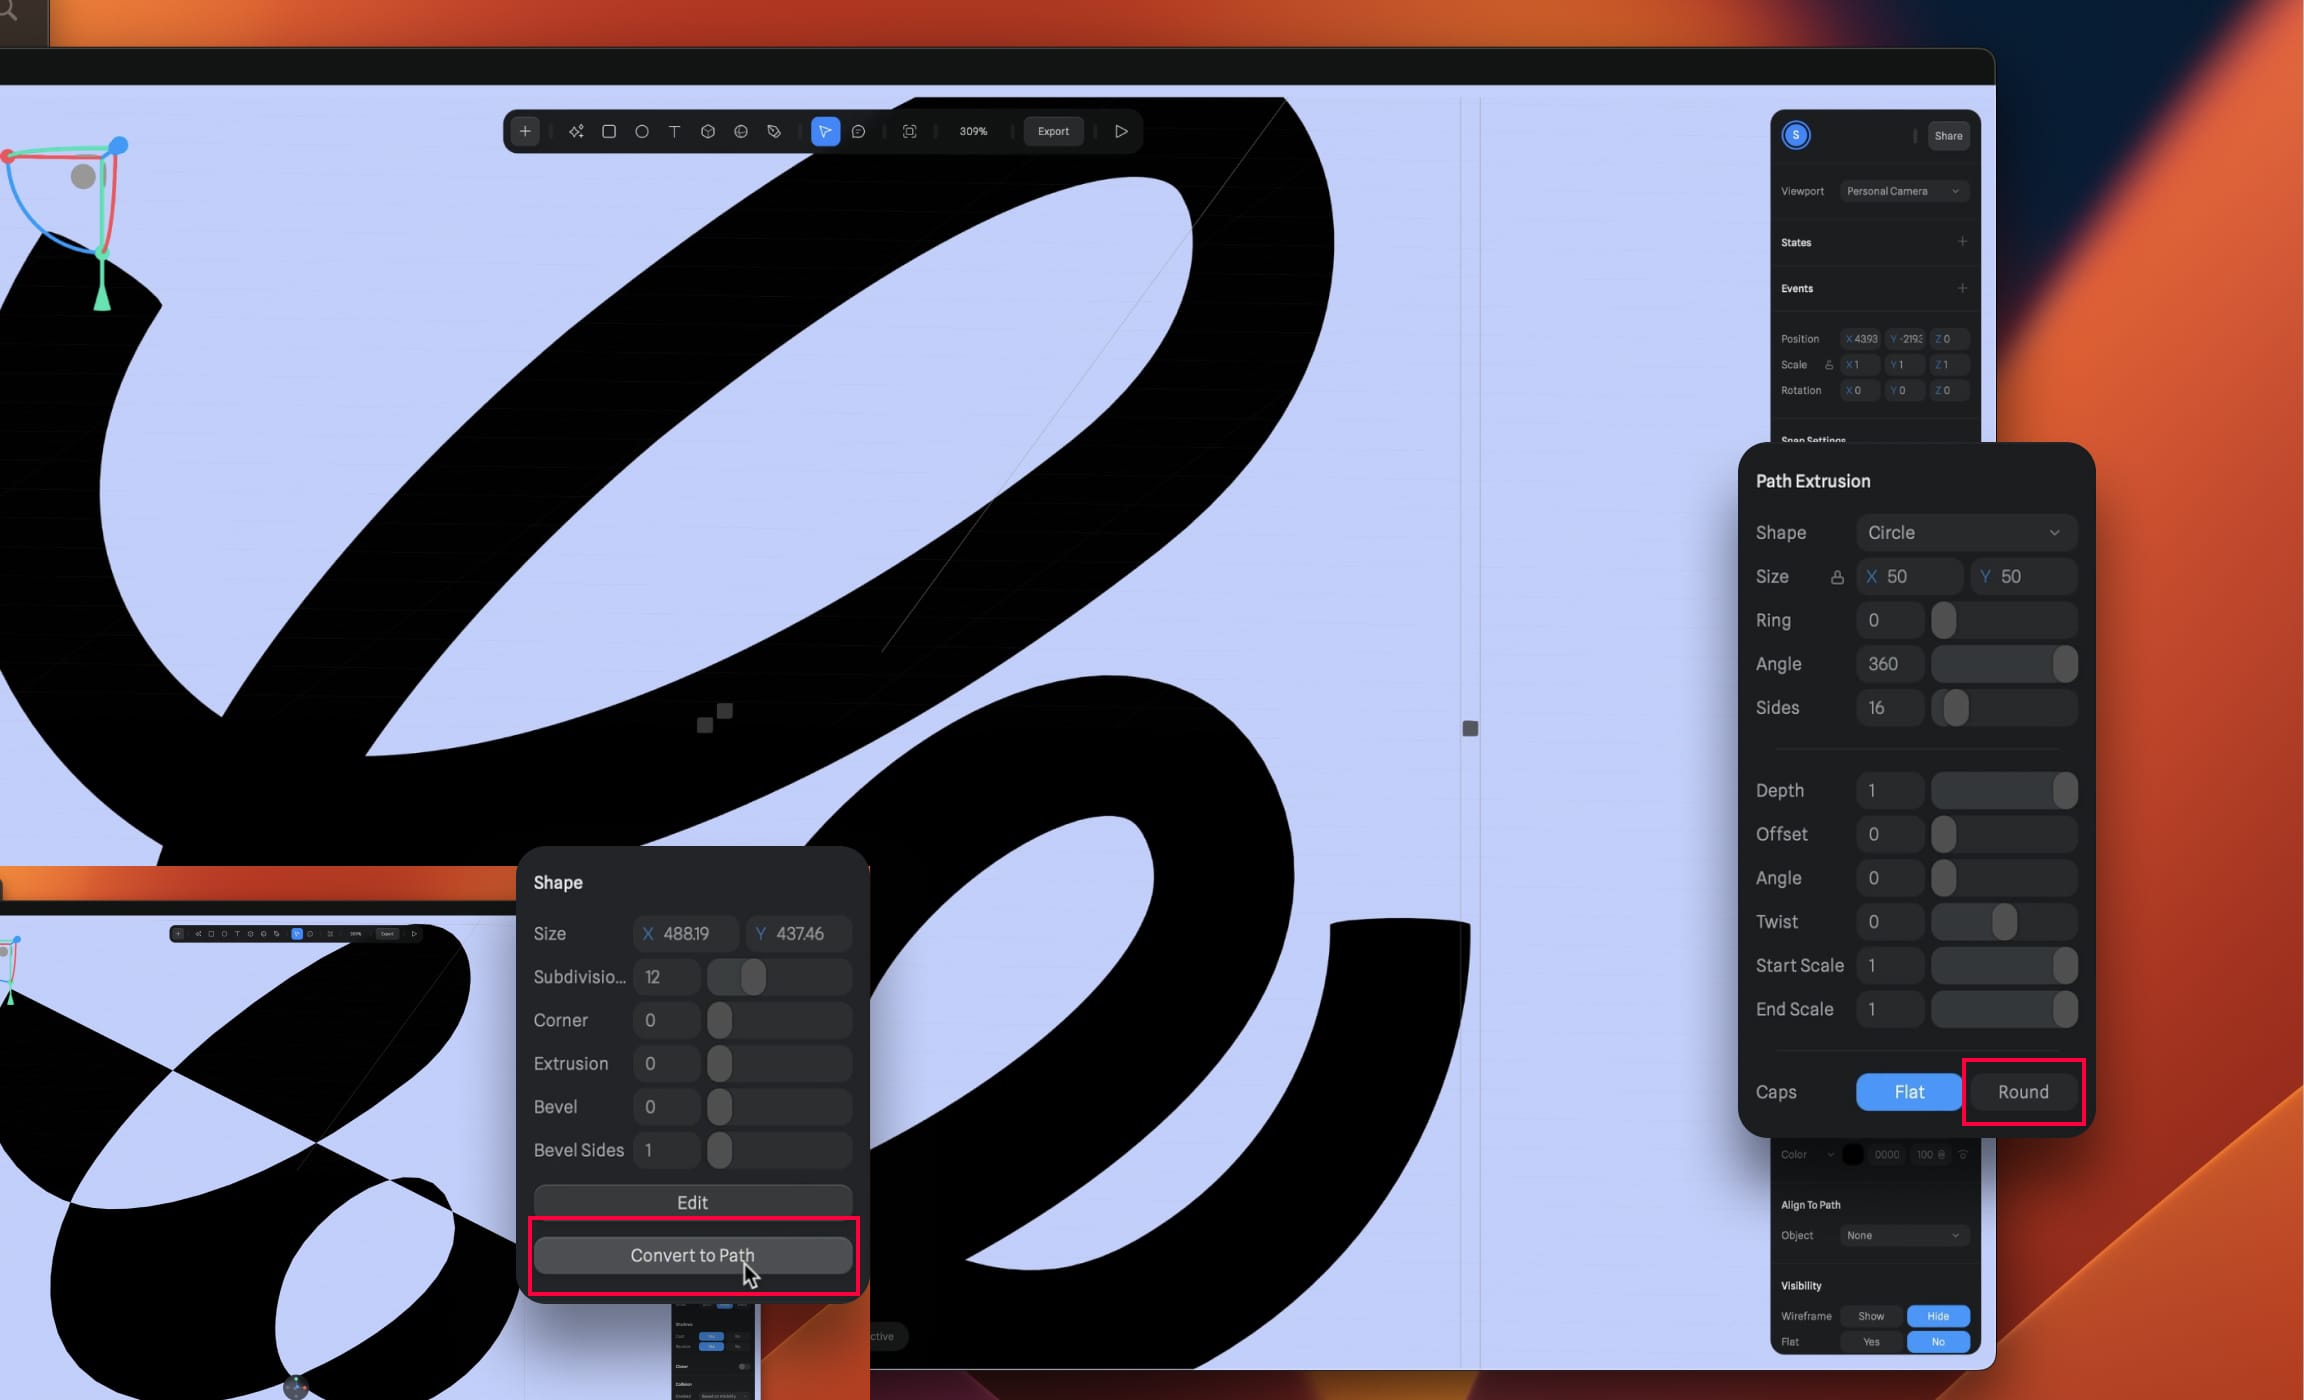
For more flexibility, use the path tool to add editing points and Bézier curves. We will re-create this complex and custom path inspired by Apple 2021 event.
Click on the plus sign and select path. Add multiple points and play with the handles to reproduce the same path. Don't worry if it's not perfect right away, we can still edit it after the path is created. For the extremities of the path, you can leave it as flat to have straight edges, or rounded. Go to caps and select round to have a beautiful and natural finish.
Finalize the first path by adding a subdivision value of 30, to smoothen everything. Repeat the same process for a second path. Play with the rotation angle to add a unique look.

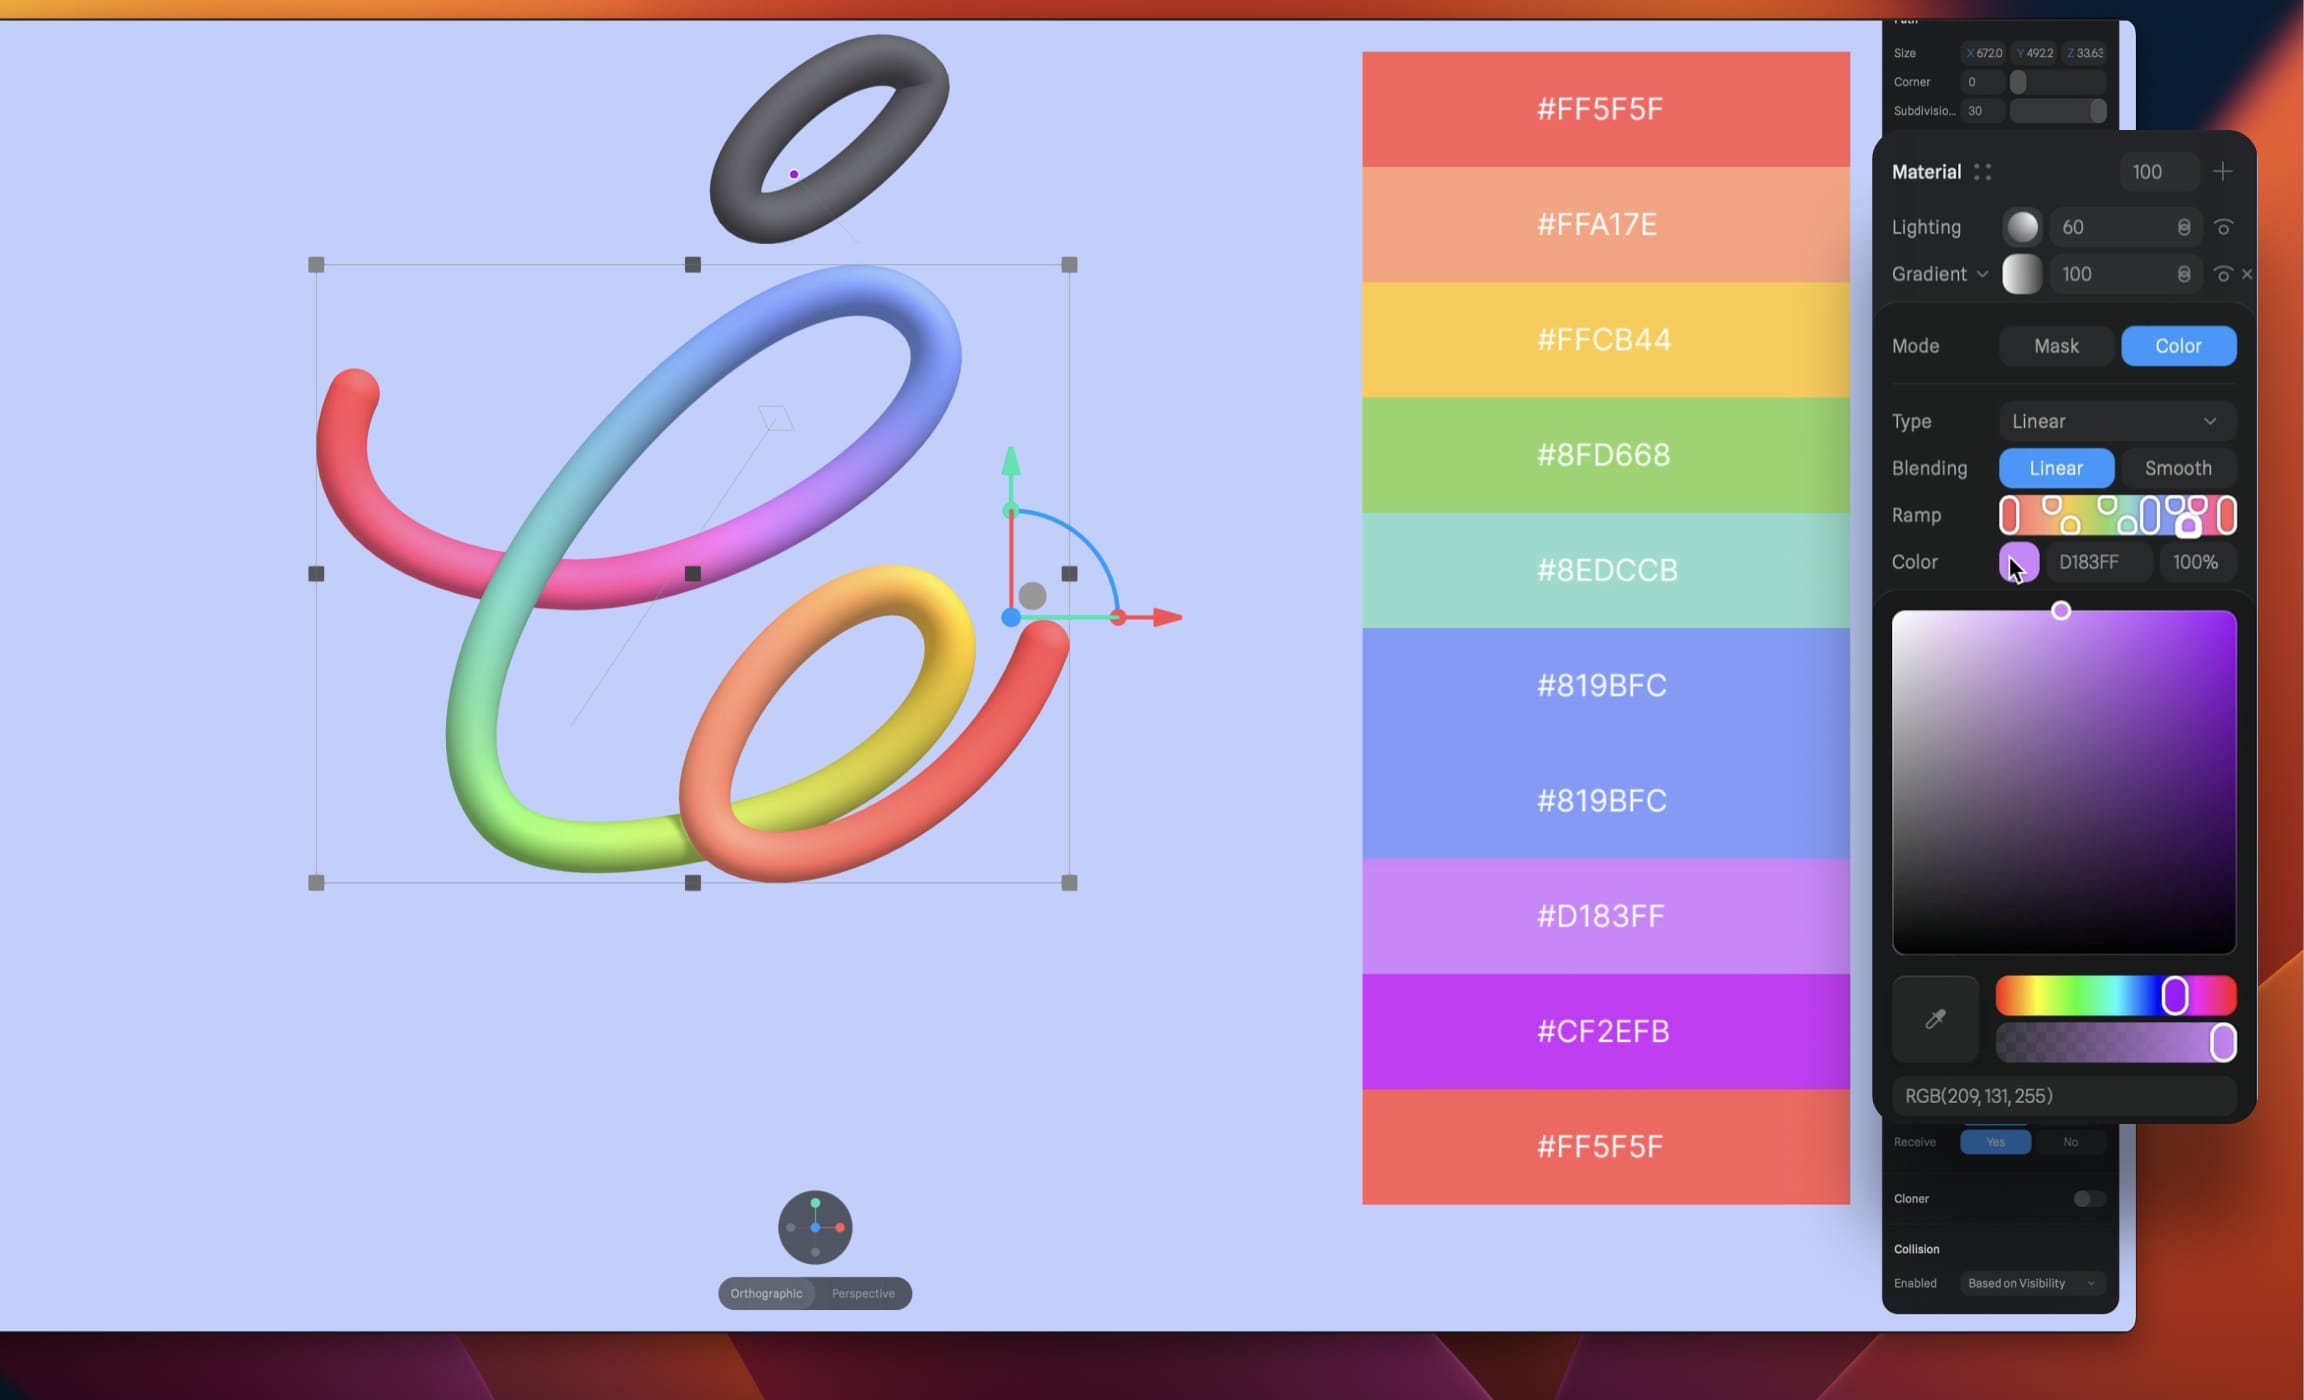
Applying Gradients
Elevate your design by incorporating a 4-color gradient into your path. Modify the color stops by clicking on them, and introduce new ones by clicking on the color bar. Ensure the angle is set to 90 degrees. For rounded caps, ensure the start and end colors are consistent. Experiment with color stops and consider adding a fifth color for further customization.
To preserve your gradient, save it as a material. Access the 4-dots icon next to Material, click the plus sign, and label it "Gradient path." Apply this material to your second path.
For an overlapping effect on the path, introduce new points and adjust their positions until you're content with the visual outcome.
Importing SVG files into Spline
Importing SVG files into Spline is a convenient option, especially for beginners. To do this, click on the Import button at the bottom left of the Spline interface. Select Vector SVG and choose the appropriate file. You can also drag and drop your file directly into Spline.
After importing, it's likely that the vector will only show the fill instead of the outline because the lines intersect. Don't worry, this is normal and fixable.

Adjusting Vector Points
To fix the intersecting lines issue, select the first layer and click on Convert to Path. Add a subdivision value of 30 to smoothen the edges. Repeat this process for all layers as needed.
Despite this, you might notice that the intersection points are still not smooth. To resolve this, adjust the path handles slightly until you achieve the desired smoothness. Be careful not to distort the original path too much.
Adding Gradients and Round Caps
Once you've smoothed your path, you can enhance its appearance by adding a gradient and round caps. However, you might notice some color blending at the intersections. You can fix this by slightly moving the intersection points to give the effect that they are on top of each other.

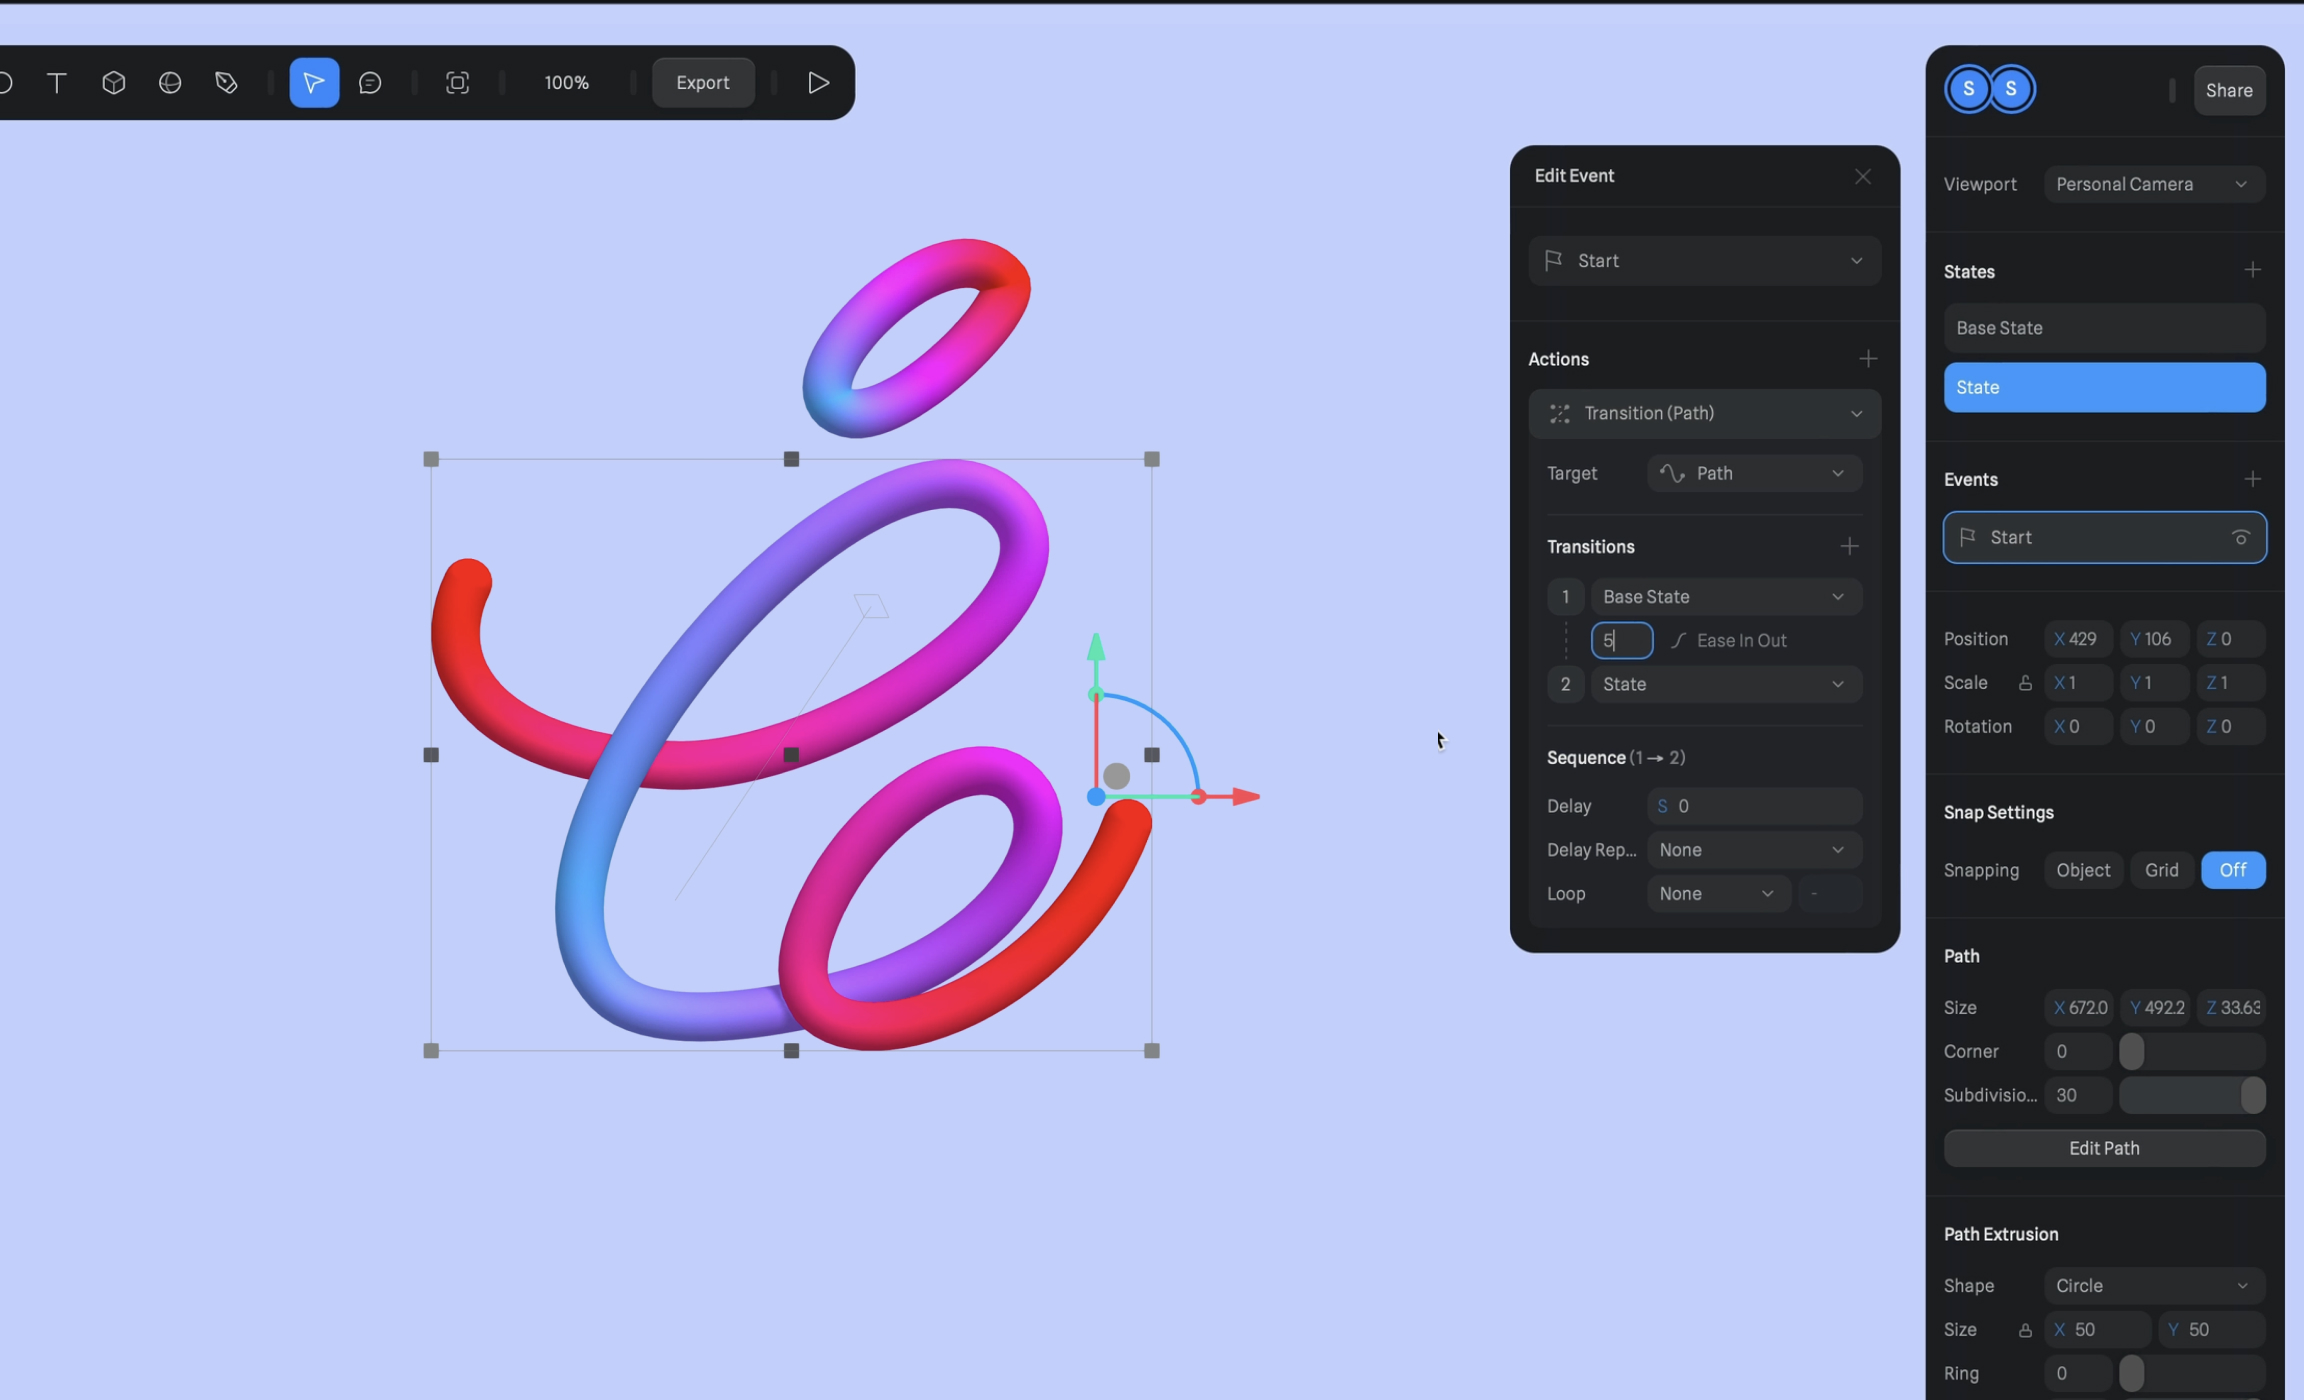
Creating Animations with States
With your paths finalized, it's time to add some states to create an animation. To do this, select Path, and under States, click on the plus sign to add a new state. Make sure to edit each state properly for a smooth transition.

Setting Up Events
- Go to the Event panel, then click on the plus icon to add an event.
- Choose Start for the event type.
Defining Actions
- For the action, click on the plus icon to add a new action.
- Choose Transition.
- In the Target dropdown, choose Path.
- Set Transitions 1 to Base State and Transitions 2 to State.
- Set the animation to Linear, with a duration of 5 seconds.
- Use play mode to preview
![Path Animation image 12]()
Fine-tuning your Animation
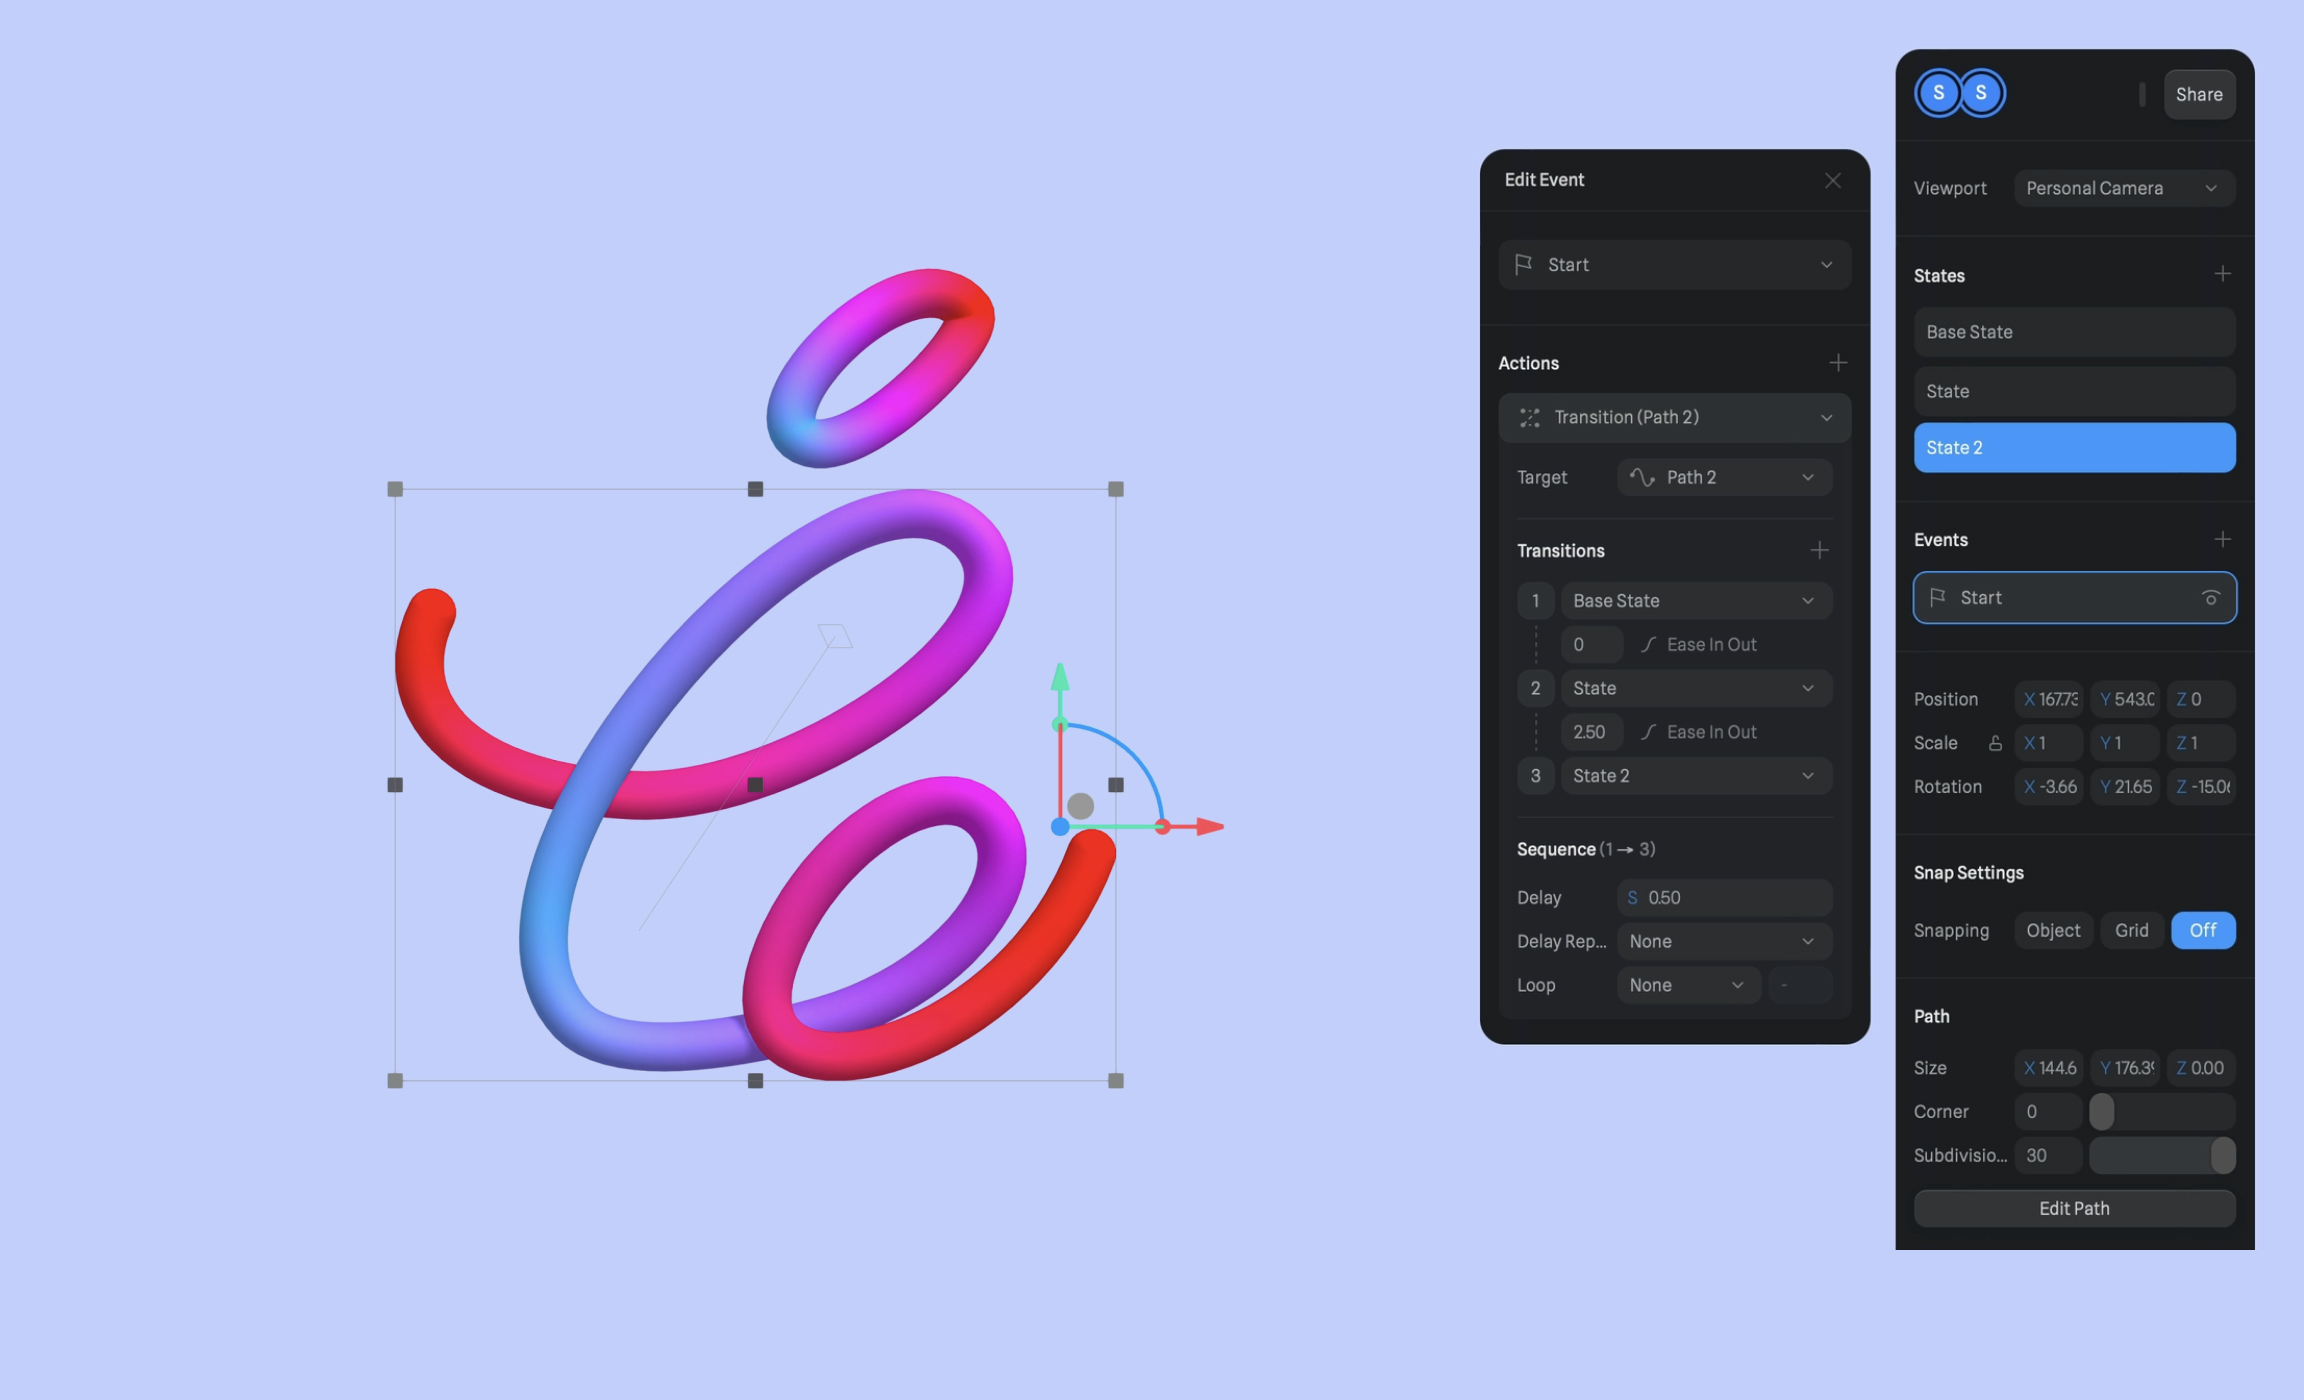
Now, let's add the same logic to another path. If you want to mask an element entirely at the beginning of the animation, add a third state with reduced opacity. Then, add transitions between each state with appropriate durations and delays to ensure smooth animation flow.

Setting Up Events
- Go to the Event panel, then click on the plus icon to add an event.
- Choose Start for the event type.
Defining Actions
- For the action, click on the plus icon to add a new action.
- Choose Transition.
- In the Target dropdown, choose Path 2.
- Set Transitions 1 to Base State,Transitions 2 to State and Transitions 3 to State 2.
- Set the animation to Ease In out, with a duration of 0 seconds and 5 seconds.
- Set the delay to 0.50
- Use play mode to preview
![Path Animation image 14]()
Demo
Both animations should work now. For interactive demos, check out
Conclusion
Congratulations! You've mastered the use of Spline's path tool and learned how to create and animate 3D paths. These tools can be incredibly powerful in adding a touch of creativity and interactivity to your designs. Continue to experiment with different shapes, gradients, and animations to make your designs truly unique!
Templates and source code
Download source files
Download the videos and assets to refer and learn offline without interuption.
Design template
Source code for all sections
Video files, ePub and subtitles
Assets
1
Introduction to Spline
Learn 3D design, UI animations, icons, components, variables, screen resizing, scrolling, and optimize and publish 3D assets online
10:24
2
3D Shapes and Materials
Creating a 3D Icon in Spline: a step-by-step guide
9:45
3
Weather Icon and Sculpting
Master the art of 3D design with Spline's user-friendly interface, and learn how to create a stunning weather icon in a few easy steps.
13:29
4
Icon Animation
Learn to build a 3D animated weather icon using Spline's intuitive interface and powerful features
9:27
5
Path Animation
Learn how to create 3D paths with the path tool and to edit them
9:35
6
Waves Animation
Mastering Wave Animation with the Spline 3D Tool
15:33
7
3D Card with Parallax
Creating a 3D Card with Parallax Effect using a glass layer
9:57
8
Button Components
Simplify Your Design Workflow with Spline Components for Reusable and Dynamic Object Creation
11:41
9
Screen Resize Adaptive Layout
Creating adaptive layouts with Screen Resize Events using Breakpoints and Transitions
10:43
10
Tab Bar Animation
Crafting Futuristic UI: Designing a Glass Tab Bar with Crystal Floating Button using Spline
21:23
11
UI Charts and Variables
Exploring Variables Usage in Interactive UI Design
16:54
12
Scroll Interaction and Scenes
Crafting Scroll-Based Interactions and Scenes for Web Design
9:18
13
Export to USDZ and Optimizations
Creating immersive AR experiences on iOS devices using Spline's 3D models
9:28
14
Publish to 3D Site
Easily embed your 3D creations on web pages using Spline's native HTML component, the Spline Viewer
3:48
Meet the instructor
We all try to be consistent with our way of teaching step-by-step, providing source files and prioritizing design in our courses.
Akson Phomhome
UI Designer
Designer at Design+Code.
13 courses - 60 hours
AI Design with Ideogram
Meet Ideogram, an AI-powered image generation tool that takes your ideas and transforms them into stunning visuals. Whether you're a designer, marketer, or just a visual enthusiast, Ideogram simplifies the creative process. In this guide, we’ll walk you through step-by-step instructions to create beautiful logos, social media posts, and more.
1 hrs
Build a SwiftUI app with Claude AI
This comprehensive SwiftUI course combines cutting-edge AI assistance with hands-on development, guiding you through the process of transforming Figma designs into fully functional iOS applications. Leveraging Claude 3.5 Sonnet, you'll learn to efficiently generate and refine SwiftUI code, create reusable components, and implement advanced features like animations and responsive layouts.
9 hrs
Prototype and Code iOS apps in Figma and SwiftUI
Welcome to our course on designing a sleek wallet interface with Figma! You’ll learn to create a visually appealing and functional wallet interface using DesignCode and Apple UI Kits. Master prototyping, swipe gestures, carousel animations, overlays, and reusable components. Plus, explore a Figma plugin to easily transition from design to SwiftUI. By the end, you’ll create dynamic, user-friendly prototypes.
3 hrs
Create 3D UI for iOS and visionOS in Spline
Comprehensive 3D Design Course: From Basics to Advanced Techniques for iOS and visionOS using SwiftUI
3 hrs
3D UI Interactive Web Design with Spline
Learn to create 3D designs and UI interactions such as 3D icons, UI animations, components, variables, screen resize, scrolling interactions, as well as exporting, optimizing, and publishing your 3D assets on websites
3 hrs
Design and Prototype for iOS 17 in Figma
Crafting engaging experiences for iOS 17 and visionOS using the Figma design tool. Learn about Figma's new prototyping features, Dev Mode, variables and auto layout.
6 hrs
Design and Prototype Apps with Midjourney
A comprehensive course on transforming Midjourney concepts into interactive prototypes using essential design techniques and AI tools
8 hrs
Web App Design using Midjourney and Figma
Get UI inspirations from Midjourney and learn UI design, colors, typography as a beginner in Figma
2 hrs
UI Design for iOS 16 in Sketch
A complete guide to designing for iOS 16 with videos, examples and design files
3 hrs
UI Design Android Apps in Figma
Design Android application UIs from scratch using various tricks and techniques in Figma
2 hrs
UI Design Smart Home App in Figma
Design a Smart Home app from scratch using various tricks and techniques in Figma
2 hrs
UI Design Quick Apps in Figma
Design application UIs from scratch using various tricks and techniques in Figma
12 hrs
Figma Handbook
A comprehensive guide to the best tips and tricks in Figma. Not affiliated with or endorsed by Figma, Inc.
6 hrs