
Scroll Interaction and Scenes
Add to favorites
Crafting Scroll-Based Interactions and Scenes for Web Design
Play video
3D UI Interactive Web Design with Spline
1
Introduction to Spline
10:24
2
3D Shapes and Materials
9:45
3
Weather Icon and Sculpting
13:29
4
Icon Animation
9:27
5
Path Animation
9:35
6
Waves Animation
15:33
7
3D Card with Parallax
9:57
8
Button Components
11:41
9
Screen Resize Adaptive Layout
10:43
10
Tab Bar Animation
21:23
11
UI Charts and Variables
16:54
12
Scroll Interaction and Scenes
9:18
13
Export to USDZ and Optimizations
9:28
14
Publish to 3D Site
3:48

Open the Project
We're going to complete two exercises on scroll interaction and scenes. You'll need the two files we'll work on to follow this section. One is titled " Scroll Interaction and Scenes Exercise, " and the other is " Scroll Interaction and Scenes Demo 2 Exercise, " which can be found in our Spline Courses library. Alternatively, you can import a project you've created in Figma or another design tool.

Add Elements to Your Scene
To create interactions, you need elements to animate. You can add images, text, or any other elements to your scene and arrange them how you want them to appear initially. As you may see, the design is ready when you open the file, and you don't need to adjust it. We will focus on learning animation, camera placement, and using states and events.

Add Camera
First, click on "Reset," where is the Spline's camera controls on the bottom center of the Viewport. Then, add a new camera. Go to the Viewport next to the personal camera, and click "Add new camera." We'll work in both viewport modes, personal camera and camera. Also, you can add a new camera from the toolbar by clicking on the plus button.

Add States
We will add a State before moving the Camera to the second screen. Rename it by "screen 2". Then, we will move the Camera down to the second screen. You'll see that the view changes in the preview. To use it, you need to use the personal Camera. If you want to see a single screen, change the viewport to Camera.

Add Third State
We have our starting state and our second state. To add one more screen, create a new state called "Screen 3." To position it, switch back to the personal camera mode, move it to the right until it looks right, and use the preview as a guide. Click on the camera again to center the screen. If you still see a gap, adjust the X position directly. Avoid making adjustments from the scene, as it can affect elements within the frame. Now, we have our three states set up. Make sure the rotation value for all three states is 0.

Scroll Event
The Scroll Event feature lets you add interactive effects as users scroll through your webpage. It's excellent for making engaging web experiences that catch people's attention. You can use it to create transitions and animations, with the main action being a "Transition."
- To set it up, select the element you want to animate in the Layers panel. Click "Add," then choose "Scroll Event" from the menu. This will open a new section in the Properties panel specifically for configuring the Scroll Event for your selected element.
![Scroll Interaction and Scenes image 7]()

Steps
The primary property associated with the Scroll Event is 'Steps.' Steps represent the amount of scrolling required to move from the start of a transition to the end. By adjusting the number of steps, you can control the speed and fluidity of your scroll-triggered animations. Using fewer steps will make your animations faster, while using more steps will slow them down. We won't be utilizing the scroll type because the scroll mode only functions when exporting for the spline viewer. Thus, our focus will be on the step property.

Configuring the Scroll Event
In the Scroll Event section, you can configure the number of "Steps" you desire for your animation. This setting directly influences the speed at which your animation unfolds as the user scrolls. From the dropdown menu, select the "Transition" action. This action will trigger when the user scrolls through the specified number of steps.
Configuration Details:
- Type: Steps
- Target: Camera
-
Transitions:
- Base state
- Screen 2
- Screen 3
- Transition Curve: Linear

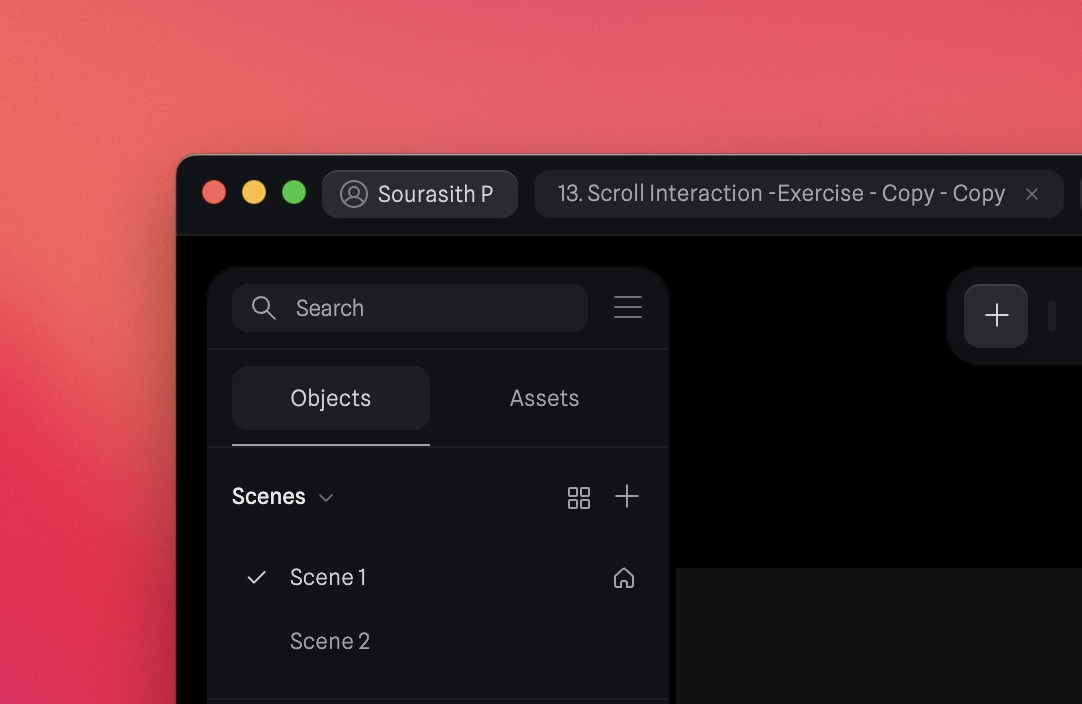
Multi-Scenes
You can create multiple scenes within a single Spline file. Each scene represents a distinct 3D space containing its own set of objects. Transitions between scenes are facilitated through the Events system using the 'Scene Transition' action.
- In the Spline editor, you'll find a list of scenes on the left-hand side. Click on it to view 'Scene 1' and 'Scene 2'. You can add a new scene by clicking the '+' button.
![Scroll Interaction and Scenes image 10]()
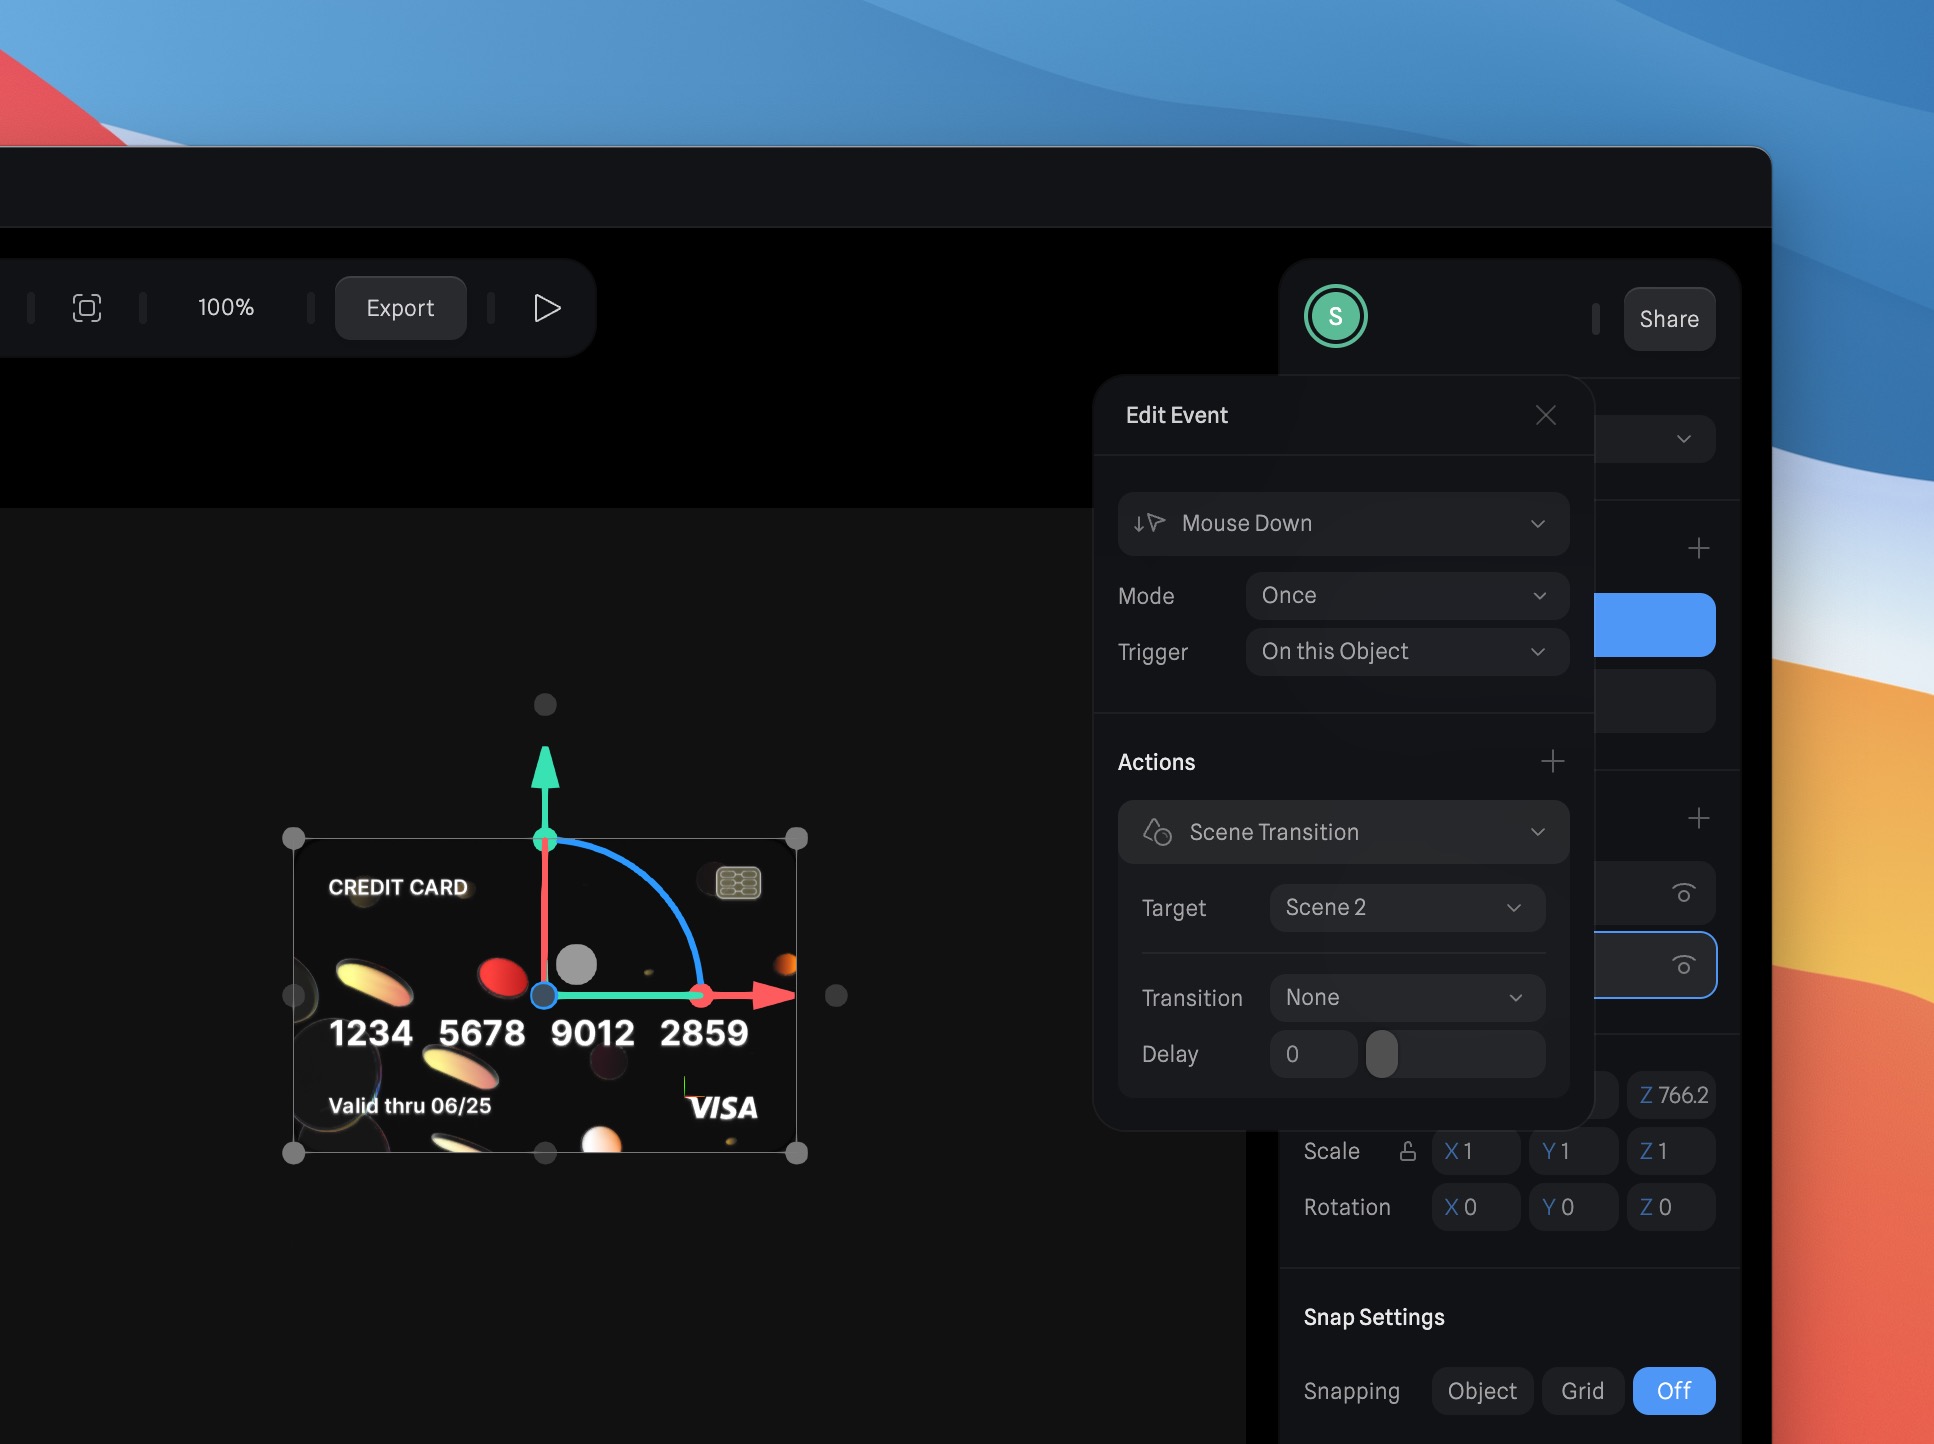
Mouse Down Events
Select the credit card from the scene 1. Add the Mouse down Events. The Mouse Down Event will trigger the actions when the mouse button is pressed. "In the mode option, you can choose 'once,' which means the actions occur only once when triggered. Alternatively, you can choose 'toggle,' where actions reverse when triggered again, creating a toggle effect. For the trigger, select this object, which is the credit card.

Scene Transition Action
Choose the scene transition action. A scene transition action enables you to create transitions between multiple scenes in your file. Edit the action, set the trigger to "screen 2" and select "no transition.”
Second Exercise
In the second exercise, we have two screens in different positions. The first screen is in front, and the other is to the side. When we transition, it will rotate slightly. To pivot towards the second element, select the left-axis points.

Camera Transition
- Reset your project by clicking the "Reset" button and adding a camera.
- Add states to your project, following the same steps as in the first exercise.
- Move the camera to the second screen to achieve the desired view.
- Incorporate the Scroll event into your project.
- Focus on configuring the step type for the Scroll event.
- Add a transition action, specifying the camera as the target and transitioning from the base state to screen 2.
![Scroll Interaction and Scenes image 14]()

Conclusion
Now that you've learned how to use scroll and mouse events, scene transitions, and transition actions in Spline, it's time to get creative. Experiment with these tools to make your website more engaging. Your new skills will help you capture your audience's attention and create exciting web interactions. So, don't be afraid to try new things and make your website stand out.
Templates and source code
Download source files
Download the videos and assets to refer and learn offline without interuption.
Design template
Source code for all sections
Video files, ePub and subtitles
Assets
1
Introduction to Spline
Learn 3D design, UI animations, icons, components, variables, screen resizing, scrolling, and optimize and publish 3D assets online
10:24
2
3D Shapes and Materials
Creating a 3D Icon in Spline: a step-by-step guide
9:45
3
Weather Icon and Sculpting
Master the art of 3D design with Spline's user-friendly interface, and learn how to create a stunning weather icon in a few easy steps.
13:29
4
Icon Animation
Learn to build a 3D animated weather icon using Spline's intuitive interface and powerful features
9:27
5
Path Animation
Learn how to create 3D paths with the path tool and to edit them
9:35
6
Waves Animation
Mastering Wave Animation with the Spline 3D Tool
15:33
7
3D Card with Parallax
Creating a 3D Card with Parallax Effect using a glass layer
9:57
8
Button Components
Simplify Your Design Workflow with Spline Components for Reusable and Dynamic Object Creation
11:41
9
Screen Resize Adaptive Layout
Creating adaptive layouts with Screen Resize Events using Breakpoints and Transitions
10:43
10
Tab Bar Animation
Crafting Futuristic UI: Designing a Glass Tab Bar with Crystal Floating Button using Spline
21:23
11
UI Charts and Variables
Exploring Variables Usage in Interactive UI Design
16:54
12
Scroll Interaction and Scenes
Crafting Scroll-Based Interactions and Scenes for Web Design
9:18
13
Export to USDZ and Optimizations
Creating immersive AR experiences on iOS devices using Spline's 3D models
9:28
14
Publish to 3D Site
Easily embed your 3D creations on web pages using Spline's native HTML component, the Spline Viewer
3:48
Meet the instructor
We all try to be consistent with our way of teaching step-by-step, providing source files and prioritizing design in our courses.
Akson Phomhome
UI Designer
Designer at Design+Code.
13 courses - 60 hours
AI Design with Ideogram
Meet Ideogram, an AI-powered image generation tool that takes your ideas and transforms them into stunning visuals. Whether you're a designer, marketer, or just a visual enthusiast, Ideogram simplifies the creative process. In this guide, we’ll walk you through step-by-step instructions to create beautiful logos, social media posts, and more.
1 hrs
Build a SwiftUI app with Claude AI
This comprehensive SwiftUI course combines cutting-edge AI assistance with hands-on development, guiding you through the process of transforming Figma designs into fully functional iOS applications. Leveraging Claude 3.5 Sonnet, you'll learn to efficiently generate and refine SwiftUI code, create reusable components, and implement advanced features like animations and responsive layouts.
9 hrs
Prototype and Code iOS apps in Figma and SwiftUI
Welcome to our course on designing a sleek wallet interface with Figma! You’ll learn to create a visually appealing and functional wallet interface using DesignCode and Apple UI Kits. Master prototyping, swipe gestures, carousel animations, overlays, and reusable components. Plus, explore a Figma plugin to easily transition from design to SwiftUI. By the end, you’ll create dynamic, user-friendly prototypes.
3 hrs
Create 3D UI for iOS and visionOS in Spline
Comprehensive 3D Design Course: From Basics to Advanced Techniques for iOS and visionOS using SwiftUI
3 hrs
3D UI Interactive Web Design with Spline
Learn to create 3D designs and UI interactions such as 3D icons, UI animations, components, variables, screen resize, scrolling interactions, as well as exporting, optimizing, and publishing your 3D assets on websites
3 hrs
Design and Prototype for iOS 17 in Figma
Crafting engaging experiences for iOS 17 and visionOS using the Figma design tool. Learn about Figma's new prototyping features, Dev Mode, variables and auto layout.
6 hrs
Design and Prototype Apps with Midjourney
A comprehensive course on transforming Midjourney concepts into interactive prototypes using essential design techniques and AI tools
8 hrs
Web App Design using Midjourney and Figma
Get UI inspirations from Midjourney and learn UI design, colors, typography as a beginner in Figma
2 hrs
UI Design for iOS 16 in Sketch
A complete guide to designing for iOS 16 with videos, examples and design files
3 hrs
UI Design Android Apps in Figma
Design Android application UIs from scratch using various tricks and techniques in Figma
2 hrs
UI Design Smart Home App in Figma
Design a Smart Home app from scratch using various tricks and techniques in Figma
2 hrs
UI Design Quick Apps in Figma
Design application UIs from scratch using various tricks and techniques in Figma
12 hrs
Figma Handbook
A comprehensive guide to the best tips and tricks in Figma. Not affiliated with or endorsed by Figma, Inc.
6 hrs