
3D Camera & Lighting
Add to favorites
Customize your camera to make your scene looks stunning
Play video

Type of cameras
In Spline, you can set 2 type of cameras: Perspective and Orthographic.

Orthographic: The orthographic camera is commonly utilized in designing. All objects show up at the same scale, parallel lines stay parallel and a unit of length will show up to have the same length all over on the drawing. This makes it simpler to judge relative sizes and to adjust models.
Perspective: The perspective camera gives you more data around depth, objects which are distant away are littler than those adjacent. A point of view see is as seen by human eyes within the real world.
Personal Camera
You should use the personal camera to work around your scene, since it is your hand-free camera. Using the Export Play Settings with this camera is not recommended.
Isometric Camera
This camera is a custom one that we created to view the scene from an isometric point of view. We use this camera for exporting play settings since it is always in the same position.
Camera controls
The camera controls are located at the bottom of the editor. With this feature, you can reset the camera, select an axis, set it to isometric, or change the type of camera. If you want to view a scene from different angles, you will really appreciate the change axis feature.

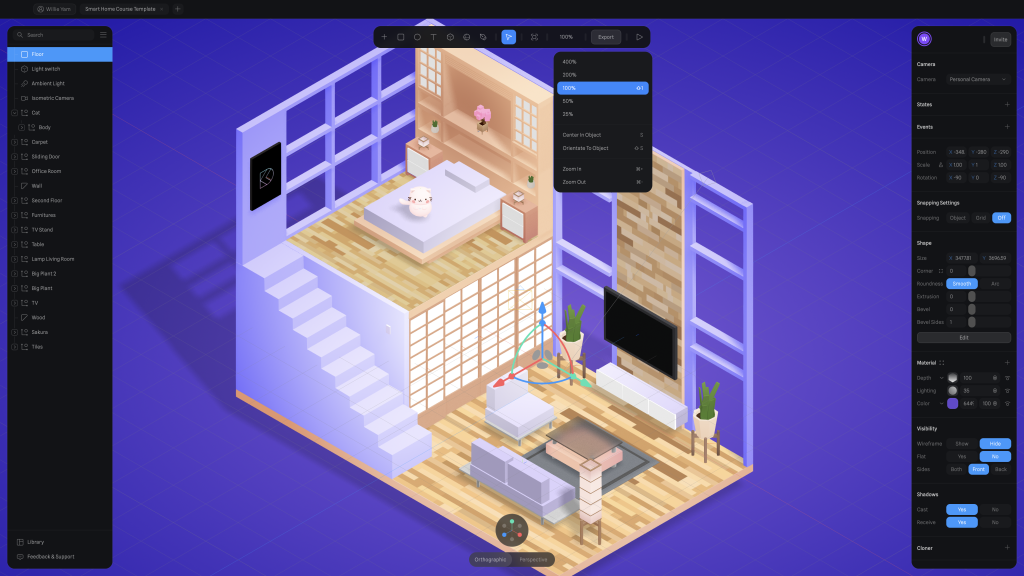
Zoom
There is also a Zoom control on Spline. You can zoom at which depth, center the target object, and select the object's orientation on the top bar.
How to create a camera
On the top bar, you need to select the + icon, then, select camera.
- On the top bar, click on the +
- Select Camera
Camera follow
In Game Controls dropdown, you'll be able see that there's a camera follow option. A camera is the selected camera that follows your character, orient to is the way it follows your character, position and rotation delay are the camera's acceleration, and up/down limits its rotation.
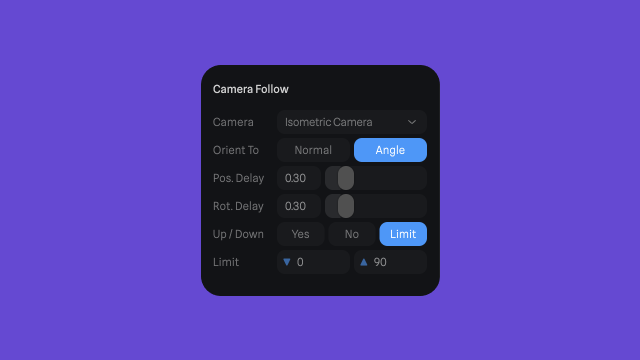
- Camera: Selected camera will follow the character
- Orient To: Normal - The camera will follow the moving character by moving ahead, behind, or to the sides. Angle - The camera rotates at an angle behind the character while moving in sync with the movement of the character.
- Pos.Delay: Acceleration of the speed of the camera
- Rot.Delay: Acceleration of the rotation of the camera
- Up/Down: Enable the player to move the camera
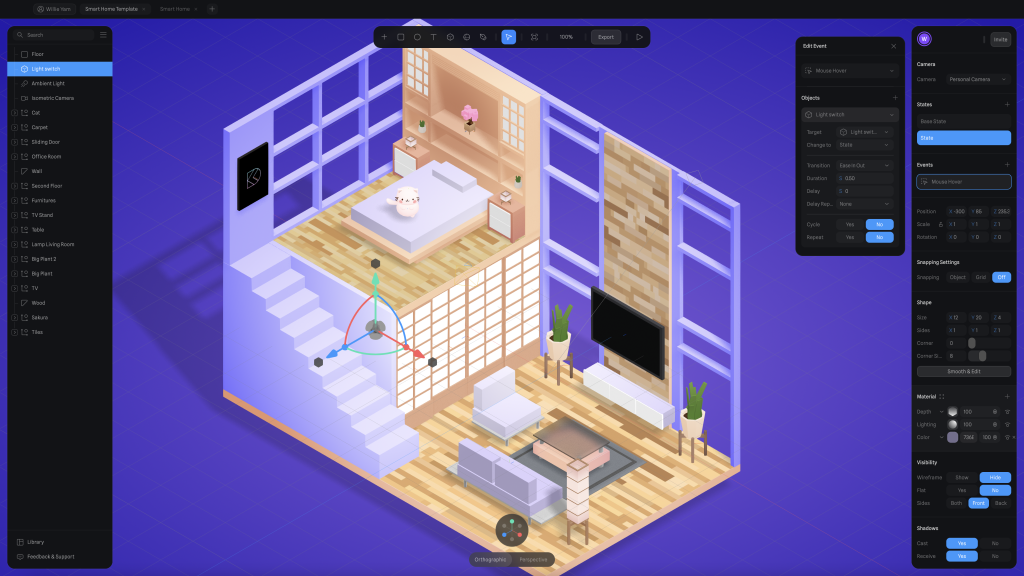
Camera State
In Spline, you can also add states to cameras. You can change the camera's angle by clicking the sliding doors. We will first select the Isometric camera, add a state, and change the camera's angle. We can see that we are viewing the scene from different angles by switching between the states. Add a Mouse Down event to the Sliding Door, set the toggle to Yes, and on the Objects, select the Isometric Camera. We have to set the camera follow to none, because it conflicts with the camera state.
Night Mode

In Spline, you can create a night scene by changing the ambient light and the colors of the objects. Although it appears difficult, trust me, we're going to use the techniques we've learned previously to achieve this.
Light Switch
It's time to talk about the trigger: the light switch. When you click on the Light Switch, we will change the colors of some objects and change the ambient light. First, let's add a state to the Light Switch. We will set the color to 736E8D when hovering over it. Set the duration to 0.5s.
Objects night mode
To fit the environment, we're going to assign some objects a night mode state. Make sure to include the object in the light switch's Mouse Down event.
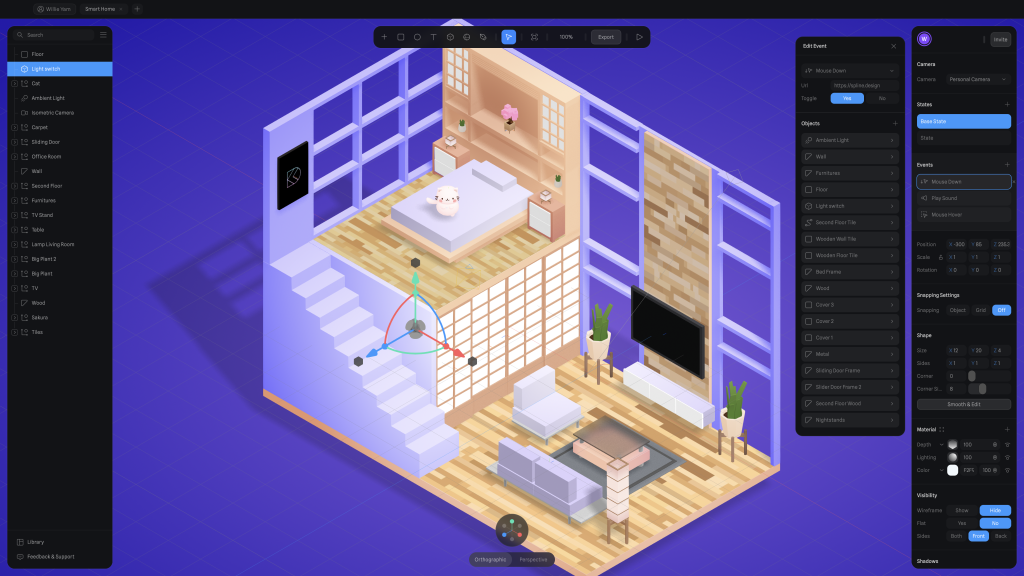
- Ambient Light: Set the color to 333333 and the intensity to 3.64, Position Y to 720
- Wall: Set the color to 252525
- Furnitures ( Shape not group ): Set the color to 8572C7 Depth - Origin: ( 3.89, 0.00, 127.43 ) and Far to 480.42 Set the right radial
- Floor: Set the color to 332081
- Light Switch: Set the color to 736E8D
- Wooden Wall Tile: Set the lighting to 70, image to 50 and color to 2A2480 with opacity 100
- Wooden Floor Tile: Set the lighting to 70, image to 50 and color to 423C99 with opacity 100
- Second Floor Tile: Set the lighting to 70, image to 50 and color to 423C99 with opacity 100
- Second Floor Wood: Set the color to 434397 with opacity 100
- Bed frame: Set the color to 2E2EA9 with opacity 100
- Wood: Set the color to 8B8BBF with opacity 100
- Cover 1 TV Stand: Set the color to 6E7BFF with opacity 100
- Cover 2 TV Stand: Set the color to 6E7BFF with opacity 100
- Cover 3 TV Stand: Set the color to 6E7BFF with opacity 100
- Metal ( Furnitures ): Set the color to 000446 with opacity 100
- Sliding Door Frame: Set the color to 34349A with opacity 100
- Slider Door Frame 2: Set the color to 34349A with opacity 100
- Nightstands: Set the color to 5959C5 with opacity 100
Templates and source code
Download source files
Download the videos and assets to refer and learn offline without interuption.
Design template
Source code for all sections
Video files, ePub and subtitles
Subtitles
Videos
Assets
1
Intro to Game Controls
Use key inputs, joysticks, buttons, gravity, and collision detection to move your character through your scene
4:26
2
States, Events & Animations
Animate objects by using state-based animations
13:03
3
Movement & Controls
Use game controls to move an object in your scene
5:26
4
Collision Detection
Set a shape to your character to enable collisions
10:15
5
Physics
Make your object dynamic in a 3D environment
4:34
6
3D Camera & Lighting
Customize your camera to make your scene looks stunning
16:10
7
Audio & Sounds
Elevate your scene with beautiful sounds
6:32
8
URL & Embed
Export your 3D scene in web with no code
4:16
9
Export in React Site
Export your design in a React environment
29:31
10
Performance & 3D Vitals
Monitor and optimize your scene using 3D Vitals
4:28
Meet the instructor
We all try to be consistent with our way of teaching step-by-step, providing source files and prioritizing design in our courses.
Willie Yam
Front-end/UI developer at Design+Code
I do UI coding. HTML/CSS/JS/SWIFTUI dev.
10 courses - 37 hours
Design and Prototype an App with Play
Build a completely functional prototype without writing a single line of code from your phone
3 hrs
Create a 3D site with game controls in Spline
Build an interactive 3D scene implemented on a ReactJS site using Figma and Spline
2 hrs
Build a Movie Booking App in SwiftUI
Learn how to create an iOS app based on a beautiful UI design from Figma with interesting animations and interactions, create a custom tab bar and use navigation views to build a whole flow
1 hrs
Build Quick Apps with SwiftUI
Apply your Swift and SwiftUI knowledge by building real, quick and various applications from scratch
11 hrs
CSS Handbook
A comprehensive series of tutorials that encompass styled-components, CSS, and all layout and UI developments
1 hrs
Advanced React Hooks
Learn how to build a website with Typescript, Hooks, Contentful and Gatsby Cloud
5 hrs
Unity for Designers
If you want to make a game and don't know where to start, you are in the right place. I will teach you how to use Unity, code in C# and share essential tips and tricks to make your first game.
5 hrs
Create a Javascript Game
Learn how to create a web game using Phaser 3, a popular javascript game engine. Draw a map using an editor, implement the player, make the player move, apply physics, collisions, and implement the enemies.
2 hrs
Build an ARKit 2 App
Introduction to ARKit and learn how to make your own playground. You will be able to add models or even your own designs into the app and play with them
4 hrs
Create a SpriteKit Game
Overview of SpriteKit a powerful 2D sprite-based framework for games development from Apple and learn how to create your very own platform
3 hrs