
Particles Animation
Add to favorites
Discover the new particle feature designed to create a range of visual effects like fire, smoke, rain, snow, and other dynamic phenomena
Play video
Create 3D UI for iOS and visionOS in Spline
1
Intro to Spline for iOS and visionOS
7:25
2
Basic Shapes in 3D Smart Home
10:12
3
Materials, Lights and Effects
12:11
4
Camera Animation and States
7:05
5
3D Thermostat and Cloner
14:38
6
Buttons and Components
8:26
7
Path Animation and Rotation
7:10
8
Create a 3D iOS App Icon
7:09
9
Create a visionOS App Icon
9:53
10
Create 3D UI Scene
9:49
11
Particles Animation
20:30
12
Export to SwiftUI Project
16:20
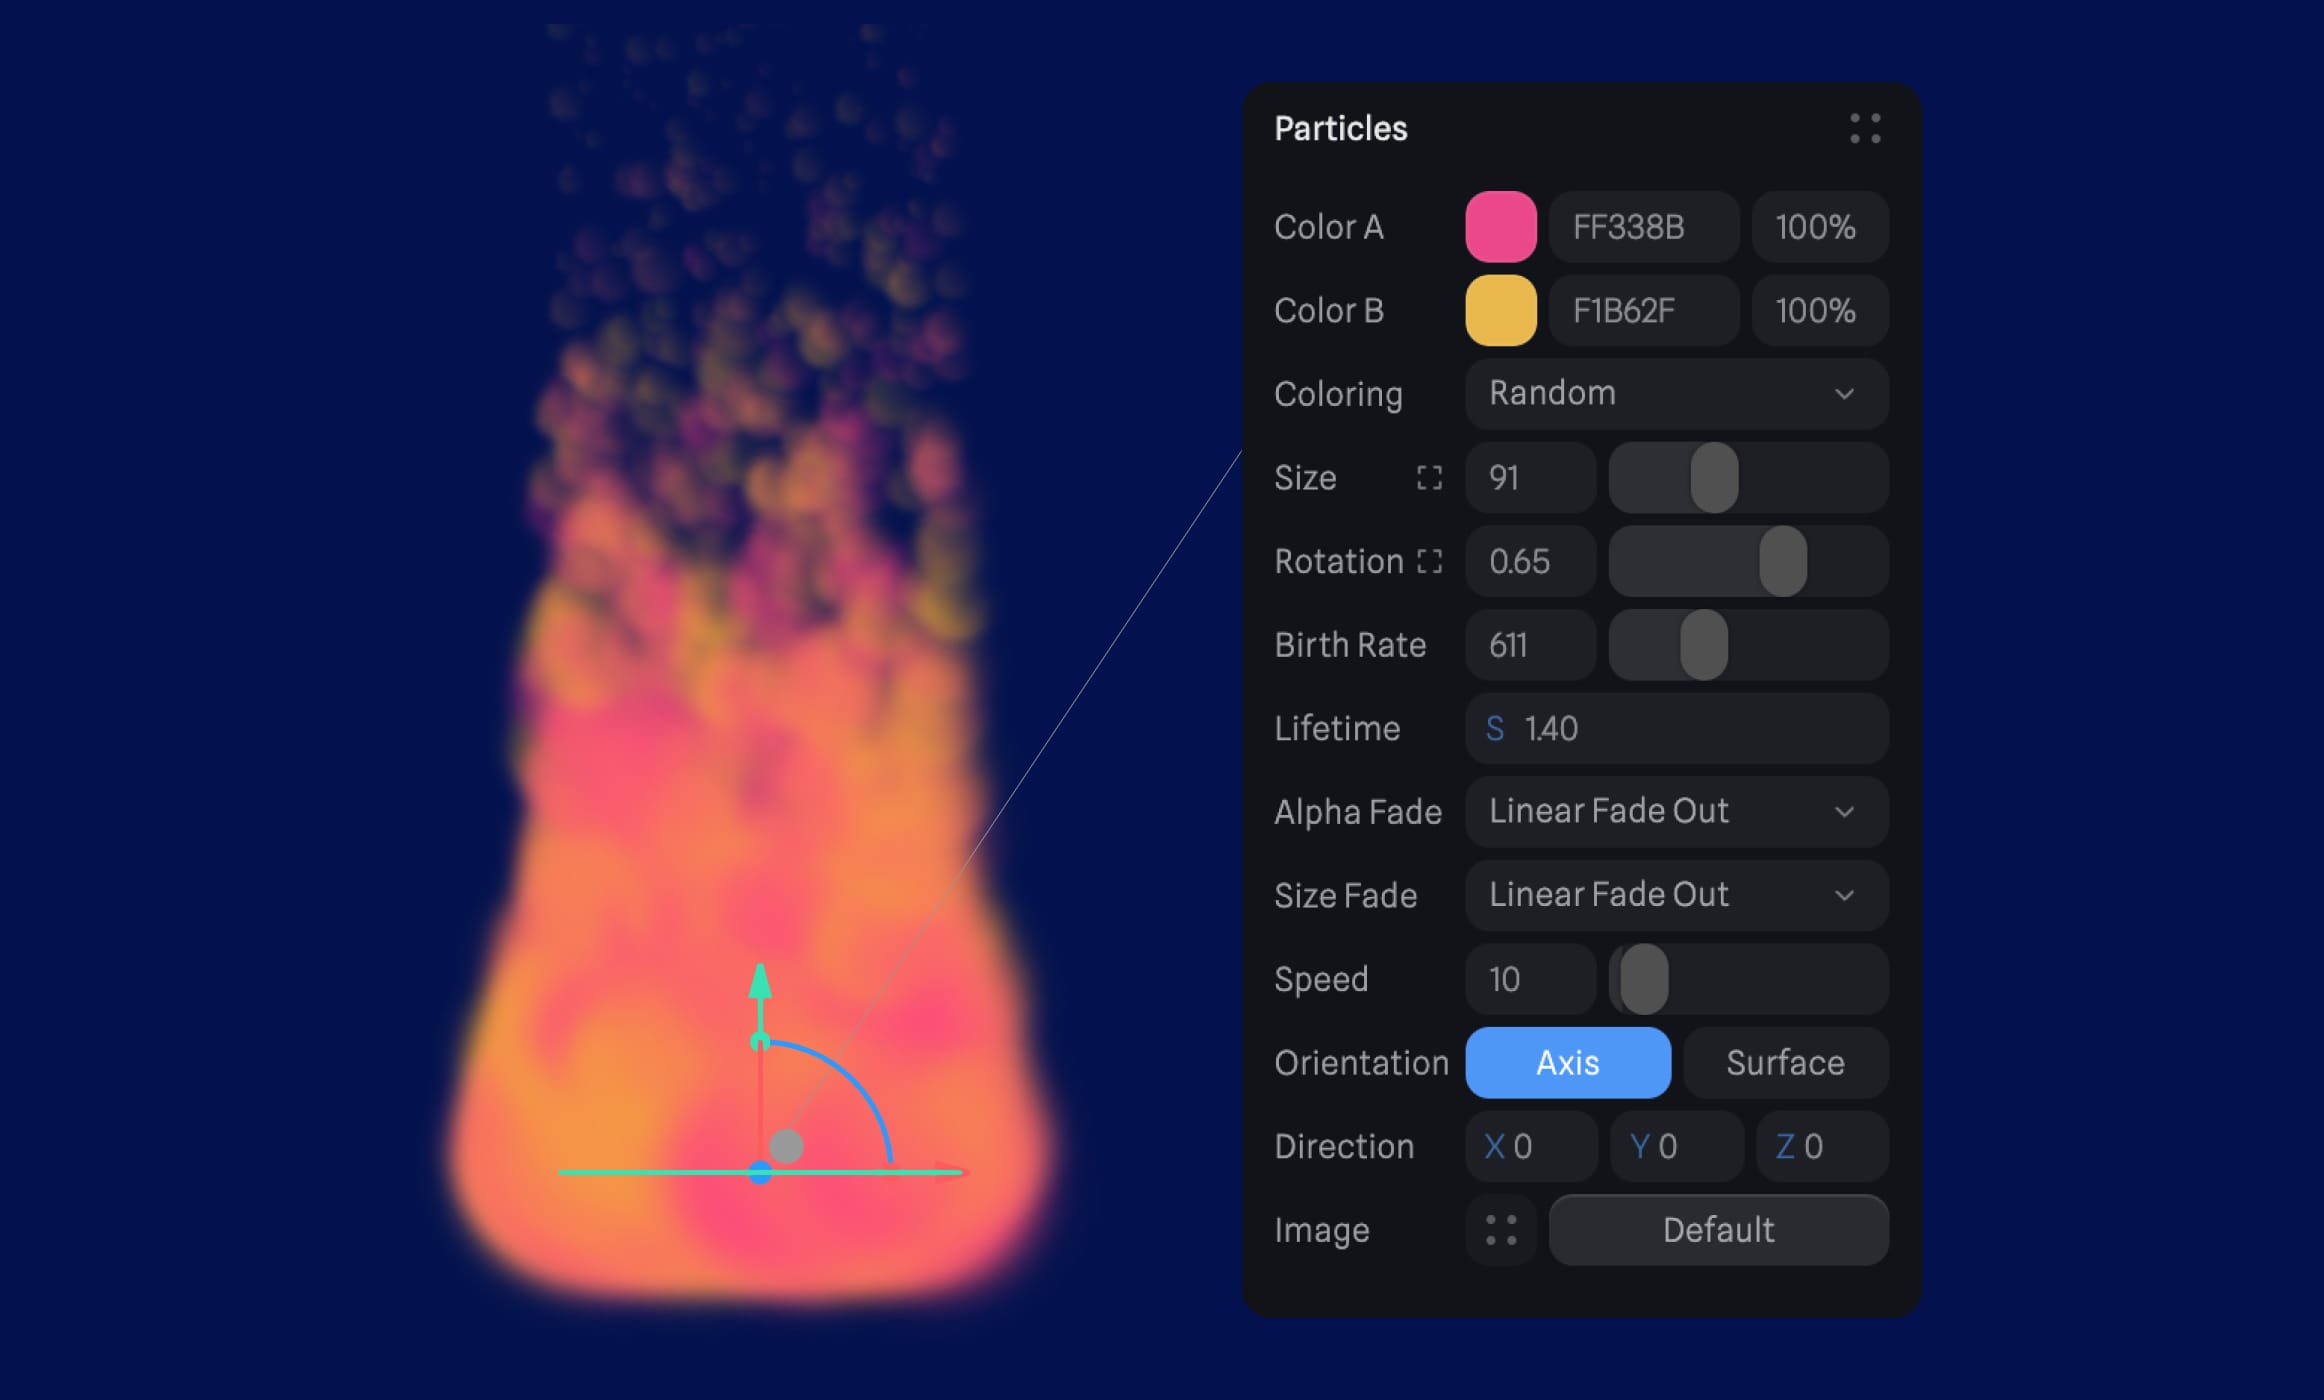
First, let's explore the basics of particle emitters. By default, you'll notice particles emitting from the emitter. These particles can be customized extensively to achieve different effects.
Particle Attributes
- Color A and Color B: These define the starting and ending colors of the particles. You can create gradients between two colors or choose random colors for a dynamic effect.
- Coloring Modes: Choose between 'Blend' for smooth color transitions or 'Random' for randomized colors between Color A and Color B.
- Size: Adjust the size of particles to control their visibility.
- Rotation: Modify particle rotation for added dynamics.
- Birth Rate (Emit Rate): Control the frequency of particle emission.
- Lifetime: Determine how long particles remain visible.
- Fading: Set up alpha and size fading for smooth transitions in particle appearance.
- Speed: Adjust particle speed to control movement dynamics.
- Orientation: Define the direction of particle emission, especially useful for changing emitter shapes.
Particle Emitter
When customizing a particle emitter in Spline, you have the flexibility to adjust various properties that determine the appearance and behavior of the particles. Here's a breakdown of the customization options available:
Shape
- Choose from options like Plane, Box, Sphere, Torus, Cone, or even a Custom Shape.
- Define the shape of the particle emitter, influencing the direction and spread of emitted particles.
Size
- Determine the size of the emitter object, affecting the overall area from which particles are emitted.
Autoplay
- Decide whether the emitter should emit particles automatically or wait for manual activation.
Emit Time
- Choose between Infinite, Loop, or One Time emission modes.
-
For Loop and One Time modes:
- Delay: Specify the time until the emitter starts emitting particles.
- Duration: Set the duration of the particle emission period.
![Particles Animation image 2]()

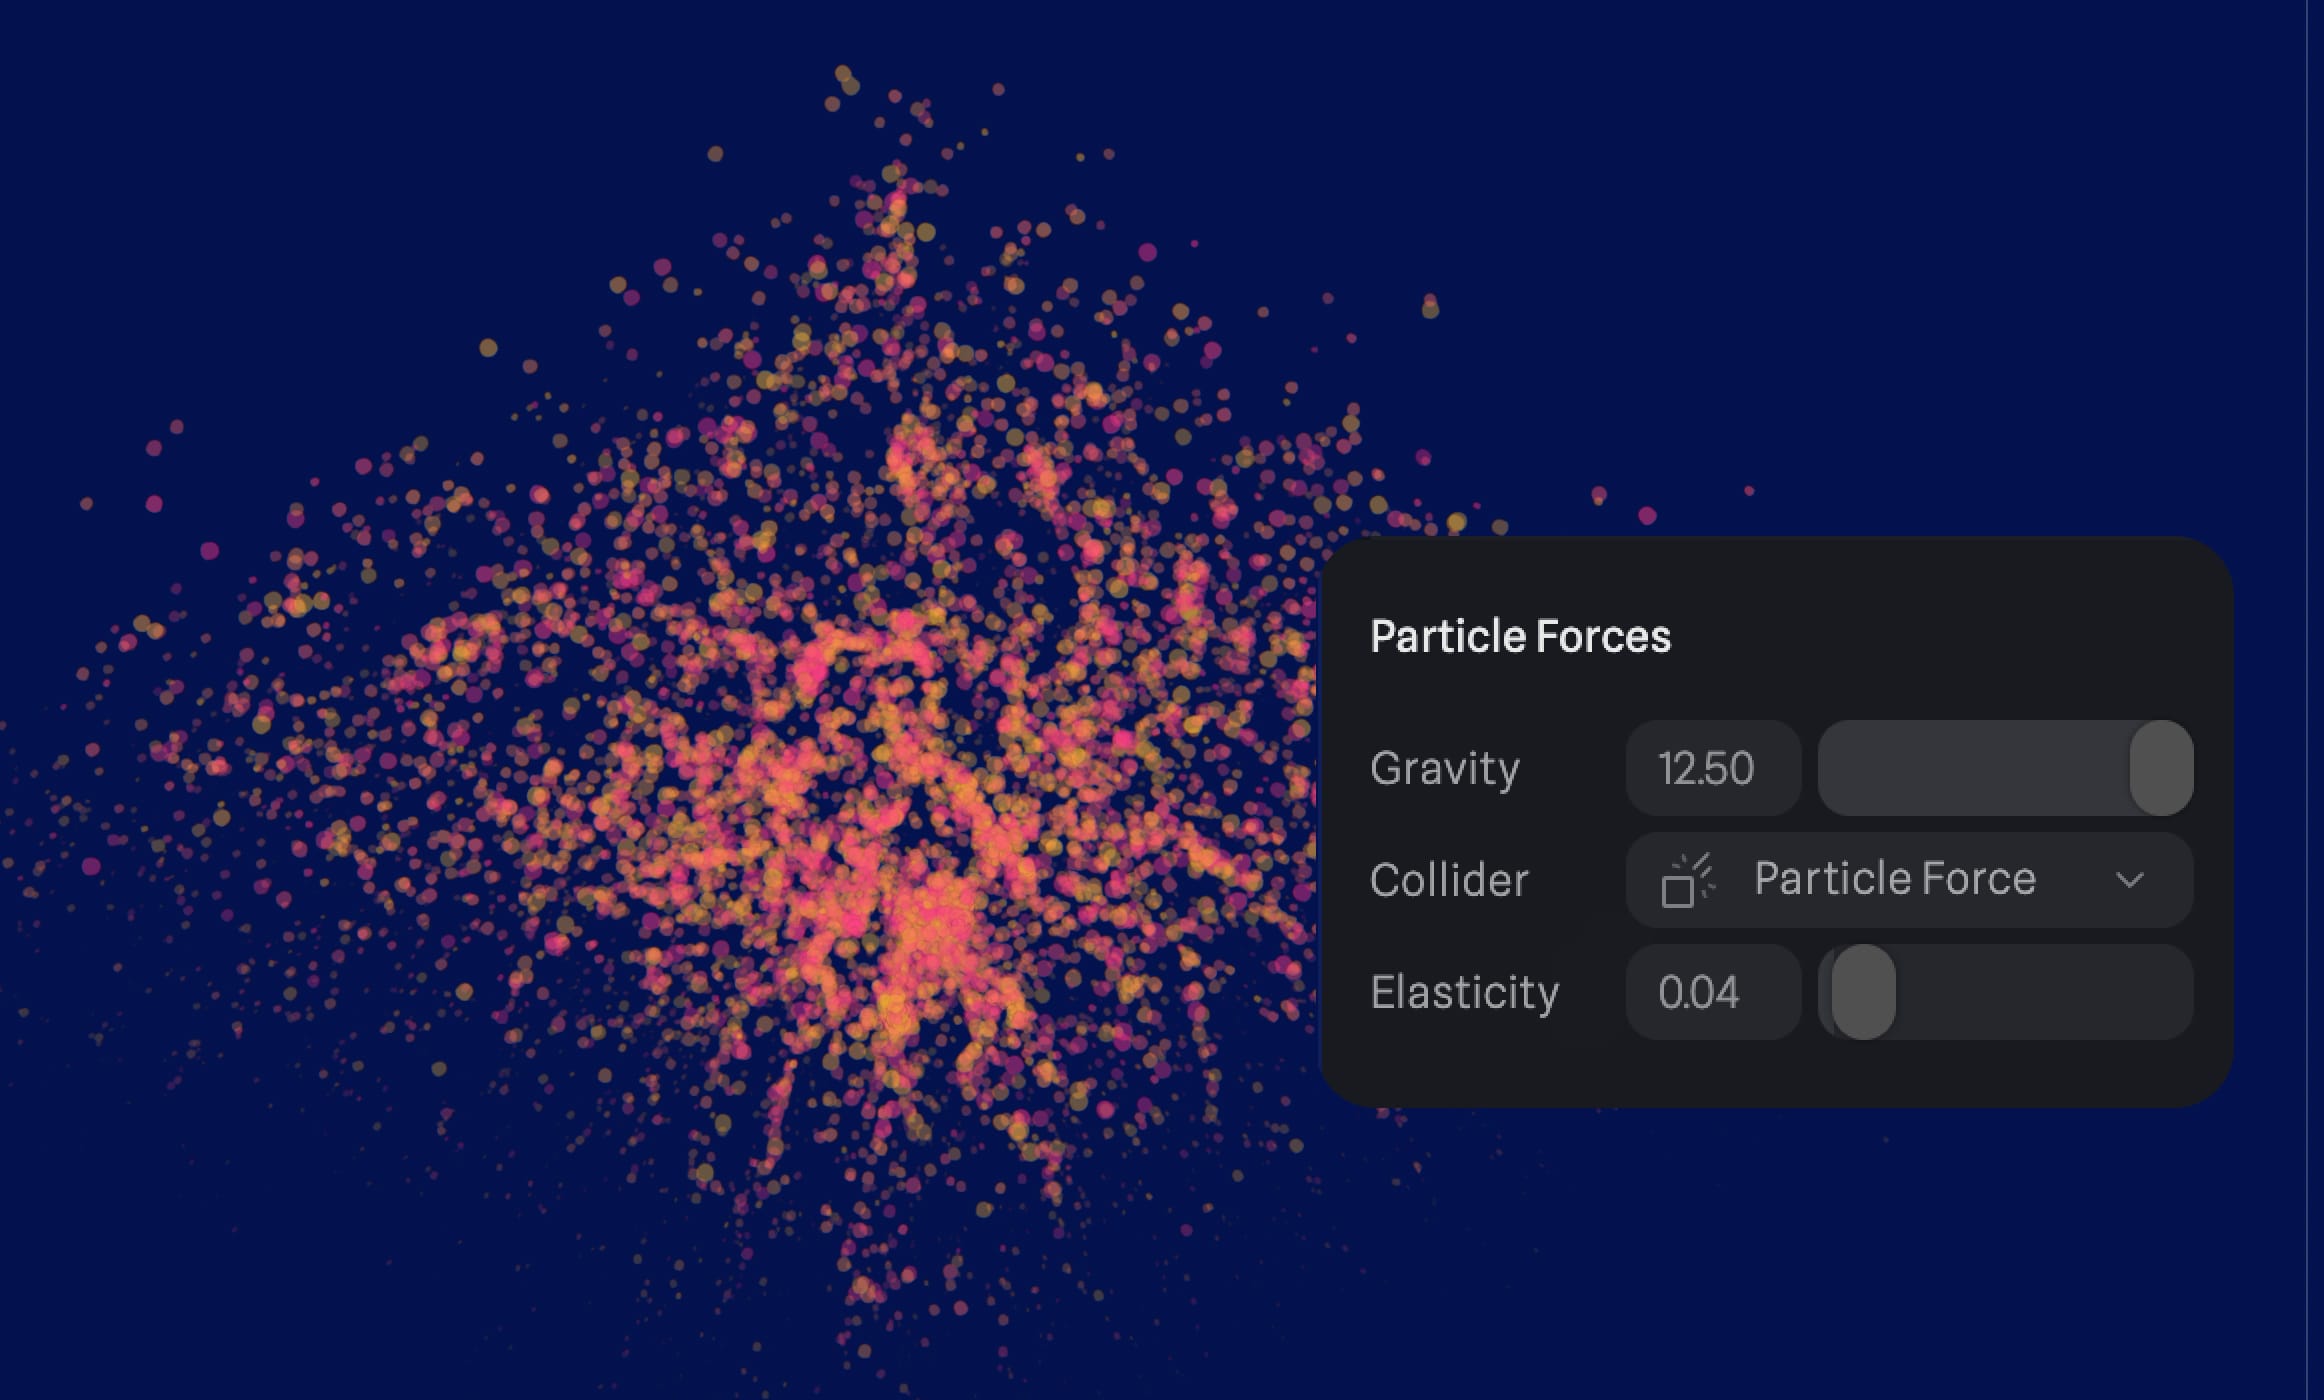
Particle Forces
In Spline, Particle Forces offer precise control over how emitted particles behave within your animation. Here are two crucial elements you can adjust:
Gravity
Gravity influences the vertical movement of particles. Positive values lift particles upwards, while negative values pull them downwards.
Collision
Collision settings enable you to select a particle collider or force that influences the behavior of the particles emitted by your selected emitter.
Particle Noise
Adjusts how particles move by applying various types of noise:
-
Type (Curl, Simplex, or Fbm): Choose the type of noise pattern to apply.
- Curl: Creates swirling patterns, like turbulent fluid or clouds.
- Simplex: Generates natural-looking patterns efficiently.
- Fbm (Fractal Brownian Motion): Produces intricate and detailed patterns, ideal for creating complex visual effects.
- Scale: Determines the size of the noise patterns, affecting the overall appearance of the noise effect.
- Variation: Alters the level of randomness within the noise, allowing for different degrees of complexity and irregularity.
- Seed: Provides consistency by allowing specific noise patterns to be reproduced reliably.

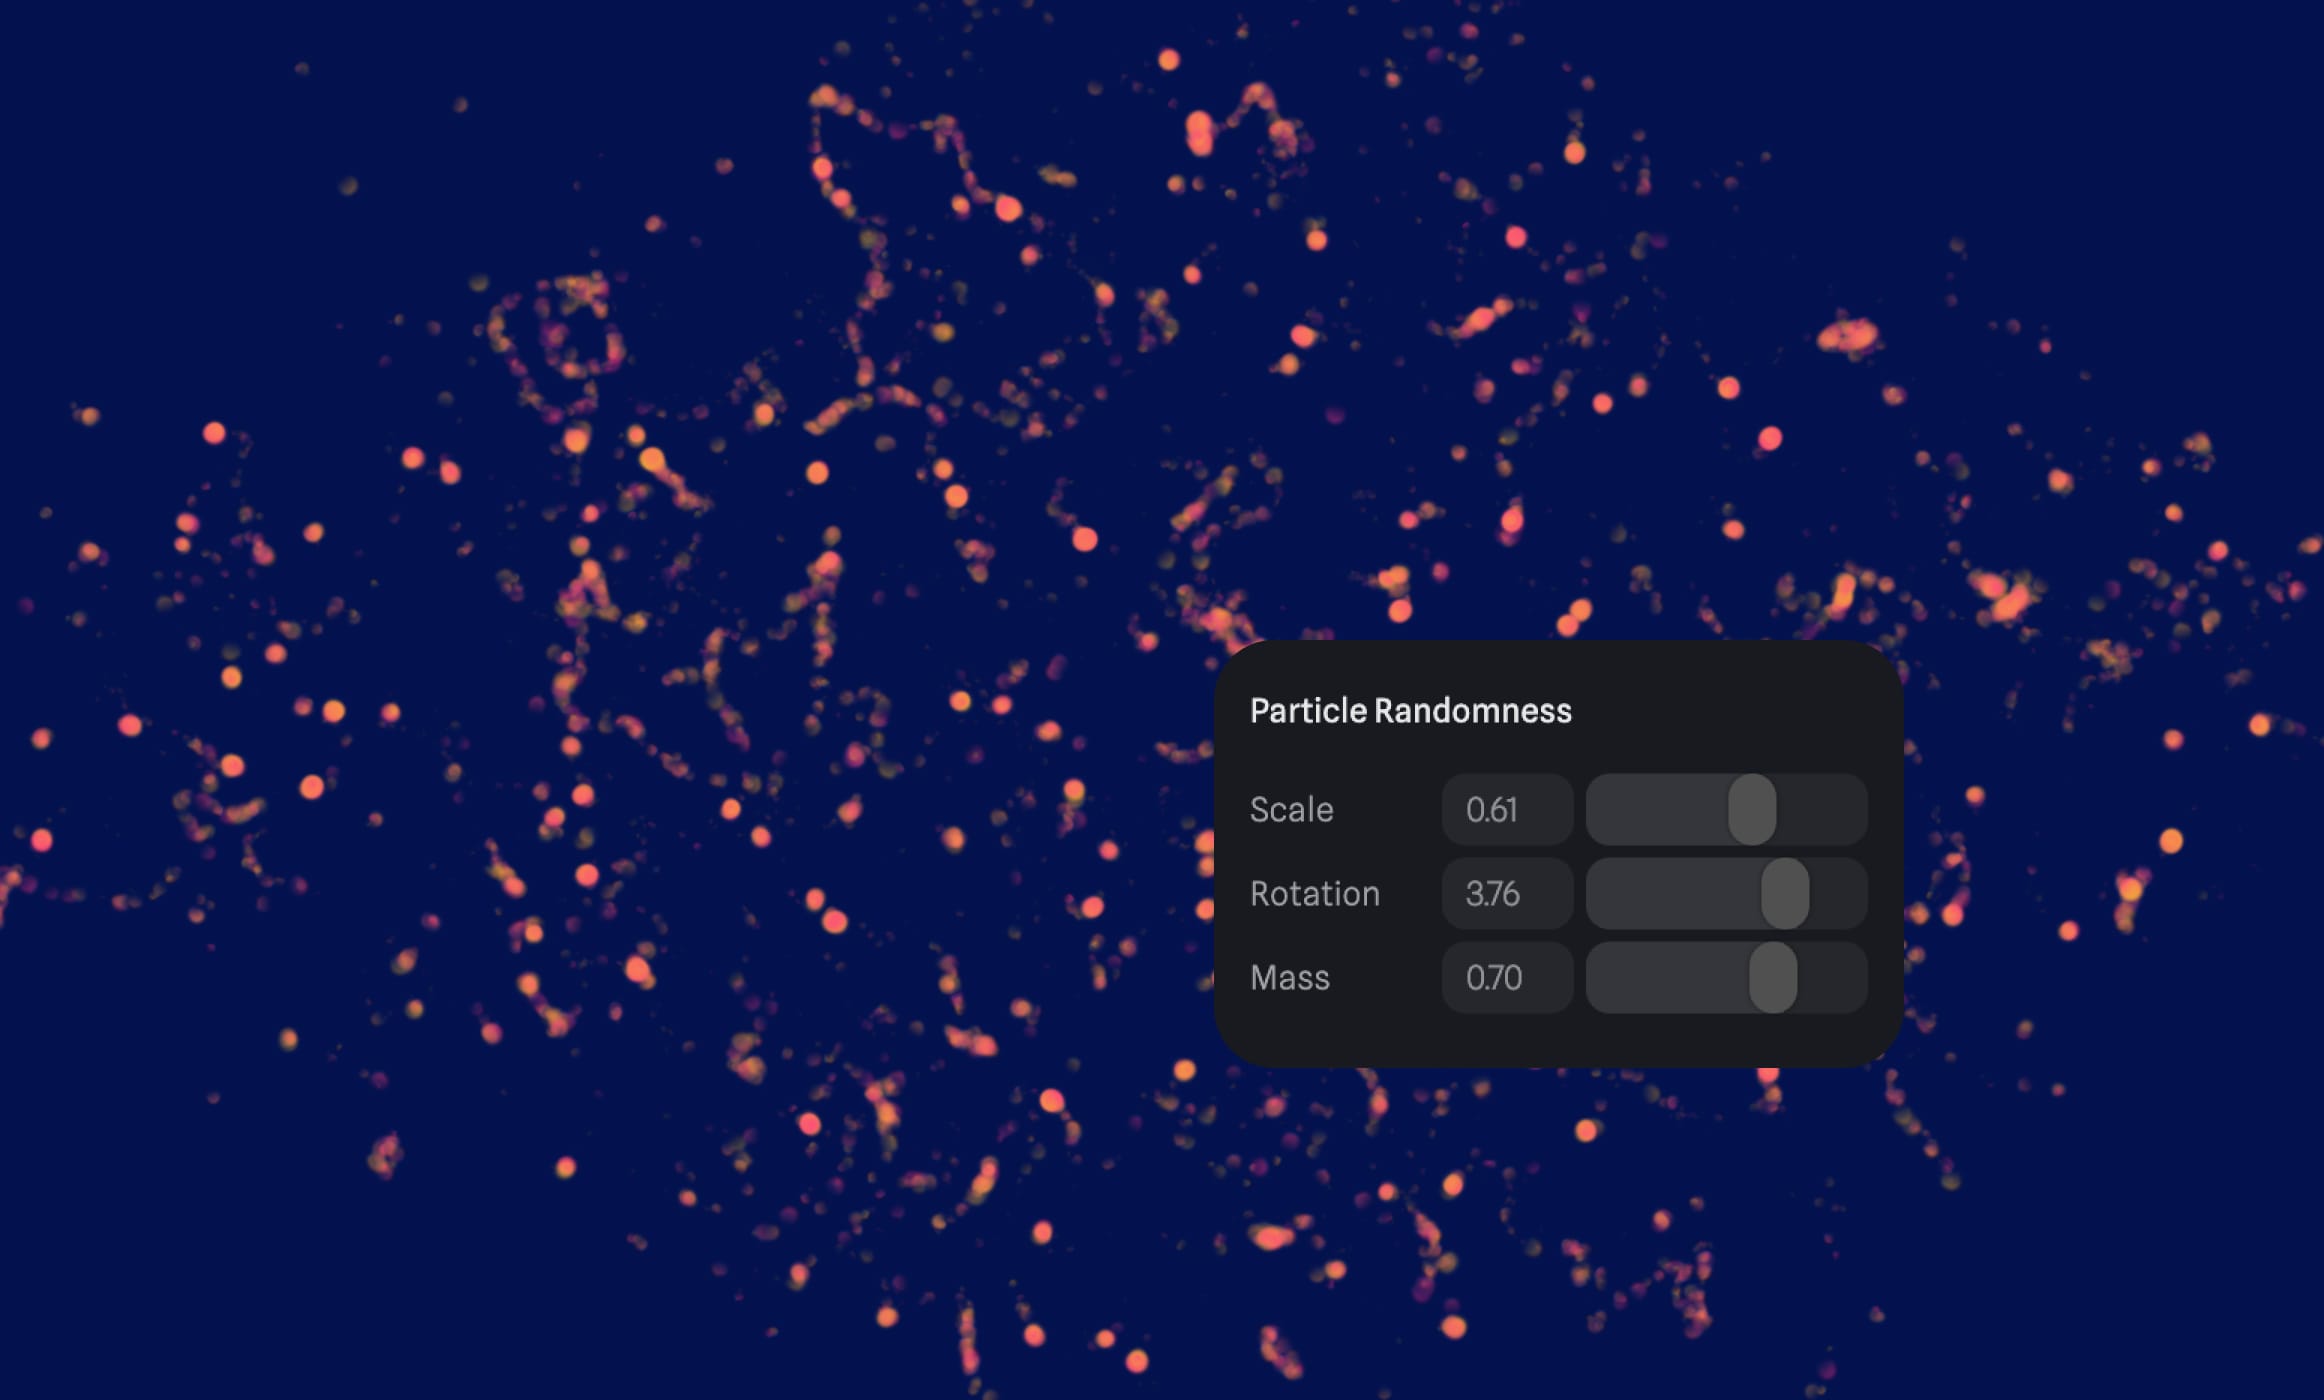
Particle Randomness
Introduces randomness to particle behavior and appearance:
- Scale: Adds randomness to the size of particles.
- Rotation: Adds randomness to the orientation of particles.
- Mass: Adds randomness to the mass of particles, affecting their movement and interaction with forces.
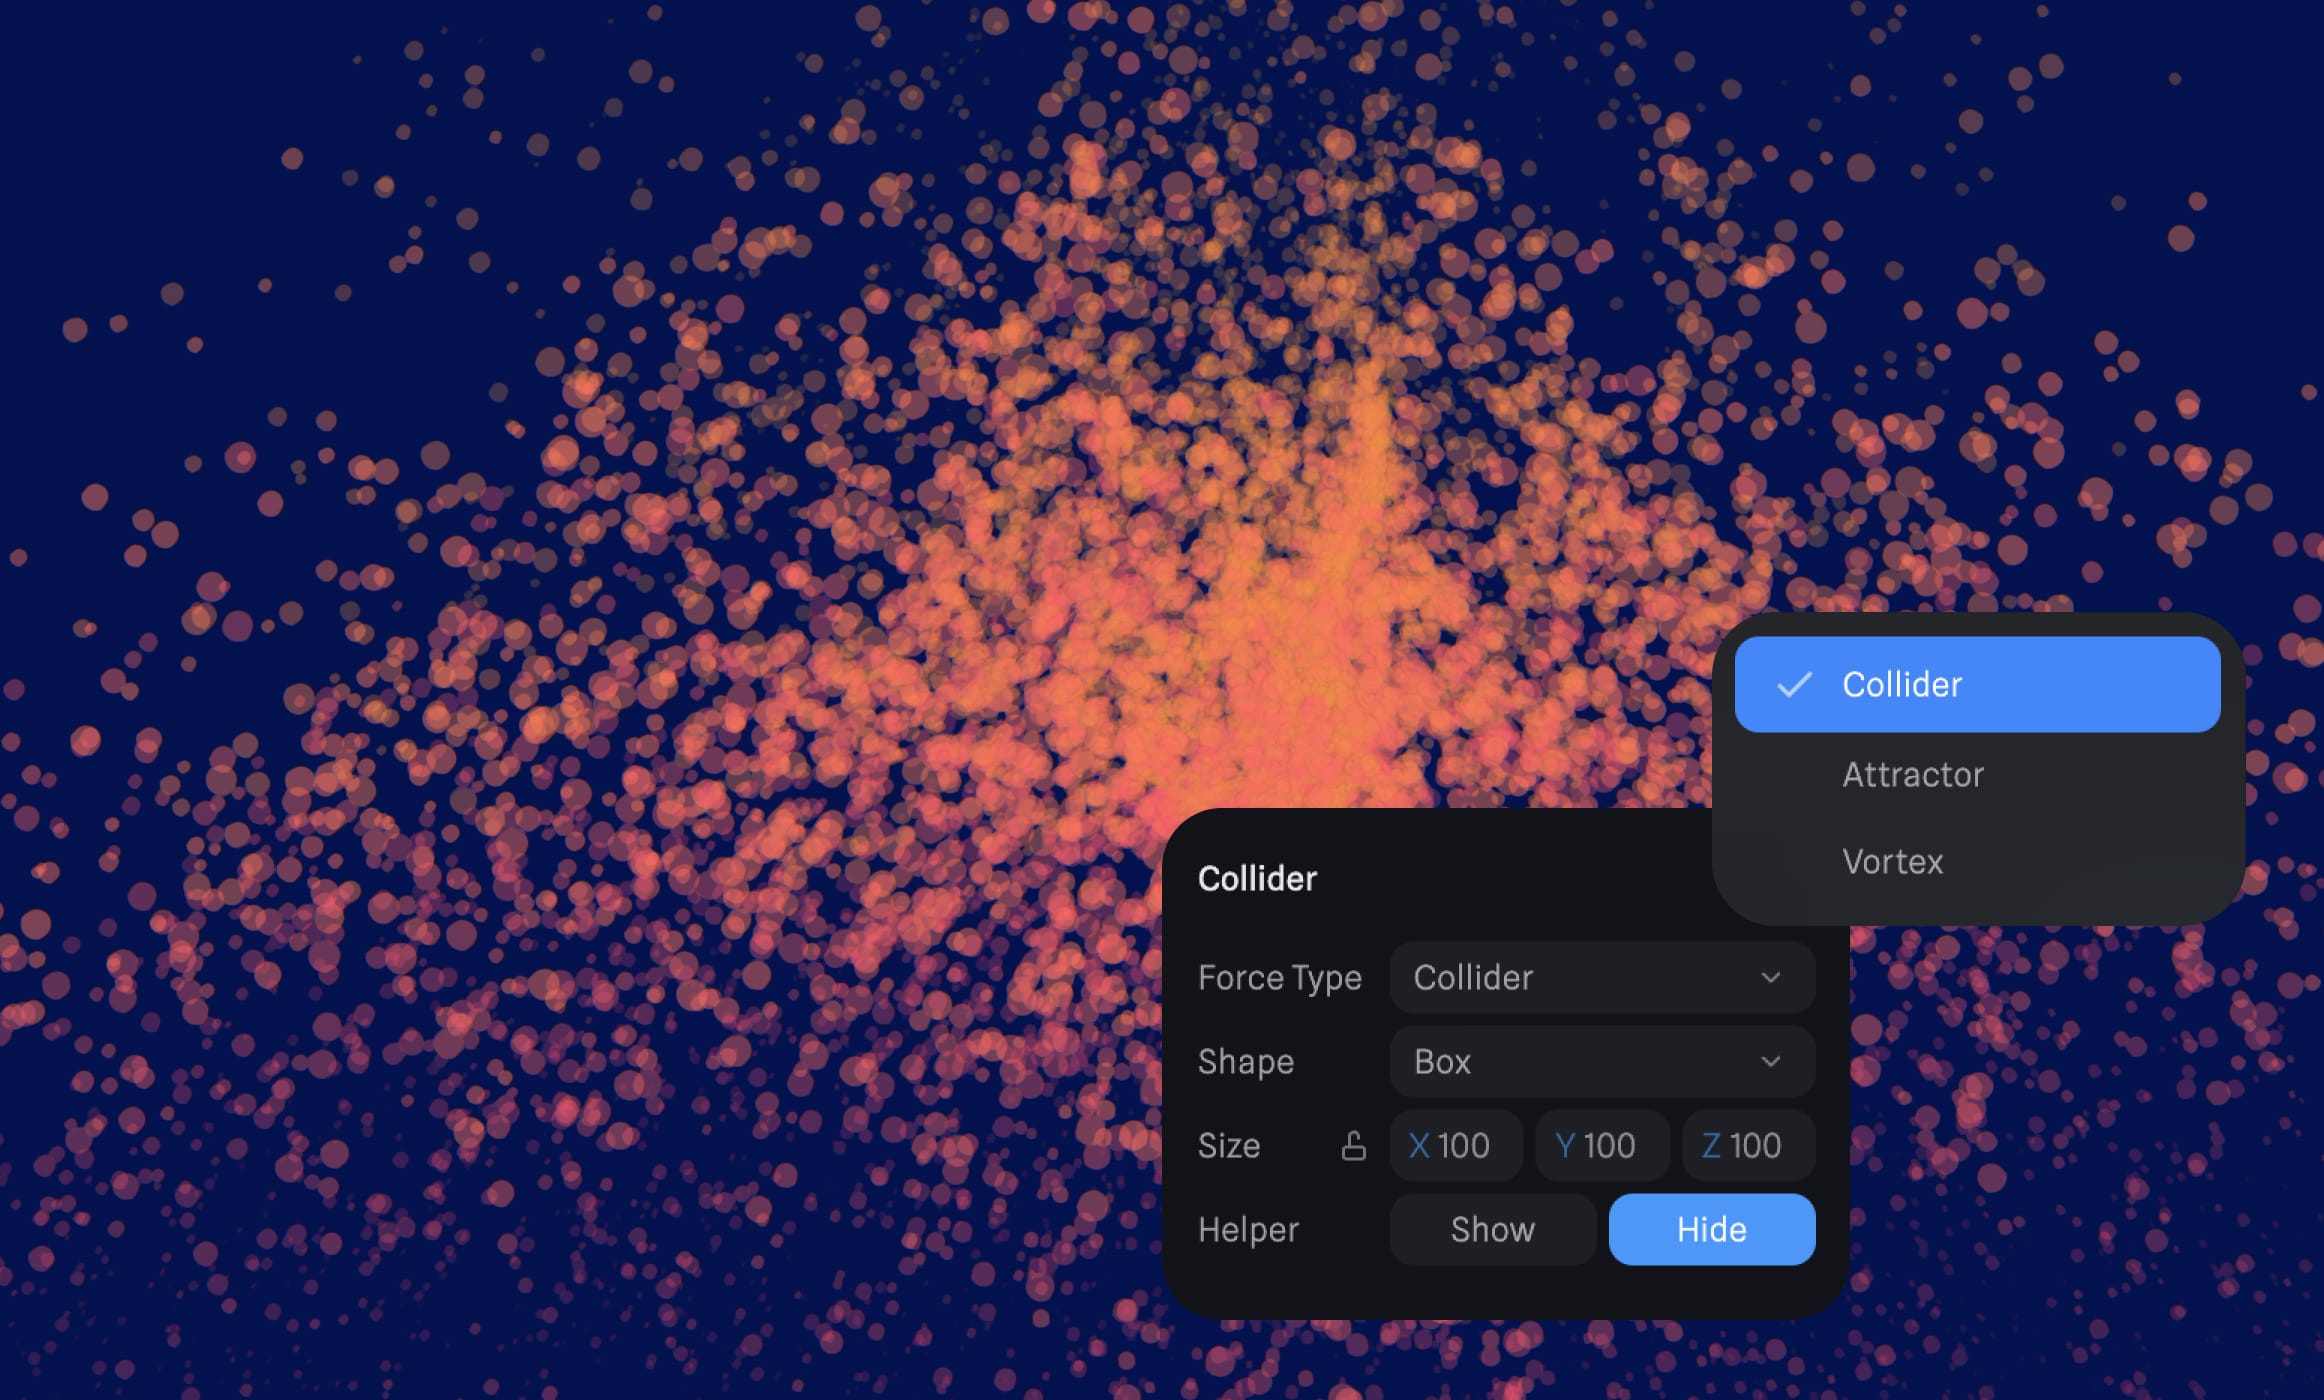
Customizing the Particle Force
Particle Forces in Spline are specialized areas that interact with particles, altering their behavior and movement. After selecting a Particle Force, you can tailor its properties to suit your animation needs. Here's what you can customize:
Force Type
- Collider: Particles will collide with the force area.
- Attractor: Particles will be drawn towards the force area.
- Vortex: Particles within the force area will orbit around its center.
Shape
- Choose between a box or sphere-shaped force area.
Size
- Adjust the size of the force area to control its influence on particles.
Helper
- Toggle the visibility of the viewport helper for the force area, aiding in visualization while editing.
![Particles Animation image 6]() And that's all! By learning how to use particle emitters, forces, and colliders in Spline, you can get creative and make awesome visual effects for your project.
And that's all! By learning how to use particle emitters, forces, and colliders in Spline, you can get creative and make awesome visual effects for your project.
 And that's all! By learning how to use particle emitters, forces, and colliders in Spline, you can get creative and make awesome visual effects for your project.
 ow to create a particle animation with Spline
https://my.spline.design/6pM-3AKYWvku-0b9MNsW5sYd/
Now that you're familiar with the basics, let's dive into a practical exercise. Together, we'll recreate this particle animation step by step.
- Create a new project
- Set the background to black
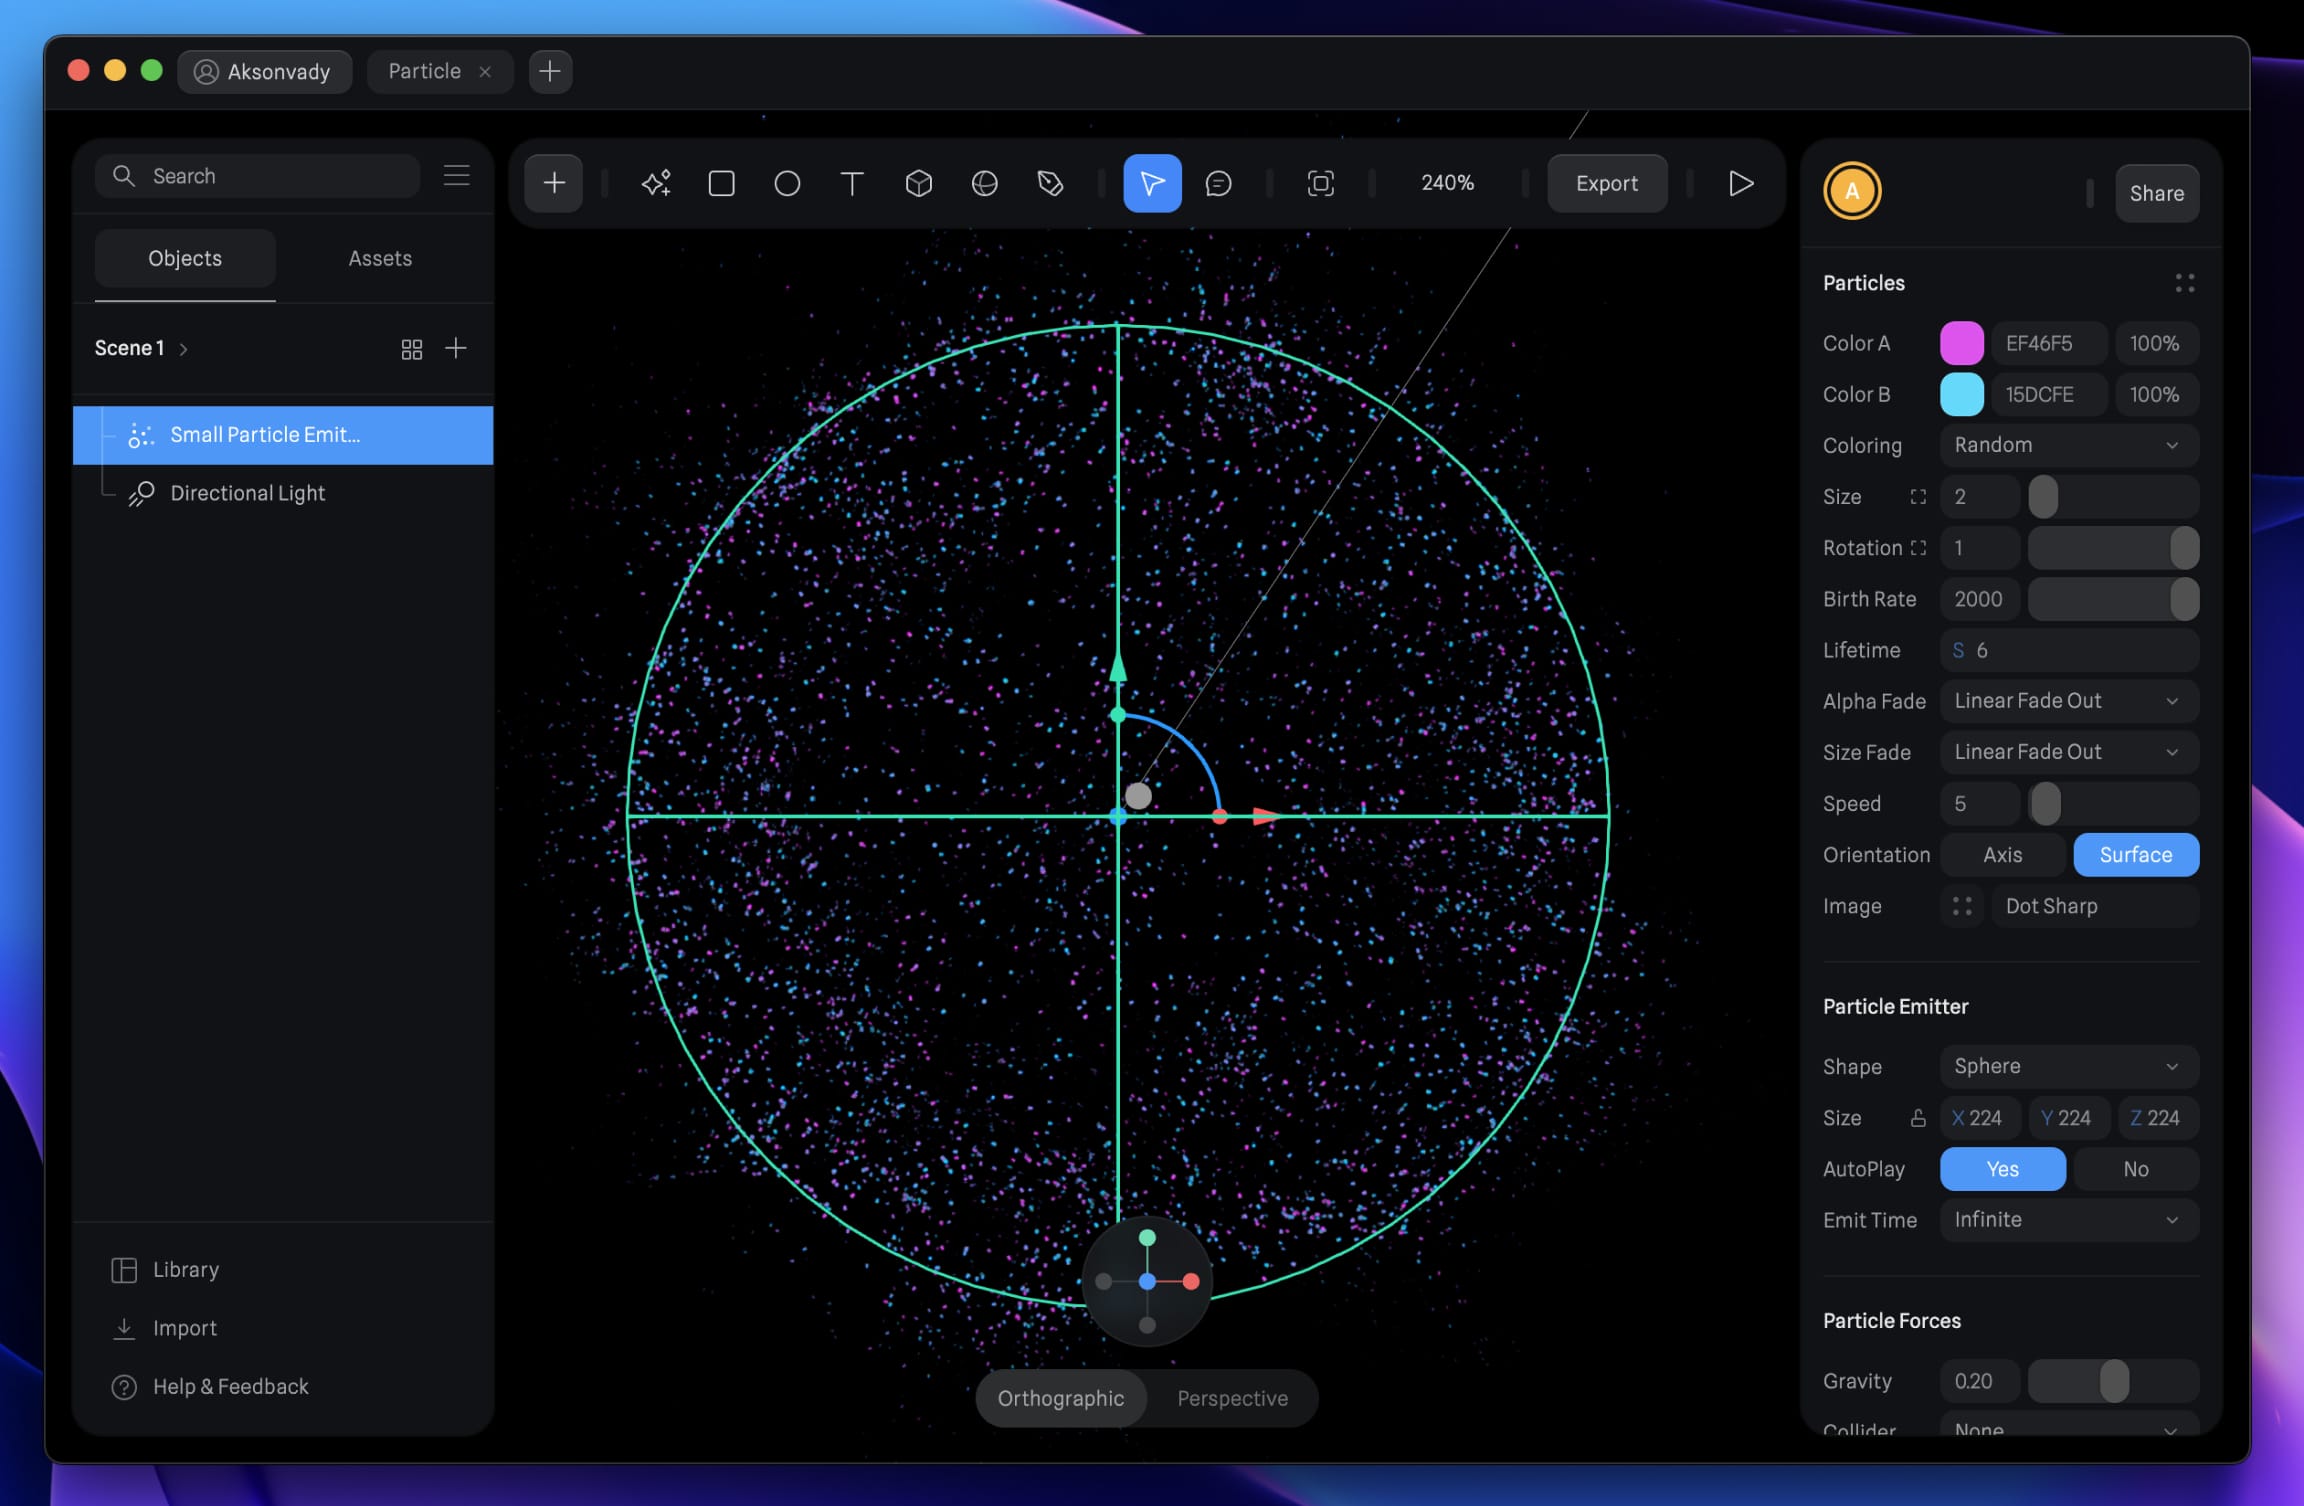
Creating the First Particle Emitter
- Navigate to the toolbar and select "Particle Emitter."
- Rename it to "Small Particle Emitter" and align it to the center (X0 Y0 Z0).
Customizing the Particle Attributes
Add the following attributes below:
- Color A and Color B: A #EF46F5 B #15DCFE or use color of your choose.
- Coloring Modes: Select 'Random'.
- Size: Adjust the size 2.
- Rotation: Set to 1.
- Birth Rate: Adjust to 2000.
- Lifetime: set to 6.
- Fading: Set up alpha and size fading to Linear Fade Out.
- Speed: Set to 5.
- Orientation: Choose Surface.
- Image: Utilize Dot Sharp, or any desired image.
Customizing the Particle Emitter
We'll choose a sphere or any shape you prefer, such as a patch, text, or any other shape available.
- Shape: Choose "Sphere".
- Size: Set all dimensions to 224.
- Autoplay: Enable.
- Emit Time: Select "Infinite".
Customizing the Particle Force
Adjust the particle force:
- Gravity: Set to 0.20.
- Collider: By default, it's set to none.
Customizing the Particle Noise
Modify the particle noise settings:
- Type: Select "Curl".
- Scale: Slide to 6.
- Variation: Slide to 10.
- Seed: Set to 100.
Customizing the Particle Randomness
Finally, customize particle randomness:
- Scale: Set to 0.
- Rotation: Set to 0.
- Mass: Set to 1.
You've done it! Here's the result of the small Particle Emitter.
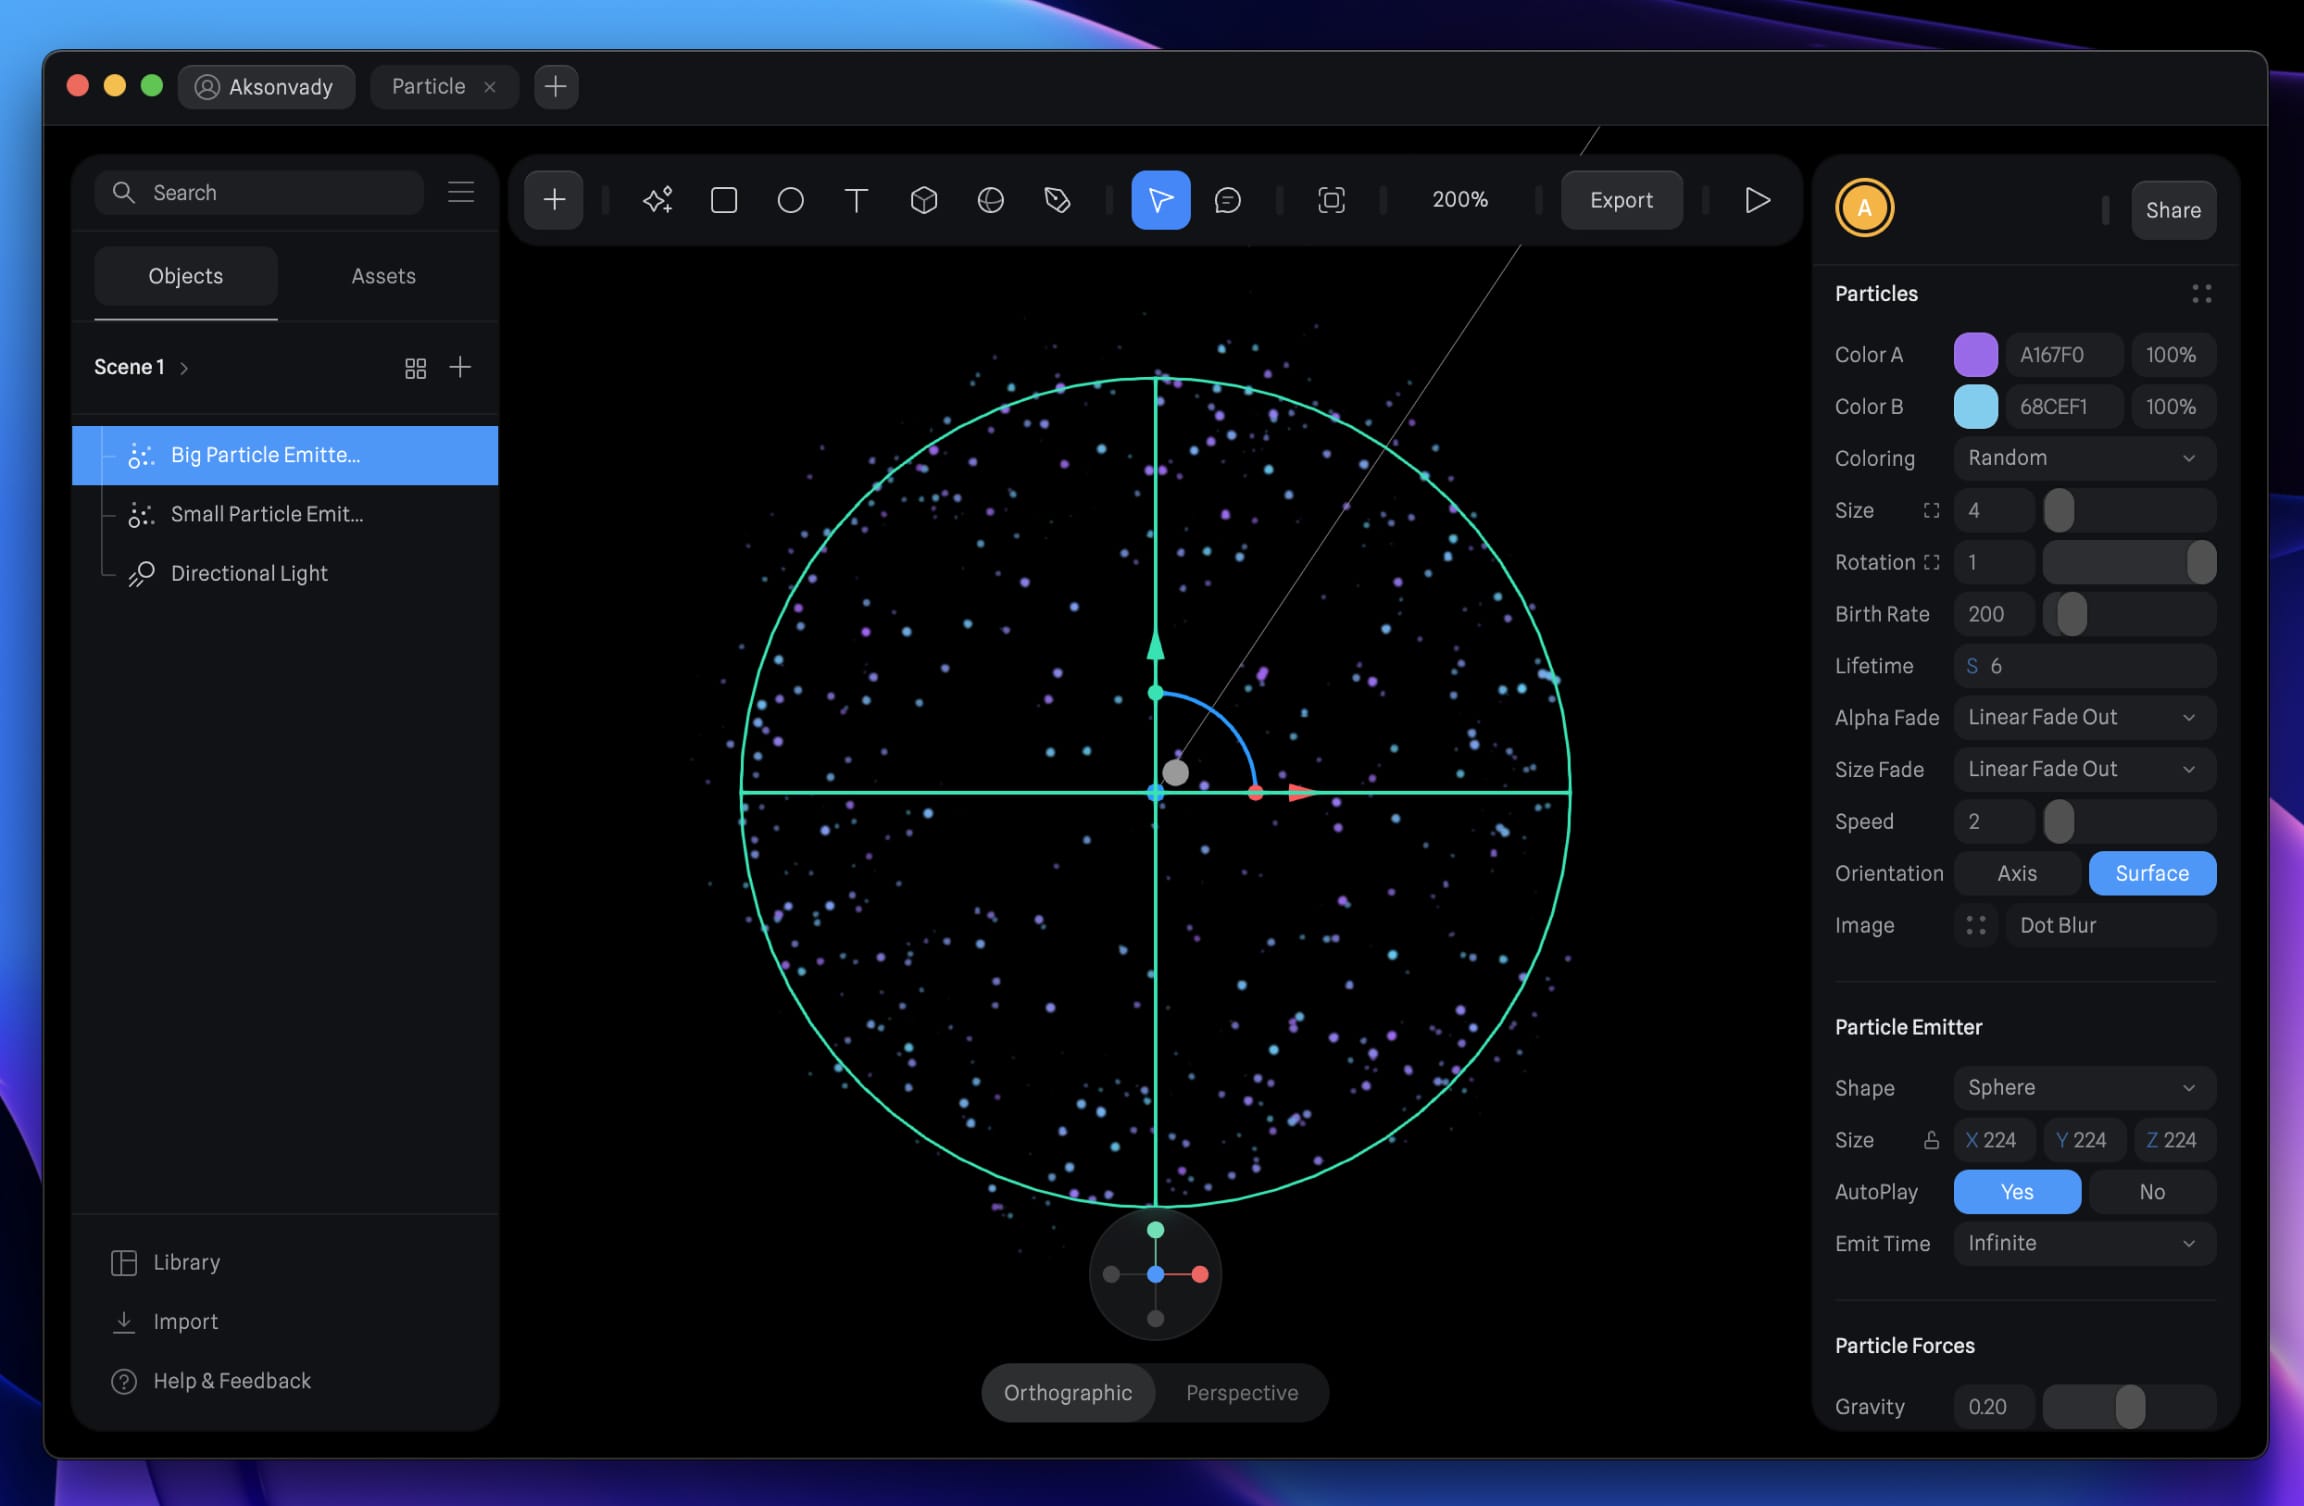
Create a Second Particles Emitter
We are going to duplicate the first particle emitter and change some of the settings. Before that let’s rename it to Big Particle Emitter.
Particle Attributes
Add the following attributes below:
- Color A and Color B: A #A167F0 B # 68CEF1 or Use color of your choose
- Coloring Modes: choose 'Random'
- Size: Adjust the size 4.
- Rotation: Set to 1.
- Birth Rate: set to 200.
- Lifetime: set to 6.
- Fading: Set up alpha and size fading to Linear Fade Out.
- Speed: Set to 2.
- Orientation: Set it to Surface.
- Image: Dot Blur
Customizing the Particle Emitter
Now, let's customize the particle emitter shape:
- Shape: Choose "Sphere".
- Size: Set all dimensions to 224.
- Autoplay: Enable.
- Emit Time: Select "Infinite".
Customizing the Particle Force
Adjust the particle force:
- Gravity: Set to 0.20.
- Collider: By default, it's set to none.
Customizing the Particle Noise
- Type: Select Curl
- Scale: Slide yo 6
- Variation: Slide to 10
- Seed:Set to 100
Customizing the Particle Randomness
Finally, customize particle randomness:
- Scale: Set it 0
- Rotation: Set it 0
- Mass: Set it to 1
Well done! You've successfully created the big Particle Emitter.
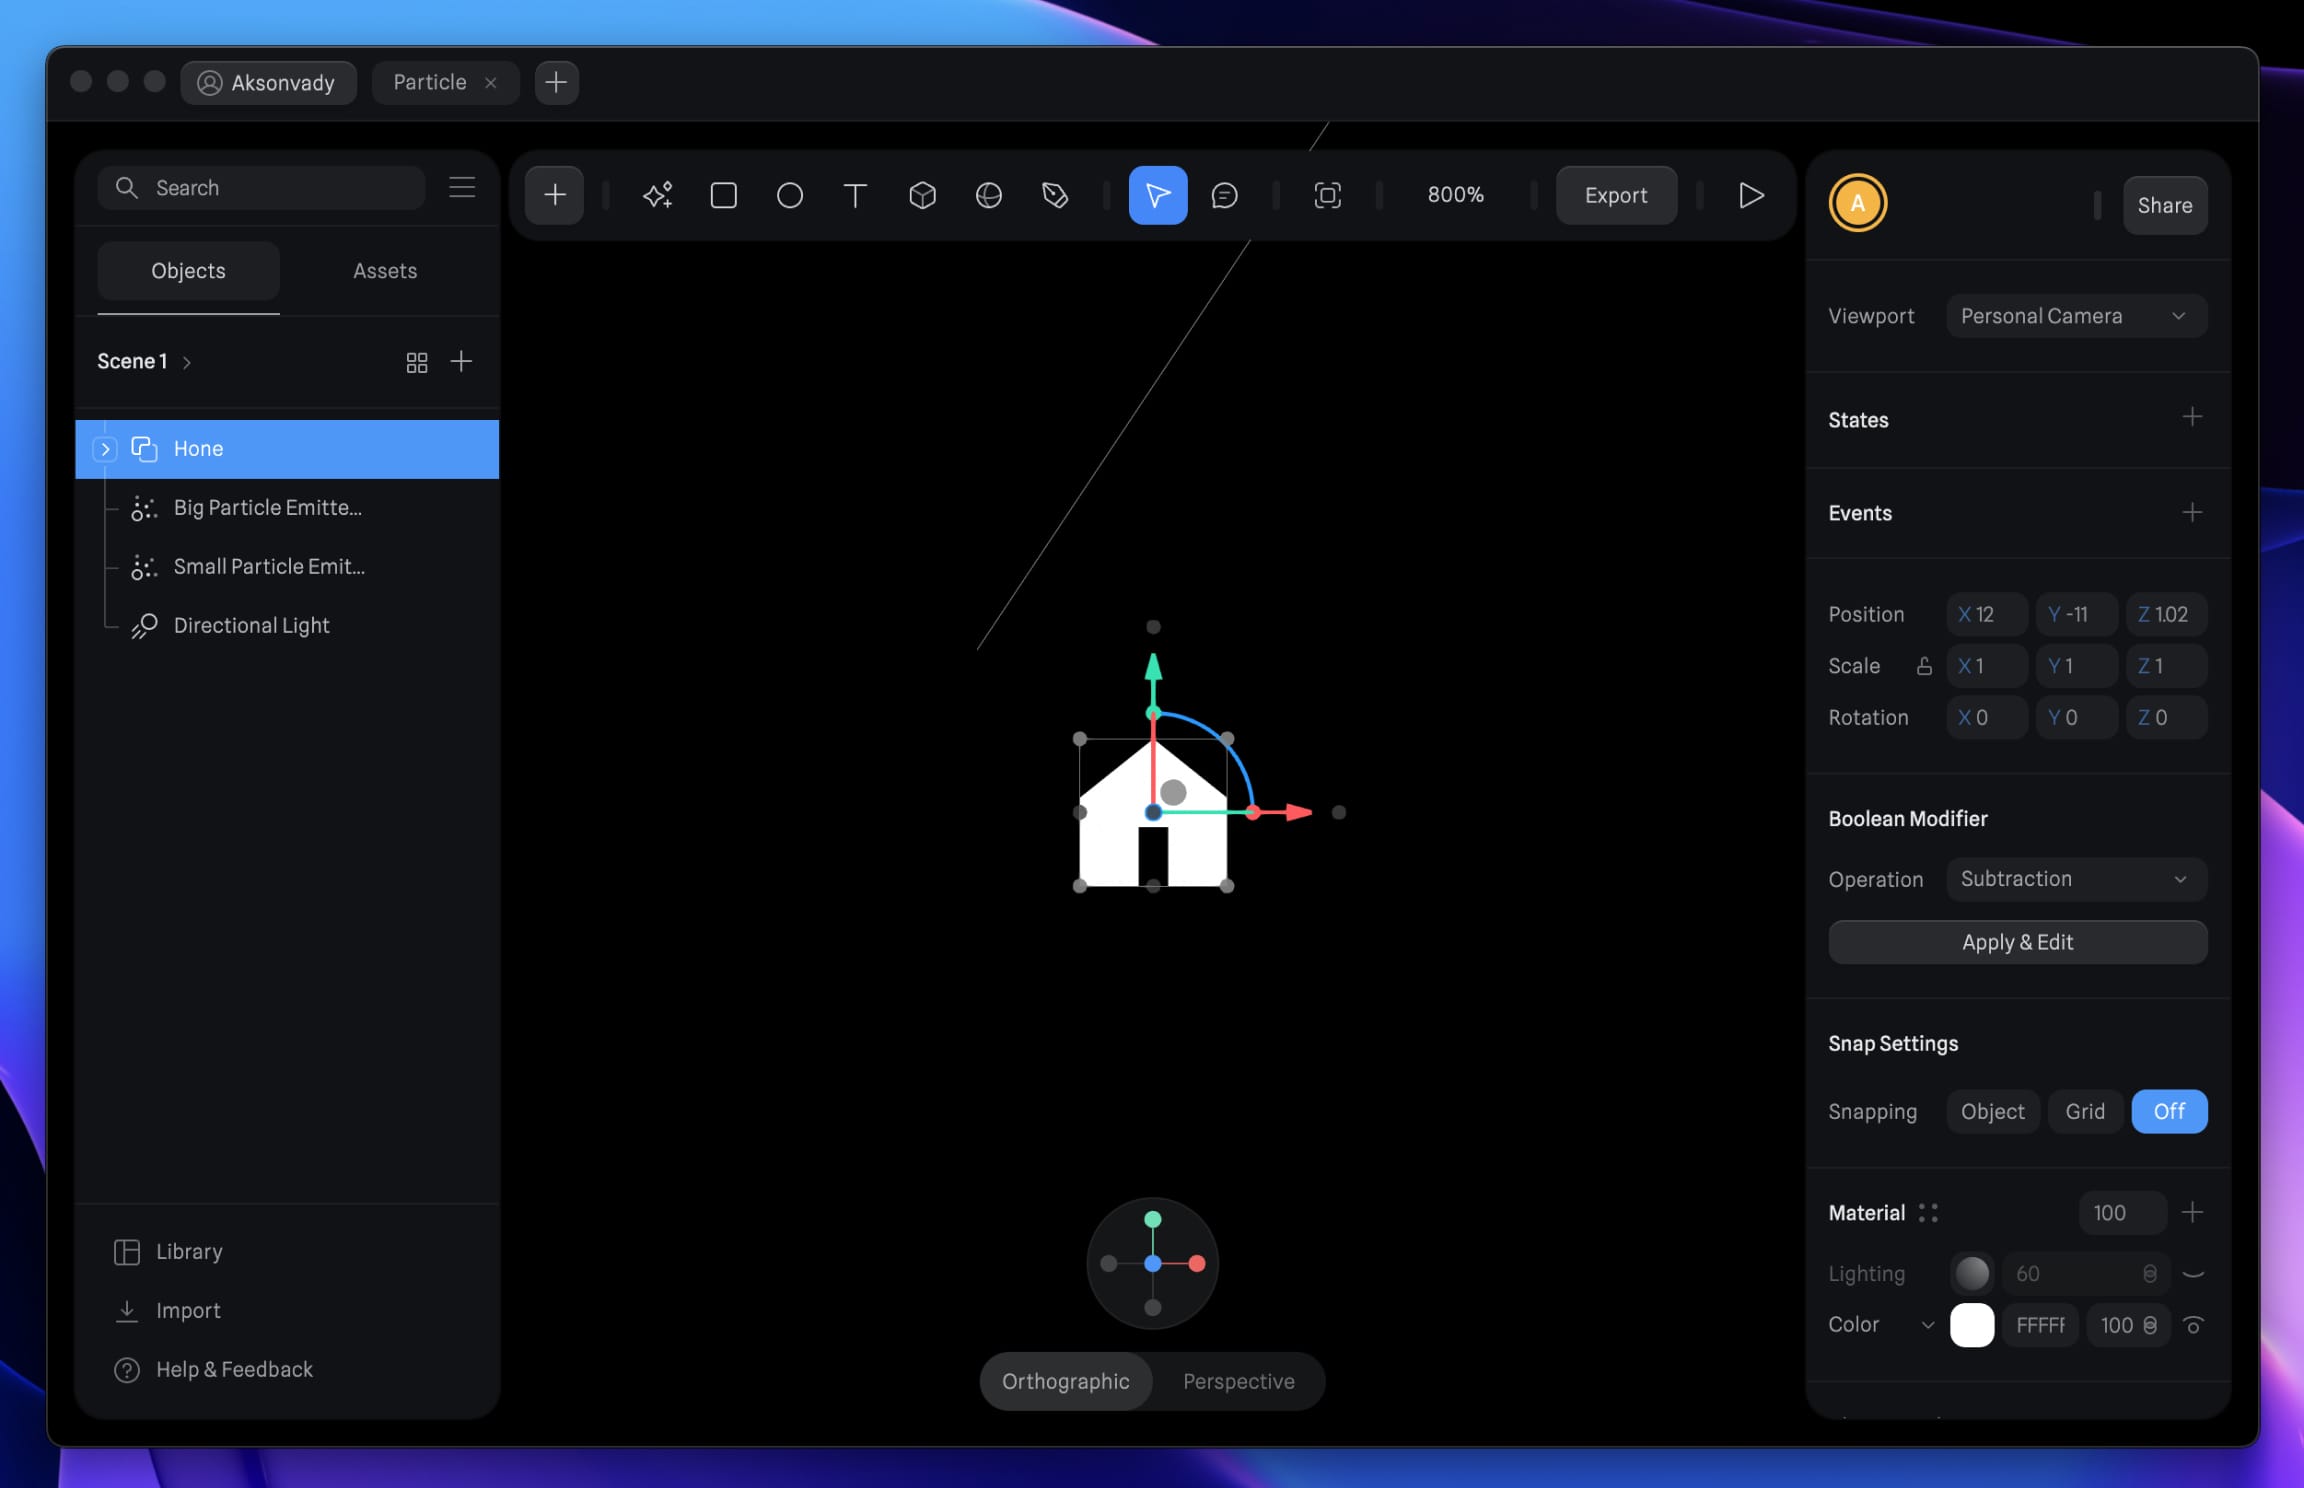
Custom Shape
Let’s customize the particle emitter shape to a custom object. This can be any shape you like, such as a icon, sphere, a patch, text, or any other shape available.
Import the SVG Icon
- Click on the Import button at the bottom left of the Spline App.
- Select SVG and locate your image, then click Open.
- Position the icon at the center and resize it to your preference.
![Particles Animation image 3]()
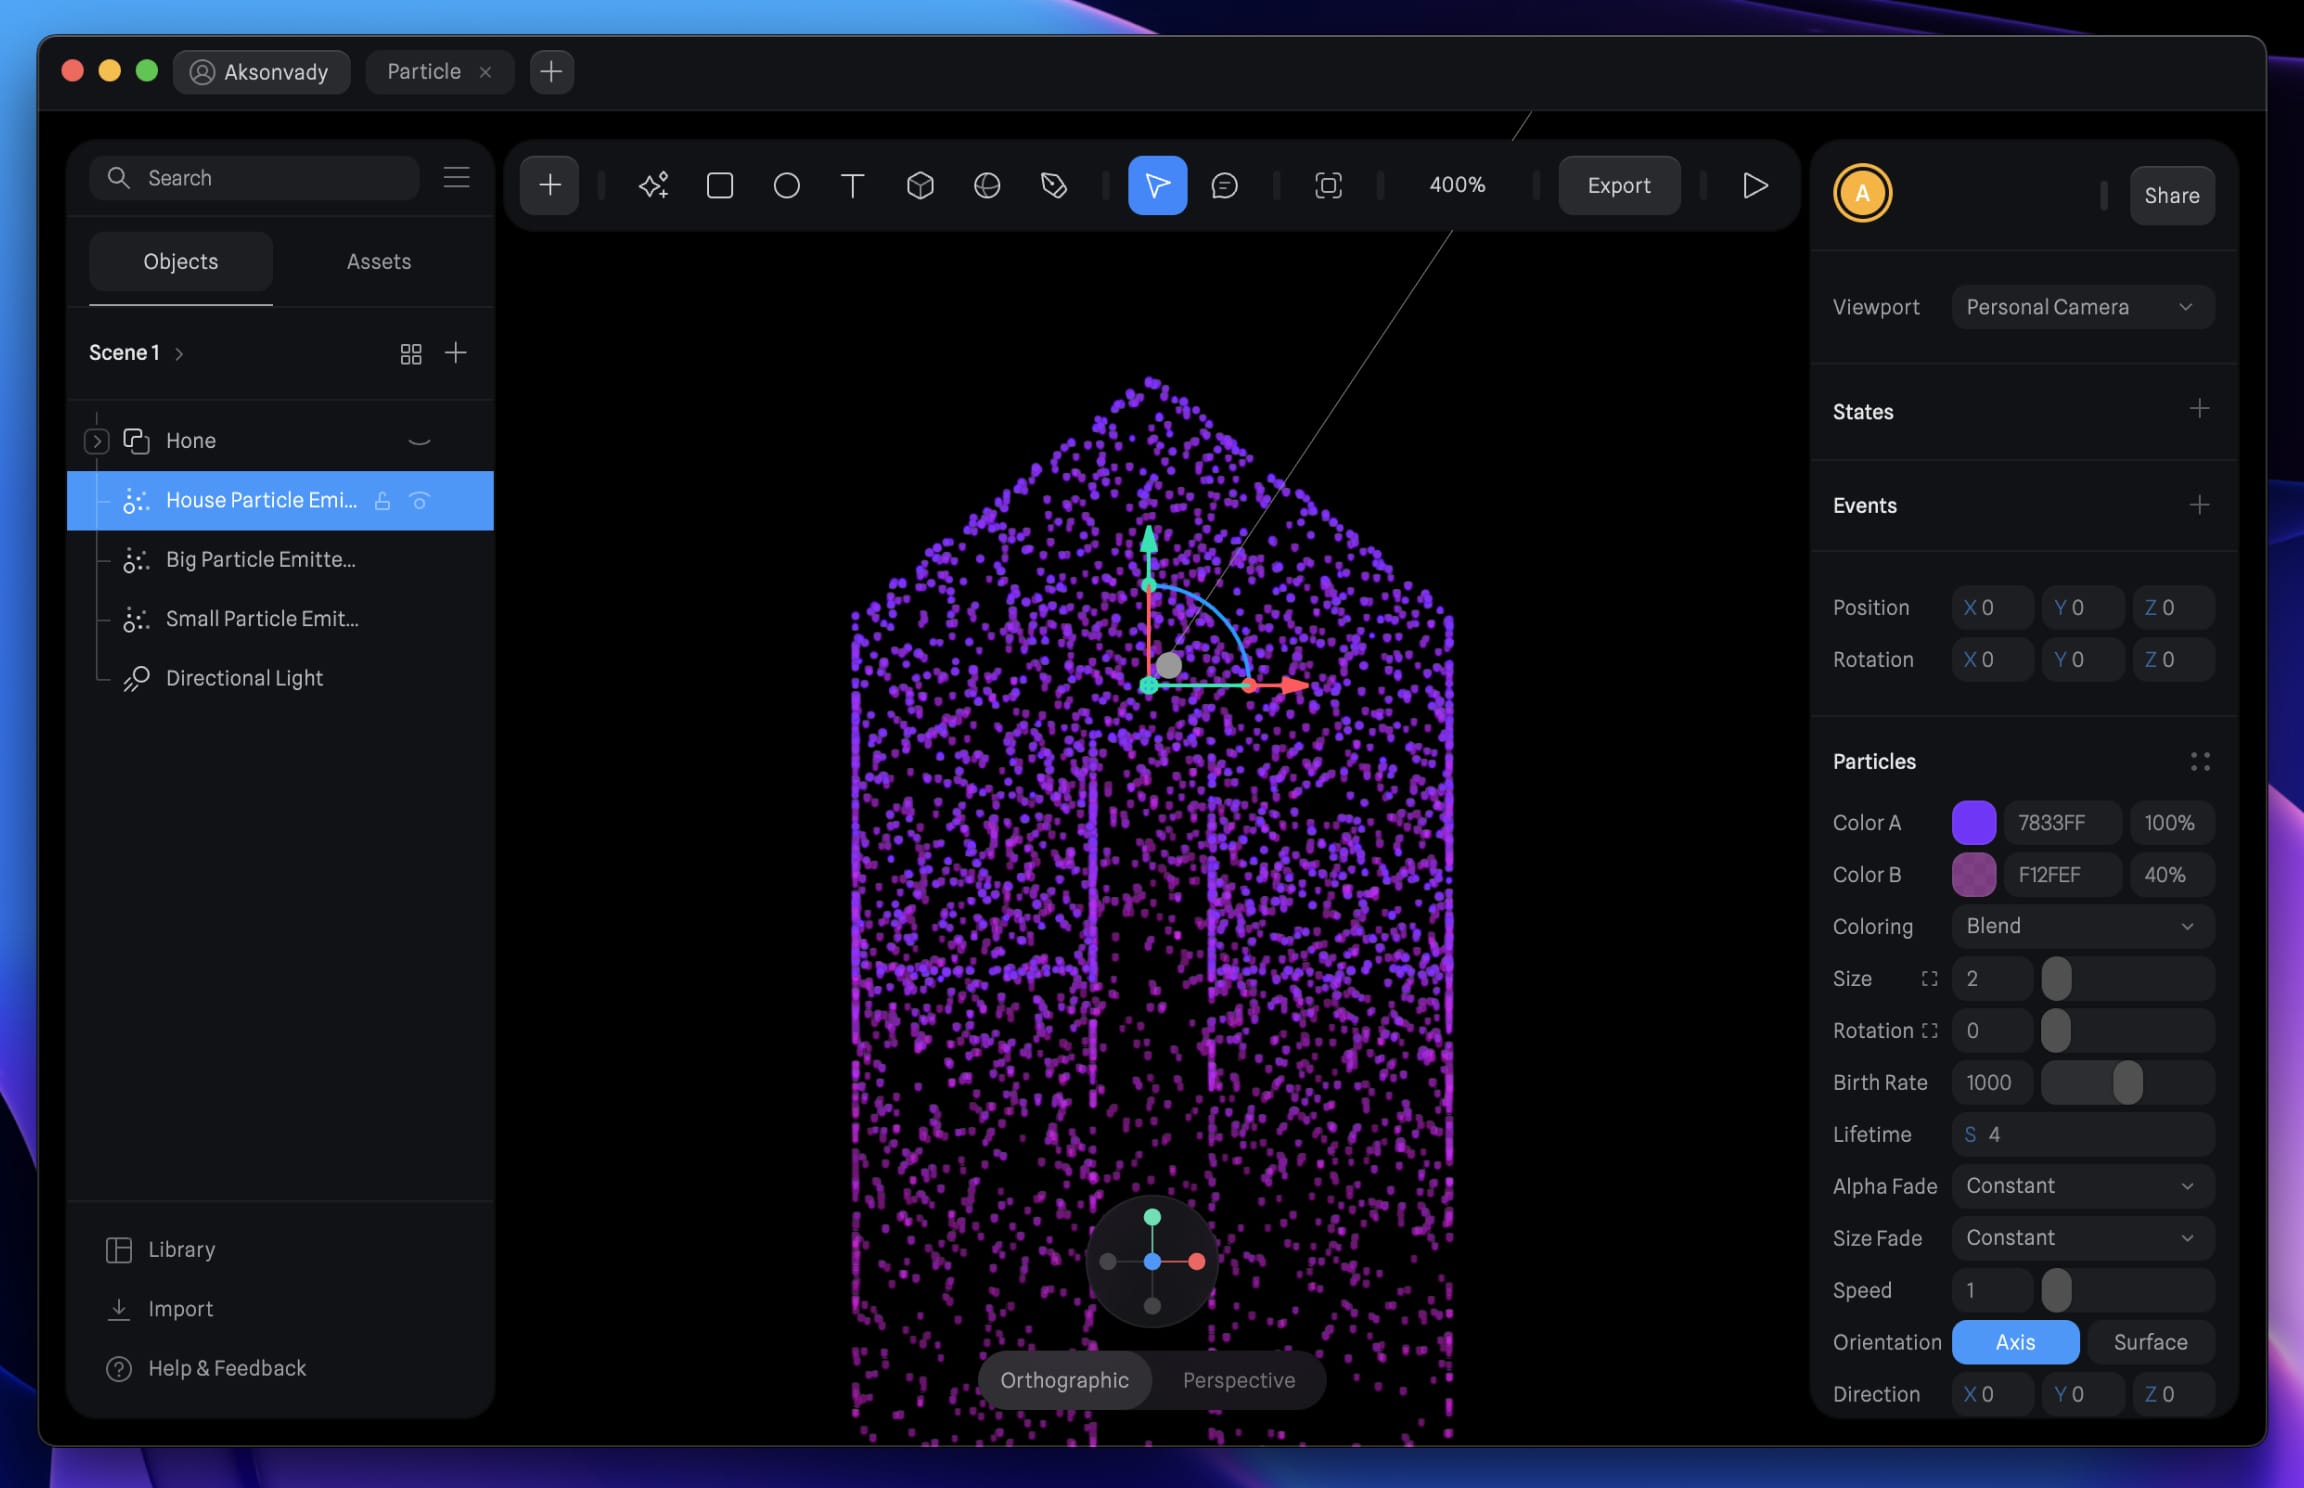
Create a Particle Emitter for the Icon
- Navigate to the toolbar.
- Click on the plus icon.
- Select Particle Emitter.
- Position it at the center.
Particle Attributes
Let's adjust the particle attributes:
- Set Color A and Color B to A #7833FF and B #F12FEF at 40%, or use colors of your choice.
- Choose 'Blend' for Coloring Modes.
- Adjust Size to 2.
- Set Rotation to 0.
- Set Birth Rate to 1000.
- Set Lifetime to 4.
- Set up alpha and size fading to Constant for Fading.
- Set Speed to 1.
- Set Orientation to Axis.
- Utilize Dot Sharp for Image.
Customizing the Particle Emitter
We'll use a custom object:
- Shape: Select Custom Object.
- Object: Choose "Home" or select your desired image.
- Size: Set all dimensions to 8.
- Autoplay: Enable.
- Emit Time: Select "Infinite".
Particle Forces
Adjust the particle forces:
- Gravity: Set to -0.06.
- Collider: Set to none.
Customizing the Particle Noise
Modify the particle noise settings:
- Type: Select Fbm.
- Scale: Slide to 0.
- Variation: Slide to 0.
- Seed: Set to 1.
Customizing the Particle Randomness
Finally, customize particle randomness:
- Scale: Set it to 0.20.
- Rotation: Set it to 0.
- Mass: Set it to 0.50.
Awesome! You've successfully created the custom shape.
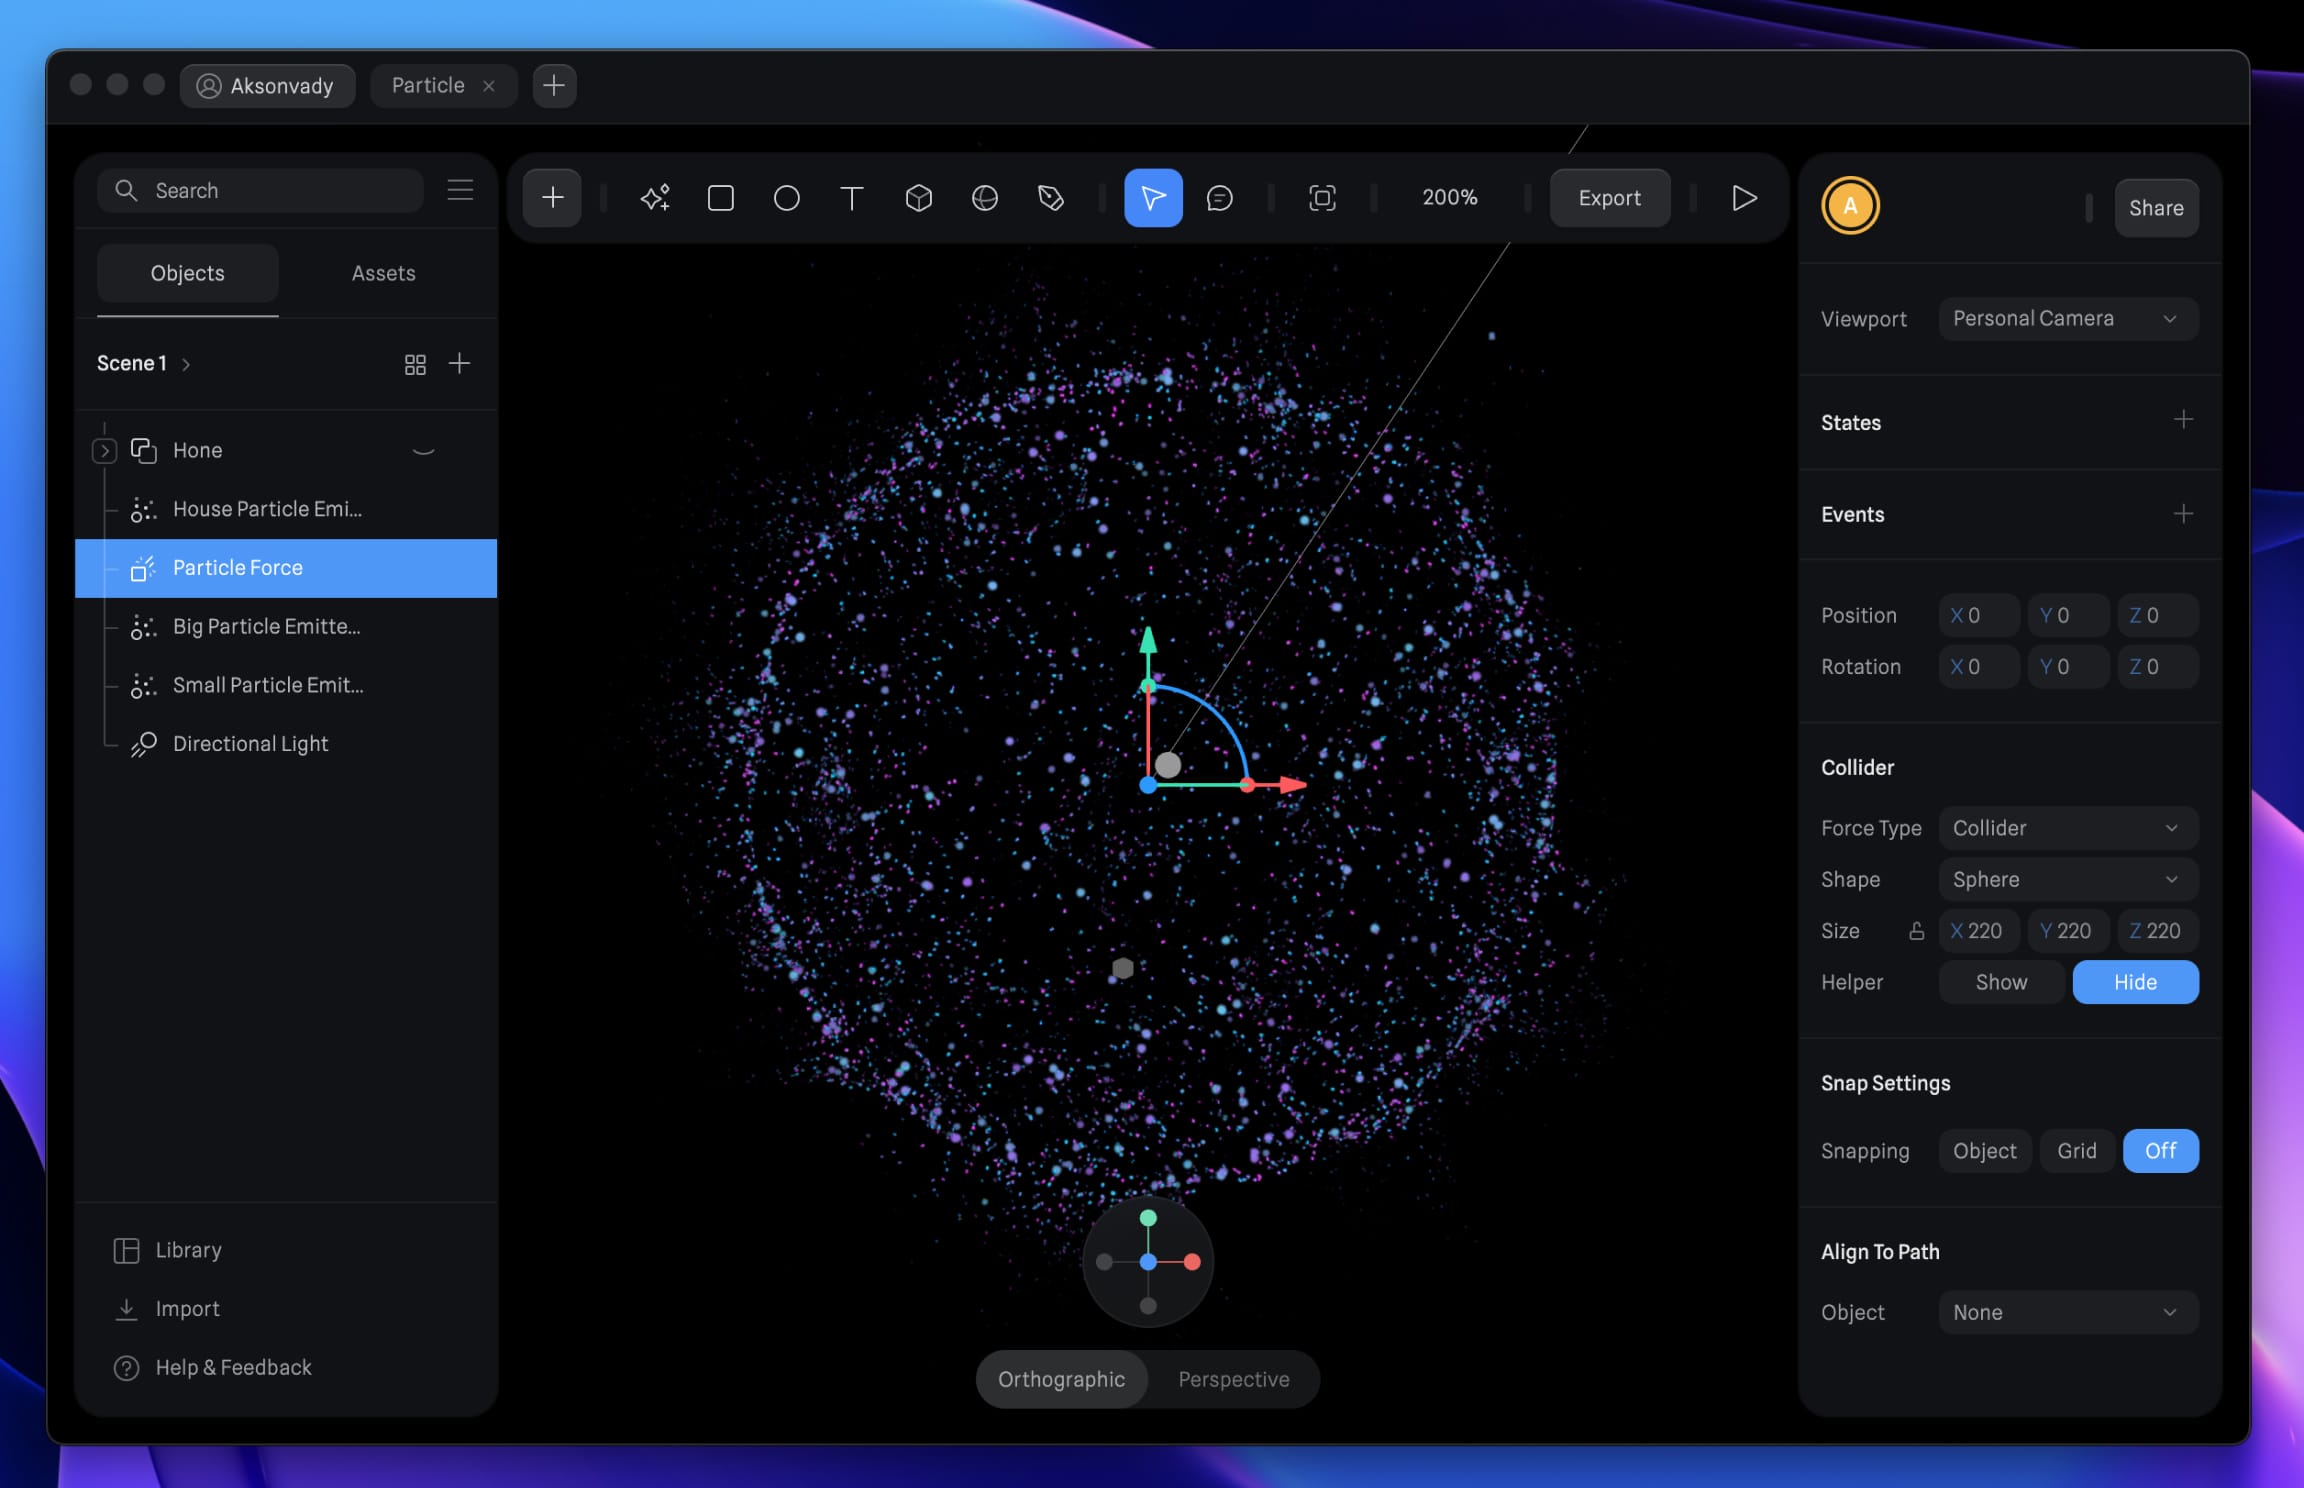
Custom Particle Forces
Next, let's create the particle forces in our scene. Particle Forces are custom areas that interact with particles, altering their behavior.
Create the Particle Forces
- Go to the toolbar.
- Click on the plus icon.
- Select Particle Forces.
- Position it at the center.
Collider Setting
Configure the collider settings as follows:
- Force Type: Collider
- Shape: Sphere
- Size: Set all dimensions to 220
- Helper: Optional setting to show or hide the helper.
- Ensure that the position of the collider is at X0 Y0 Z0.
Here's the outcome of the Particle Forces.
Applying Particle Force to Particle Emitters
How to apply particle force to particle emitter. Here how:
- Select the Small Particle Emitter layer.
- Navigate to the Particle Force panel.
- Choose "Particle Forces" from the dropdown option in the collider row.
- Set Elasticity to 1.
Repeat the same steps for the Big Particle Emitter layer.

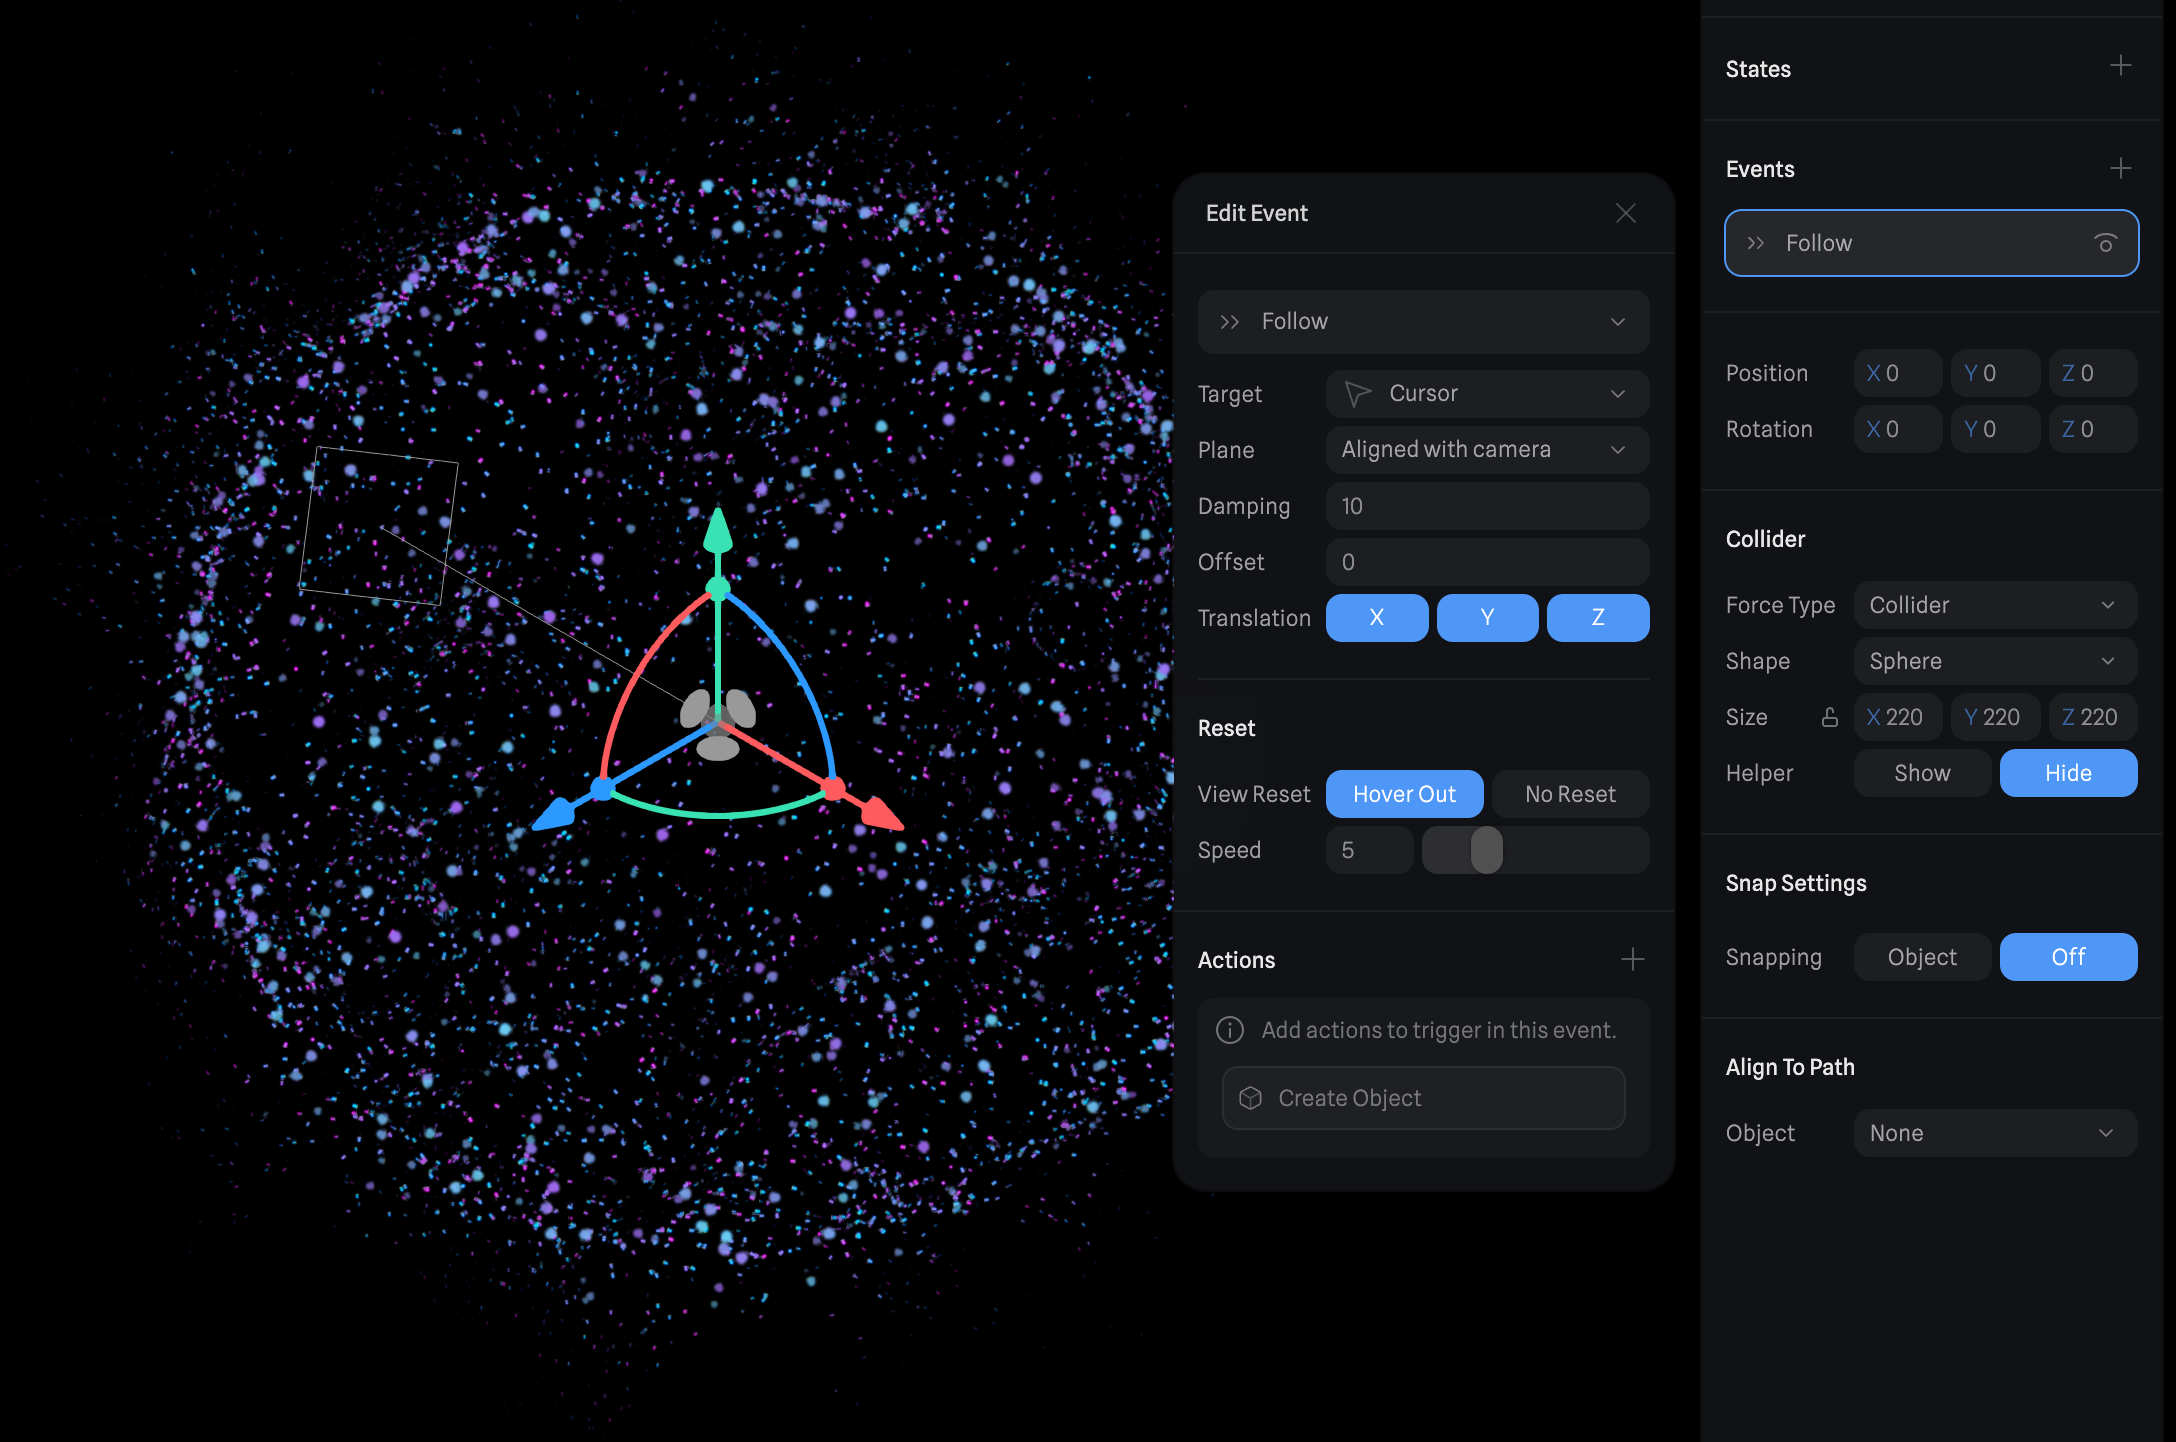
Adding Follow Event to Particle Force
The "Follow" event in Spline enables objects to track or follow other objects within a scene, allowing for dynamic animations and interactive elements.
- Select the Particle Force layer.
- Go to the Events panel.
- Click on the Plus Icon to add a new event.
- Change the event type from "Start" to "Follow."
You can leave the settings at default or experiment with them to achieve different effects.
Animated Turntable Feature
Next up, let's take advantage of the Animated Turntable feature to add a captivating rotation to our scene.
- Go to the Play settings and find the Animated Turntable option.
- Toggle the feature on to activate rotation.
- Adjust the Speed and Direction parameters to control the rotation's speed and direction.
Experiment with these settings to find the perfect spin for your scene.

Conclusion
In short, particles in Spline are like magic for making cool animations. You can use them to create all sorts of effects, like smoke or fire, and add extra detail to your animations. With Spline, it's easy to play around with particles and make your animations look amazing. So, give it a try and see what you can create!
Templates and source code
Download source files
Download the videos and assets to refer and learn offline without interuption.
Design template
Source code for all sections
Video files, ePub and subtitles
Assets
Videos
1
Intro to Spline for iOS and visionOS
Comprehensive 3D Design Course: From Basics to Advanced Techniques for iOS and visionOS using SwiftUI
7:25
2
Basic Shapes in 3D Smart Home
Transforming simple shapes into a 3D base for a house model scene
10:12
3
Materials, Lights and Effects
Enhance your 3D scene by incorporating elements from the lore ibrary and adding materials and lighting to add realism
12:11
4
Camera Animation and States
Creating dynamic scenes with the addition of animations
7:05
5
3D Thermostat and Cloner
Learn how to design a thermostat interface with basic shapes
14:38
6
Buttons and Components
Creating knobs and buttons elements and turning them to components
8:26
7
Path Animation and Rotation
Animating a Thermostat Interface: A Step-by-Step Guide
7:10
8
Create a 3D iOS App Icon
Crafting iOS 3D Icons: A Comprehensive Tutorial
7:09
9
Create a visionOS App Icon
Discover how to design the Photos app icon, enhancing the visual experience in visionOS.
9:53
10
Create 3D UI Scene
Learn how to design and implement 2D user interfaces to integrate within 3D scenes, enabling the triggering of actions on any 3D object
9:49
11
Particles Animation
Discover the new particle feature designed to create a range of visual effects like fire, smoke, rain, snow, and other dynamic phenomena
20:30
12
Export to SwiftUI Project
Crafting Stunning 3D Experiences: A Step-by-Step Guide with Spline for iOS Apps
16:20
Meet the instructor
We all try to be consistent with our way of teaching step-by-step, providing source files and prioritizing design in our courses.
Akson Phomhome
UI Designer
Designer at Design+Code.
13 courses - 60 hours
AI Design with Ideogram
Meet Ideogram, an AI-powered image generation tool that takes your ideas and transforms them into stunning visuals. Whether you're a designer, marketer, or just a visual enthusiast, Ideogram simplifies the creative process. In this guide, we’ll walk you through step-by-step instructions to create beautiful logos, social media posts, and more.
1 hrs
Build a SwiftUI app with Claude AI
This comprehensive SwiftUI course combines cutting-edge AI assistance with hands-on development, guiding you through the process of transforming Figma designs into fully functional iOS applications. Leveraging Claude 3.5 Sonnet, you'll learn to efficiently generate and refine SwiftUI code, create reusable components, and implement advanced features like animations and responsive layouts.
9 hrs
Prototype and Code iOS apps in Figma and SwiftUI
Welcome to our course on designing a sleek wallet interface with Figma! You’ll learn to create a visually appealing and functional wallet interface using DesignCode and Apple UI Kits. Master prototyping, swipe gestures, carousel animations, overlays, and reusable components. Plus, explore a Figma plugin to easily transition from design to SwiftUI. By the end, you’ll create dynamic, user-friendly prototypes.
3 hrs
Create 3D UI for iOS and visionOS in Spline
Comprehensive 3D Design Course: From Basics to Advanced Techniques for iOS and visionOS using SwiftUI
3 hrs
3D UI Interactive Web Design with Spline
Learn to create 3D designs and UI interactions such as 3D icons, UI animations, components, variables, screen resize, scrolling interactions, as well as exporting, optimizing, and publishing your 3D assets on websites
3 hrs
Design and Prototype for iOS 17 in Figma
Crafting engaging experiences for iOS 17 and visionOS using the Figma design tool. Learn about Figma's new prototyping features, Dev Mode, variables and auto layout.
6 hrs
Design and Prototype Apps with Midjourney
A comprehensive course on transforming Midjourney concepts into interactive prototypes using essential design techniques and AI tools
8 hrs
Web App Design using Midjourney and Figma
Get UI inspirations from Midjourney and learn UI design, colors, typography as a beginner in Figma
2 hrs
UI Design for iOS 16 in Sketch
A complete guide to designing for iOS 16 with videos, examples and design files
3 hrs
UI Design Android Apps in Figma
Design Android application UIs from scratch using various tricks and techniques in Figma
2 hrs
UI Design Smart Home App in Figma
Design a Smart Home app from scratch using various tricks and techniques in Figma
2 hrs
UI Design Quick Apps in Figma
Design application UIs from scratch using various tricks and techniques in Figma
12 hrs
Figma Handbook
A comprehensive guide to the best tips and tricks in Figma. Not affiliated with or endorsed by Figma, Inc.
6 hrs