Basic Shapes in 3D Smart Home
Add to favorites
Transforming simple shapes into a 3D base for a house model scene
Play video
Create 3D UI for iOS and visionOS in Spline
1
Intro to Spline for iOS and visionOS
7:25
2
Basic Shapes in 3D Smart Home
10:12
3
Materials, Lights and Effects
12:11
4
Camera Animation and States
7:05
5
3D Thermostat and Cloner
14:38
6
Buttons and Components
8:26
7
Path Animation and Rotation
7:10
8
Create a 3D iOS App Icon
7:09
9
Create a visionOS App Icon
9:53
10
Create 3D UI Scene
9:49
11
Particles Animation
20:30
12
Export to SwiftUI Project
16:20
https://my.spline.design/smarthomepractice-93a9ad45250055a917090060c429bbd1/
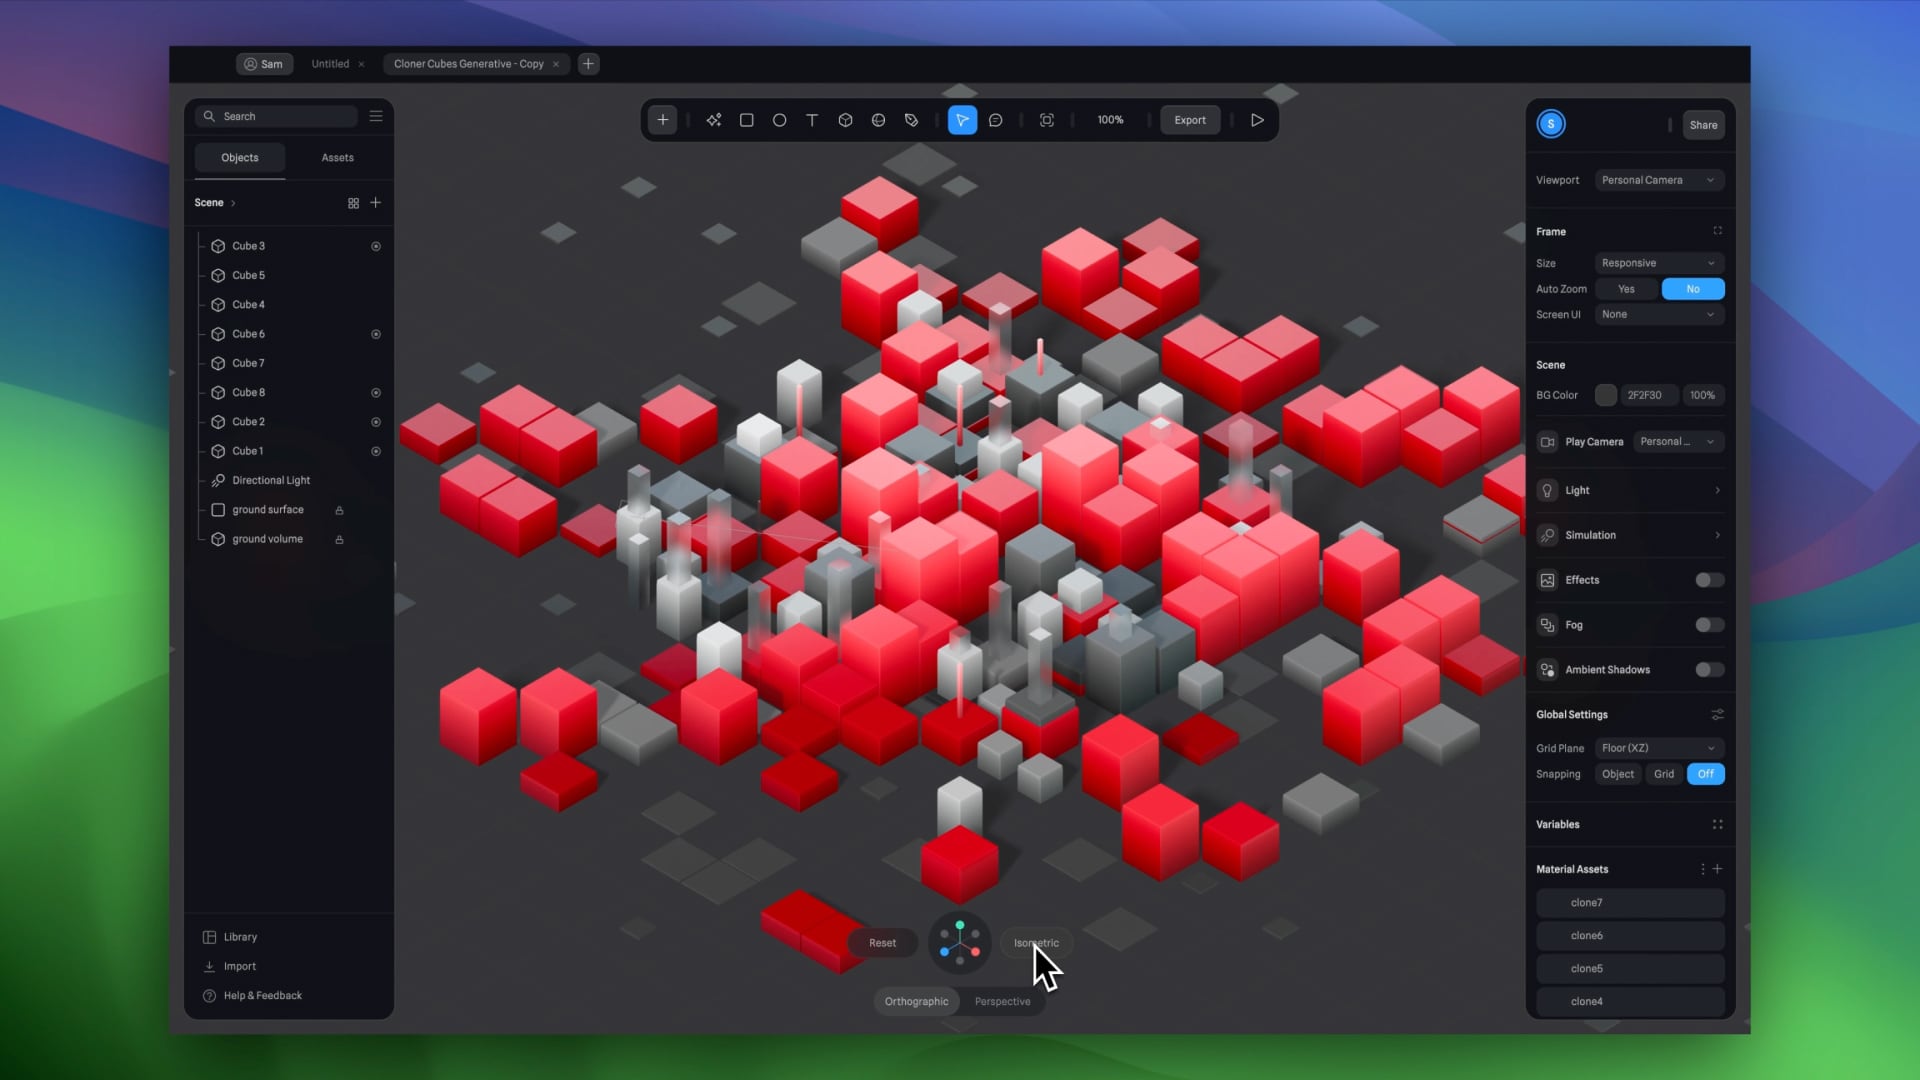
Editor Overview
Spline’s user interface is designed to be intuitive, facilitating a seamless design process for both beginners and advanced users. Key features include a toolbar for accessing common objects and tools, a viewport for interacting with your 3D scene, and panels for properties and layers that allow for detailed modifications.

Left Sidebar
Displays the layers or objects within your scene. By switching to the 'Assets' view, users can access the asset browser and manage the team library. You can import these multiples type of files on Spline.
 Library offers two categories of complimentary 3D models: Scenes and Objects.
- 3D Scenes: These are complete environments built within Spline, intended to inspire and serve as educational tools. By exploring these scenes, users can learn about achieving specific material styles, animations, lighting techniques, and more.
- 3D Objects: Designed to expedite the creation process, these objects can be seamlessly integrated into your scenes. They offer flexibility, allowing for customization in terms of colors, materials, and geometry to suit your specific design needs.
Help & Feedback gives access to a variety of useful resources, including links to Spline's social media platforms, ranging from Twitter and YouTube to Instagram. Additionally, it provides access to comprehensive documentation, offering detailed insights into the functionality of their tools. Lastly, you have the opportunity to explore a wide range of tutorials for inspiration and enhanced understanding of the available features.
Toolbar
Designed for efficient access to frequently used features, including objects, transformation options, and specialized modes such as the vector tool or frame mode. It also displays the current zoom level, offers options to export the scene, and enables the transition to presentation mode. To view a list of available objects, click on the '+' icon. The Transform feature, represented by an arrow icon, allows for the movement, scaling, and rotation of an object. Additionally, activate Presentation Mode by pressing the 'Play' icon.
Right Sidebar
Displays the Property Panels, which are designed to allow users to modify properties of either the entire scene or selected objects. Each panel provides a set of options tailored to adjusting specific aspects of the scene or object properties.
Camera Controls
Camera controls are located at the bottom center of the Viewport. To switch between views, click on the axis points. When you hover over the view helper, two additional options are revealed: you can either quickly reset the view of your scene or switch to an Isometric view.
You have the choice between two distinct camera views: Orthographic and Perspective.
- Orthographic view: all angles remain parallel
- Perspective view: angles vary depending on the object's distance from the camera.

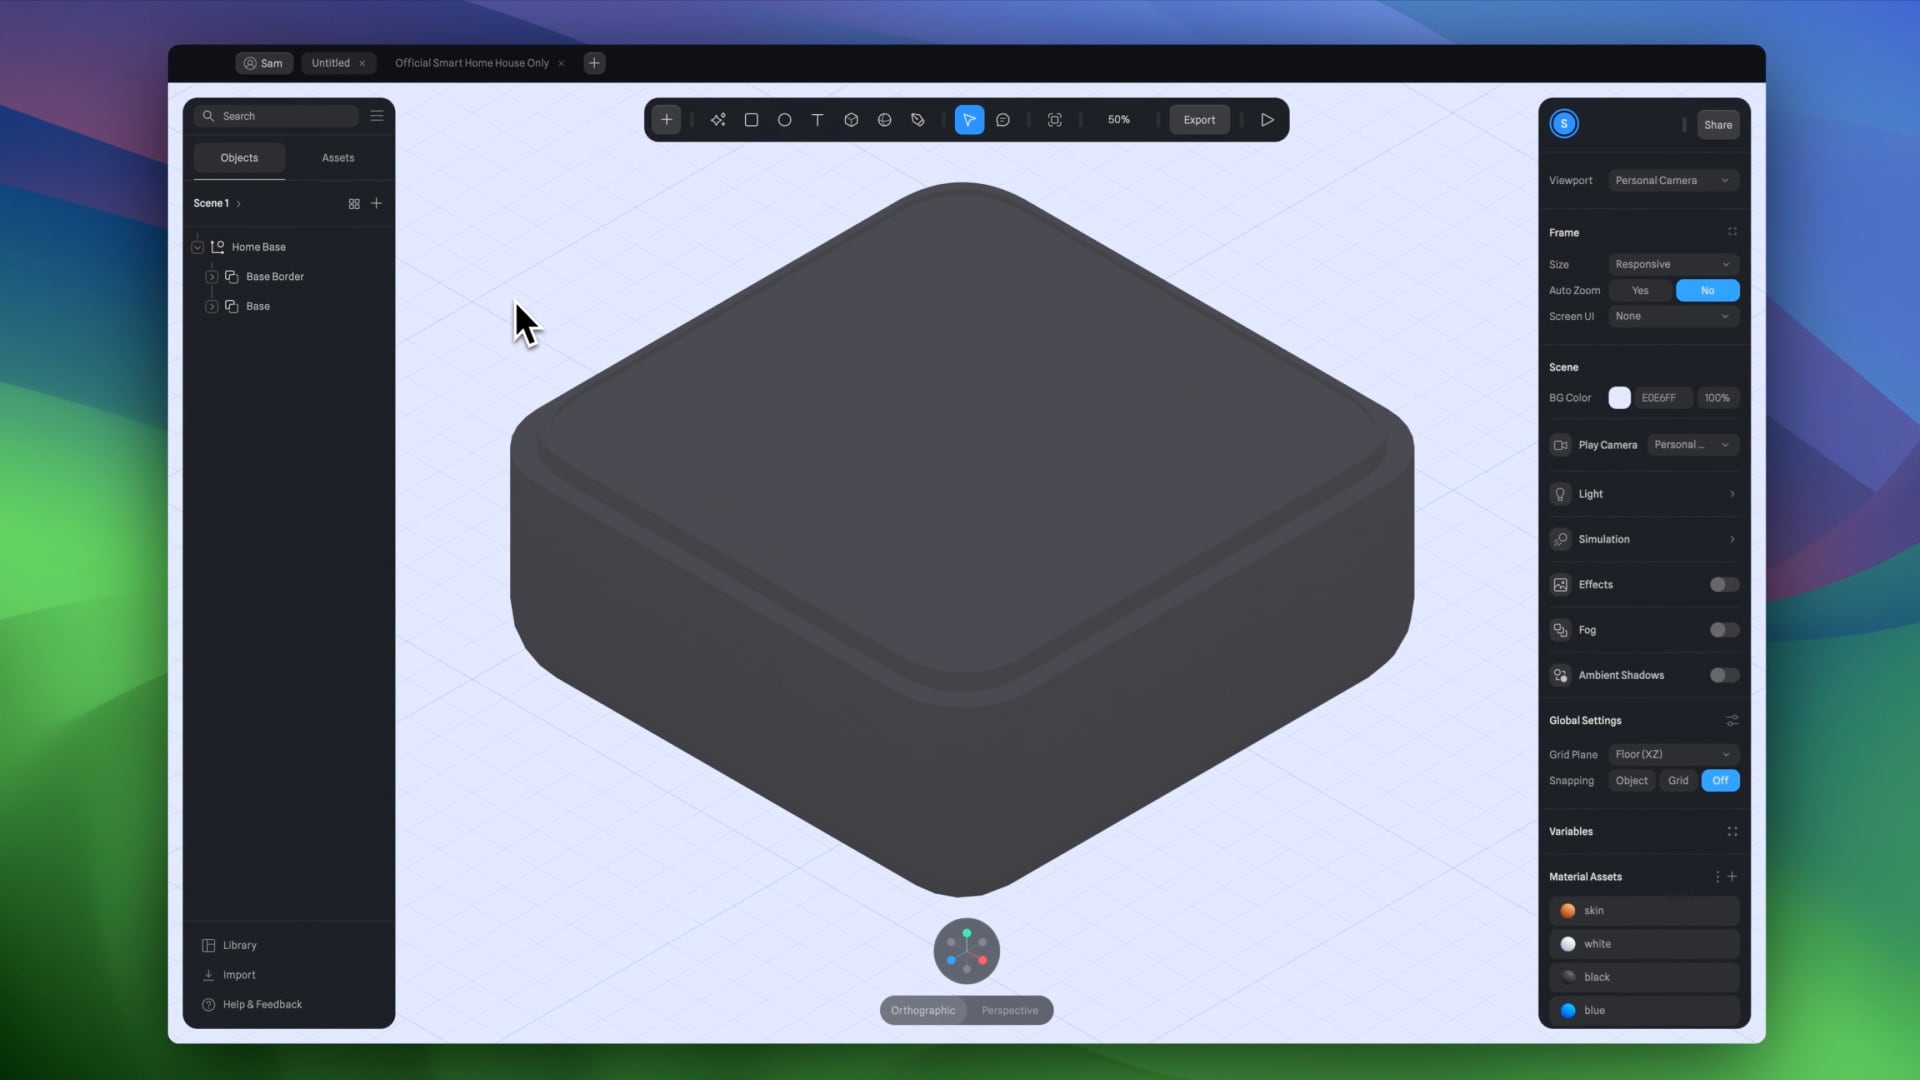
Creating the Base
Starting from scratch, we’ll use basic shapes to form the base of our 3D house model:
- Cube Creation: Start by adding a cube and set its dimensions to X: 1500, Y: 1500, Z: 800, with corners rounded to 200 for a softened edge. Apply a rotation of -90 degrees to both the X and Z axes
- Rectangle Addition: Add a rectangle with dimensions X: 1550 and Y: 1550. This shape will play a crucial role in shaping the base. Add an Extrusion value of 200
- Merging Shapes: Select both shapes and set alignment for the X and Z axis to center, for the Y-axis, select max. With both shapes selected, proceed to apply the Subtract boolean operation. This action will eliminate the overlapping sections from the base object, which is situated on the bottom layer, while the top layer is effectively subtracted from it.

- Border Creation: Add a rectangle with dimensions X: 1400 and Y: 1400 with a corners value to 200. Add an Extrusion value of 60
- Duplicate Shape: To duplicate the shape, hold the Command key, drag the shape to a new position, and then release it to create a copy. Once duplicated, adjust the size of the new shape to 1360
- Merging Border: Ensure that both shapes are centered along the X and Z axes for precise alignment. Apply the Subtract boolean operation. Choose the top shape and drag it along the Y axis towards the bottom. This action will create a depth effect

- Merging Shapes: Select both elements and align them to center on the X and Z axes, and adjust the Y axis to max. Select the top group, which is the border in this case, and slightly drag it upwards along the Y axis. This subtle adjustment makes the border appear as though it is emerging from the base
- Renaming: Rename the bottom group to Base and the top group to Base Border. After selecting both groups, group them together and then rename this new group to House Base

Conclusion
Next, we will enhance our creation by applying various materials, integrating lighting, and incorporating effects. Furthermore, we will proceed to import our house model into the scene.
Templates and source code
Download source files
Download the videos and assets to refer and learn offline without interuption.
Design template
Source code for all sections
Video files, ePub and subtitles
Assets
Videos
1
Intro to Spline for iOS and visionOS
Comprehensive 3D Design Course: From Basics to Advanced Techniques for iOS and visionOS using SwiftUI
7:25
2
Basic Shapes in 3D Smart Home
Transforming simple shapes into a 3D base for a house model scene
10:12
3
Materials, Lights and Effects
Enhance your 3D scene by incorporating elements from the lore ibrary and adding materials and lighting to add realism
12:11
4
Camera Animation and States
Creating dynamic scenes with the addition of animations
7:05
5
3D Thermostat and Cloner
Learn how to design a thermostat interface with basic shapes
14:38
6
Buttons and Components
Creating knobs and buttons elements and turning them to components
8:26
7
Path Animation and Rotation
Animating a Thermostat Interface: A Step-by-Step Guide
7:10
8
Create a 3D iOS App Icon
Crafting iOS 3D Icons: A Comprehensive Tutorial
7:09
9
Create a visionOS App Icon
Discover how to design the Photos app icon, enhancing the visual experience in visionOS.
9:53
10
Create 3D UI Scene
Learn how to design and implement 2D user interfaces to integrate within 3D scenes, enabling the triggering of actions on any 3D object
9:49
11
Particles Animation
Discover the new particle feature designed to create a range of visual effects like fire, smoke, rain, snow, and other dynamic phenomena
20:30
12
Export to SwiftUI Project
Crafting Stunning 3D Experiences: A Step-by-Step Guide with Spline for iOS Apps
16:20
Meet the instructor
We all try to be consistent with our way of teaching step-by-step, providing source files and prioritizing design in our courses.
Akson Phomhome
UI Designer
Designer at Design+Code.
13 courses - 60 hours

AI Design with Ideogram
Meet Ideogram, an AI-powered image generation tool that takes your ideas and transforms them into stunning visuals. Whether you're a designer, marketer, or just a visual enthusiast, Ideogram simplifies the creative process. In this guide, we’ll walk you through step-by-step instructions to create beautiful logos, social media posts, and more.
1 hrs

Build a SwiftUI app with Claude AI
This comprehensive SwiftUI course combines cutting-edge AI assistance with hands-on development, guiding you through the process of transforming Figma designs into fully functional iOS applications. Leveraging Claude 3.5 Sonnet, you'll learn to efficiently generate and refine SwiftUI code, create reusable components, and implement advanced features like animations and responsive layouts.
9 hrs

Prototype and Code iOS apps in Figma and SwiftUI
Welcome to our course on designing a sleek wallet interface with Figma! You’ll learn to create a visually appealing and functional wallet interface using DesignCode and Apple UI Kits. Master prototyping, swipe gestures, carousel animations, overlays, and reusable components. Plus, explore a Figma plugin to easily transition from design to SwiftUI. By the end, you’ll create dynamic, user-friendly prototypes.
3 hrs

Create 3D UI for iOS and visionOS in Spline
Comprehensive 3D Design Course: From Basics to Advanced Techniques for iOS and visionOS using SwiftUI
3 hrs

3D UI Interactive Web Design with Spline
Learn to create 3D designs and UI interactions such as 3D icons, UI animations, components, variables, screen resize, scrolling interactions, as well as exporting, optimizing, and publishing your 3D assets on websites
3 hrs

Design and Prototype for iOS 17 in Figma
Crafting engaging experiences for iOS 17 and visionOS using the Figma design tool. Learn about Figma's new prototyping features, Dev Mode, variables and auto layout.
6 hrs

Design and Prototype Apps with Midjourney
A comprehensive course on transforming Midjourney concepts into interactive prototypes using essential design techniques and AI tools
8 hrs

Web App Design using Midjourney and Figma
Get UI inspirations from Midjourney and learn UI design, colors, typography as a beginner in Figma
2 hrs

UI Design for iOS 16 in Sketch
A complete guide to designing for iOS 16 with videos, examples and design files
3 hrs

UI Design Android Apps in Figma
Design Android application UIs from scratch using various tricks and techniques in Figma
2 hrs

UI Design Smart Home App in Figma
Design a Smart Home app from scratch using various tricks and techniques in Figma
2 hrs

UI Design Quick Apps in Figma
Design application UIs from scratch using various tricks and techniques in Figma
12 hrs

Figma Handbook
A comprehensive guide to the best tips and tricks in Figma. Not affiliated with or endorsed by Figma, Inc.
6 hrs
