
Learn SwiftUI for iOS 13
Add to favorites
Learn how to code custom UIs, animations, gestures and components in Xcode 11
Play video
Build an app with SwiftUI Part 1
1
Learn SwiftUI for iOS 13
11:53
2
Layout and Stacks
22:29
3
Components and Visual Effects 2
23:50
4
Animations and States
9:24
5
Gestures and Events
10:14
6
Timing Curve and Delay Animation
14:17
7
Dismiss and Drag Anchors
14:06
8
SF Symbols and Props
13:31
9
Color Literal, Gradient and Overlay
11:55
10
Animation Between Screens
13:27
11
Drag Progress and Tap Background
7:45
12
Binding and Screen Size
8:22
13
ScrollView and Repeat
11:52
14
Data and Image Literal
13:31
15
3D Scroll Animation
7:39
16
Modal Presentation
7:03
17
Navigation View and List
11:48
18
Navigation Style and Passing Data
9:22
19
Combine and Edit Data
12:39
20
Tab Bar and Test on Device
9:38
This Course
This course is unlike any other. We care about design and want to make sure that you get better at it in the process. It was written for designers and developers who are passionate about collaborating and building real apps for iOS and macOS. While it's not one codebase for all apps, you learn once and can apply the techniques and controls to all platforms with incredible quality, consistency and performance. It's beginner-friendly, but it's also packed with design tricks and efficient workflows for building great user interfaces and interactions.
SwiftUI makes it super easy to animate and add gestures to your app. The code is lightweight and easy to understand, even for newcomers who come from React or Flutter.
Requirements
Minimal coding experience required, such as in HTML and CSS. Please note that Xcode 11 and Catalina are essential. Once you get everything installed, it'll get a lot friendlier! I added a bunch of troubleshoots at the end of this page to help you navigate the issues you might encounter.
States and Animations
Transitions are like Magic Move in Keynote. You only need to set the states and SwiftUI will figure out for you the transition between the two states.
@State var show = true

.onTapGesture {
    self.show.toggle()
}
Animations
SwiftUI provides a number of ways to animate your transitions. They even have their own physics-based built-in functions that allows you to use overshoot and apply bounciness to your animations.
// Linear
.animation(.linear)

// Ease Animation
.animation(.easeInOut(duration: 0.3))

// Animation with Delay
.animation(Animation.easeOut(duration: 0.6).delay(0.1))

// Spring
.animation(.spring())
Stacks
If you're new to stacks in SwiftUI, I suggest using Spacer a lot. By default, views take min size of child elements. This is an image I made to help you understand.

Here are some of the tricks I've learned while using Stacks in SwiftUI.
// Stack views vertically and take full height
VStack {
  Spacer()
}

// Stack views horizontally and take full width
HStack {
  Spacer()
}

// Gap between views
VStack(spacing: 20) {}

// Stack views on top of each other in a Z (depth) unit
ZStack {
    VStack {}
    HStack {}
}

// Take maximum width without Spacer()
.frame(minWidth: 0, maxWidth: .infinity)

// Align elements to the top left
ZStack(alignment: .topLeading) {}
SwiftUI for All Devices
SwiftUI works for iPad, Mac, Apple TV and Watch. There are minimal code changes and you can reuse a lot of the same components. The Stacks, Controls and Layout system will work the same, with a few adjustments. The philosophy for SwiftUI is not to write once, apply everywhere, but to learn once, apply anywhere.
For example, modals are automatically contextual giving you the dismiss gesture and sizing them properly for you. Most controls and data work across all platforms, with some minor layout changes and navigation. Those controls will be automatically translated for you, using the appropriate UI for their specific platform. For example, a Picker will look like a List in iOS, but it'll look like a drop-down for Mac.
// All
ZStack, VStack, HStack, TabView
NavigationView, Picker, Stepper, Slider, etc.
SF Symbols

// iPad / Mac
TabView

// Mac
Keyboard Shortcuts
Drag and Drop UI
Views, Modifiers and Images can be dragged to the Preview and to the code. Everything you build are automatically translated to production code.
In code just like in the Preview, you can Command + Click to get a contextual menu where you can Inspect the element and access a bunch of useful options like Embed in VStack or Extract to Subview.
Modifiers
You can easily drag and drop Modifiers next to your Views and they can be enhanced with new properties such as colors, transforms, visual effects, built-in controls and gestures.
.frame(width: 100, height: 100)
.background(Color.blue)
.shadow(radius: 10)
.offset(x: 10, y:10)
.blur()
.padding()
SF Symbols
You'll need to download the newest San Francisco fonts from Apple to open the design files. Apple provides 1000 icons in their new SF Symbols app which can be used as a vector asset in Xcode or in the design tool.
In SwiftUI, you can easily generate icons from SF Symbols using their name. Make sure to download the app. Additionally, you can customize the size (small, medium, large) and change the icon color.
Image(systemName: item.icon)
    .imageScale(.large)
    .foregroundColor(.blue)
    .frame(width: 32, height: 32)
Views and Controls
Basic elements you'd find in design tools or more complex and interactive controls like the Toggle, Slider and Data picker are available for free in SwiftUI. They're extremely easy to style and to customize the functionalities and the data.
Text
Image
Rectangle
Toggle
Picker
Stepper
Slider
Visual Effects
SwiftUI gives you a bunch of visual effects for free so that you can play with them. Most importantly, you can even animate them and it'll transition nicely for you!
.rotationEffect(Angle(degrees: 30))
.rotation3DEffect(Angle(degrees: 60), axis: (x: 0, y: 10, z: 0))
.scaleEffect(0.9)
.blendMode(.hardLight)
.blur(radius: 20)
UI Components
Just like in your design system or in React, you should break down your UI as much you can into components. To create a new component, Command + Click on a container like a VStack and select Extract to Subview.
VStack {
    Text("Card Back")
}
.frame(width: 340, height: 220.0)
Reference the component by writing its name. Components are Views and can still receive additional Modifiers without even passing properties!
CardView()
    .background(show ? Color.red : Color.blue)
    .cornerRadius(10)
Live Preview
What's interesting about SwiftUI is that all the changes that you make is live, including the data that you work with. The Debug code allows you to quickly test data and preview environments in Swift UI. It's really powerful for quick iterations.
You can preview your SwiftUI design on multiple devices at the same time. You have to Group your Content Views first and you can the preview and data settings. In this case, we're making the Preview window to be adaptive. On top of that, you can Pin your preview so that you'll always see the same screen as you make code changes.
Group {
    ContentView()
    ContentView()
        .previewLayout(.sizeThatFits) // Preview components
        .environment(\.sizeCategory, .extraExtraExtraLarge) // Accessibility
        .previewDevice("iPhone 8")  // Specific device
}
Dark Mode
To preview your layout in Dark Mode, you need to add a modifier to the Content View in the Debug area. Please note that to make your design work well with Dark mode, you should use their default colors and controls like the Navigation View as much as possible.
ContentView(courses: testData)
    .environment(\.colorScheme, .dark)
Declarative Code
In SwiftUI, you'll write shorter code that's declarative, so it's all about telling what the UI should do. It's readable and straight to the point.
Auto Indent Code
As you edit your code, it will eventually become hard to read, so you can use Re-Indent in Xcode to keep everything clean. This is a bit similar to Prettier, but you have to select the code and press Control + I.
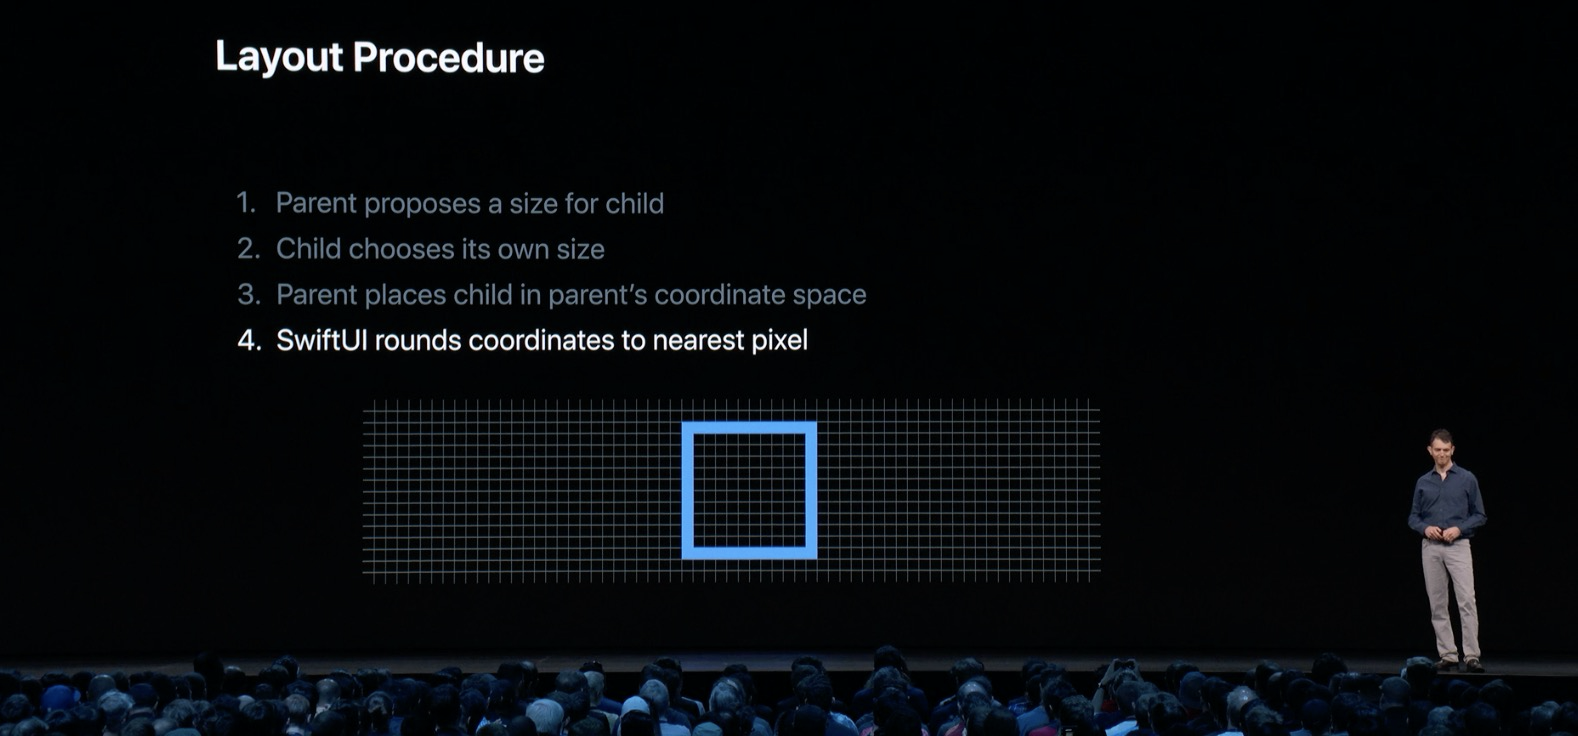
Round to Nearest Pixel
SwiftUI does the pixel fitting for you so that your views will look sharp all the time.
Swift Packages
Swift now has a package manager that lets you easily install third-party libraries from the community. To install a Library, go to your Project Settings > Swift Packages.

Install Catalina and Xcode 11
Catalina and Xcode 11 are required to run SwiftUI with the live preview features. To download Xcode, go to the Mac App Store and search for Xcode. Once everything is installed, you'll have to install a bunch of new components and follow the instructions.

Your First SwiftUI App
To create an app, click on Create a new Xcode project. Then, select Single-View app. After, you have to set the project settings. The identifier is typically your domain name in reverse. Finally, make sure to check Use SwiftUI.

After you finish setting up your app, you'll be greeted with the SwiftUI code editor alongside the Preview. Make sure to click on Resume at the top right to see the results in real-time. You can also hide the Left navigation and right inspector by clicking on the top right buttons.

Importing Assets
If you use images or glyphs, you have to import PNG, JPG or PDF assets. Photos are usually saved as JPG while vector glyphs like icons should be in PDF. PNG are used for more complex transparent images that require a level of accuracy and pixel perfection that can't be replicated in PDF, like gradients, drop shadows infused with bitmaps.
App Icon
In Sketch, you can find a template to create your App Icon. Once you customize the visual, you can export everything to a folder. Then, drag and drop the images into the App Icon inside the Assets. Make sure to remove the unassigned images and move the missing 3 images: Icon.png to 1024, icon_83.5@2x.png to iPad 83.5pt (2x), icon_76@2x.png to iPad 76pt 2x.

Color Sets in Assets
I recommend setting the colors for your app in advance directly in the Assets. Like this, you can easily reference those colors from the Inspect and from the code. On top of that, those colors will support Light/Dark modes. I prepared an Assets.xcassets folder where you can expand and drag and drop the Colors folder to your assets.

Colors set in Assets can be referenced in code like this.
Color("accent")Keyboard Shortcuts
The most important Xcode keyboard shortcuts are the following:
- Cmd + Click: Contextual menu for code or UI.
- Option + Click: Quick info for code.
- Cmd + 0: Show/hide Navigator.
- Cmd + Shift + L: Insert new element.
- Cmd + R: Run the app.
- Cmd + . : Stop the app.
App Name
To change your App Name that appears next to your App Icon, you need to go to your Project Settings > Info > Bundle Name.
Test on Device
Using your app on your device is a magical experience. Keep in mind that what you're building is fully native and extremely performant. To be able to test your app on your phone, you'll need a free developer account, and to connect via USB.
Tutorials
The tutorials made by Apple are fantastic and extremely well-executed. They tend to speak more to developers though and the complexity jumps VERY quickly. But after you take my course, I believe that you'll be able to go back to those tutorials and understand them a lot better.
SwiftUI by example
If you want quick references to how you do certain things in SwiftUI, I suggest the excellent quick tutorials by Paul Hudson from Hacking with Swift.
Resources
It would be impossible to cover everything within such a short period, so it's important to continue your journey with awesome resources. This is an excellent list.
Newsletters
There are excellent newsletters for getting the latest resources about iOS: iOS Dev Weekly and iOS Goodies.
More Videos
In my YouTube channel, I post a bunch of shorts experiments and new techniques, so if you want to take your SwiftUI skills further, you can check them out.
Templates and source code
Download source files
Download the videos and assets to refer and learn offline without interuption.
Design template
Source code for all sections
Video files, ePub and subtitles
Videos
Assets
ePub
1
Learn SwiftUI for iOS 13
Learn how to code custom UIs, animations, gestures and components in Xcode 11
11:53
2
Layout and Stacks
Build a custom UI from scratch using layout techniques and modifiers in SwiftUI
22:29
3
Components and Visual Effects 2
Apply transforms, blend modes, blur in SwiftUI and turn views to components
23:50
4
Animations and States
Create beautiful animations using states, transitions and actions.
9:24
5
Gestures and Events
Make your app interactive and animated with the Drag gesture and events in SwiftUI.
10:14
6
Timing Curve and Delay Animation
Use bezier curve animation with delay and repeat values
14:17
7
Dismiss and Drag Anchors
Snap the card to different positions using multiple conditions and operators in SwiftUI
14:06
8
SF Symbols and Props
How to use Apple's iOS icons and pass values to components
13:31
9
Color Literal, Gradient and Overlay
Quickly edit colors and add gradients and use the overlay modifier
11:55
10
Animation Between Screens
Create a transition between two views
13:27
11
Drag Progress and Tap Background
Use the drag values and use them as a progress to animate views in SwiftUI
7:45
12
Binding and Screen Size
Bind states across multiple views and detect the screen size
8:22
13
ScrollView and Repeat
Add a horizontal ScrollView to a list of cards in SwiftUI
11:52
14
Data and Image Literal
Work with arrays and data models to create a loop of components in SwiftUI
13:31
15
3D Scroll Animation
Use GeometryReader to detect the scroll position and apply 3D animations
7:39
16
Modal Presentation
Navigate to another screen using a built-in Modal view
7:03
17
Navigation View and List
Build a table view with navigation options and presentations in SwiftUI
11:48
18
Navigation Style and Passing Data
Create a detail screen for your navigation list items
9:22
19
Combine and Edit Data
Learn how to manipulate external data with built-in functions
12:39
20
Tab Bar and Test on Device
Iterate your designs quickly with previews and test directly on your device or using the iOS simulator
9:38
Meet the instructor
We all try to be consistent with our way of teaching step-by-step, providing source files and prioritizing design in our courses.
Meng To
I design, code and write
Meng To is the author of Design+Code. Meng started off his career as a self-taught designer from Montreal and eventually traveled around the world for 2 years as his US VISA was denied. During his travels, he wrote a book which now has 35,000 readers.
40 courses - 194 hours
Master AI Prompting for Stunning UI
Learn how to leverage AI tools like Aura for creating beautiful designs, working with templates, and experimenting with advanced prompts. A concise guide for designers and developers to level up their skills.
10 hrs
Build SwiftUI apps for iOS 18 with Cursor and Xcode
In this course, we'll explore the exciting new features of SwiftUI 6 and Xcode 16 for building iOS 18 apps. From mesh gradients and text animations to ripple effects, you'll learn how to create polished, highly custom apps using the latest workflows. We'll also dive into using Cursor and Claude AI for AI-driven coding, helping you start strong and customize your apps.
5 hrs
Create your Dream Apps with Cursor and Claude AI
Learn to build your dream web apps from the ground up using Cursor, Claude AI, and a suite of powerful AI tools. This course covers everything you need, including React for frontend development, Firebase for backend integration, and Stripe for handling payments. You’ll also dive into advanced AI tools like Claude Artifacts, Galileo AI, v0.dev for UI, Ideogram for design generation, and Cursor Composer for full-scale development.
6 hrs
Build a React Site from Figma to Codux
In this course, you'll learn to build a website from scratch using Codux, starting with a Figma template. You’ll master responsive design, collaborate with developers on a real React project, export CSS from Figma using Locofy, set up breakpoints with media queries, add CSS animations, improve SEO, create multiple pages with React Router, and publish your site. By following best practices, you’ll bridge design and development, improve your web design skills.
2 hrs
Create 3D UI for iOS and visionOS in Spline
Comprehensive 3D Design Course: From Basics to Advanced Techniques for iOS and visionOS using SwiftUI
3 hrs
Master No-Code Web Design with Framer
In this free Framer course, you'll learn to create modern, user-friendly interfaces. Start with dark mode and glass designs, then move from Figma to Framer, using vectors and auto layout for responsive websites. Add animations, interactive buttons, and custom components with code. Finally, you'll craft a design system suitable for teamwork or solo projects, all in a straightforward and practical approach.
4 hrs
Build SwiftUI Apps for iOS 17
In this course, we’ll be exploring the fresh and exciting features of SwiftUI 5! As we craft a variety of iOS apps from the ground up, we'll delve deep into the treasure trove that is SwiftUI's user interface, interactions, and animations.
4 hrs
Build Beautiful Apps with GPT-4 and Midjourney
Design and develop apps using GPT-4 and Midjourney with prompts for SwiftUI, React, CSS, app concepts, icons, and copywriting
4 hrs
Build SwiftUI apps for iOS 16
Create animated and interactive apps using new iOS 16 techniques using SwiftUI 4 and Xcode 14
5 hrs
Build a 3D Site Without Code with Framer
Design and publish a responsive site with 3D animation without writing a single line of code
3 hrs
Create 3D Site with Spline and React
Design and code a landing page with an interactive 3D asset using Spline and CodeSandbox
1 hrs
Build an Animated App with Rive and SwiftUI
Design and code an iOS app with Rive animated assets, icon animations, custom layouts and interactions
3 hrs
Build a SwiftUI app for iOS 15 Part 3
Design and code a SwiftUI 3 app with custom layouts, animations and gestures using Xcode 13, SF Symbols 3, Canvas, Concurrency, Searchable and a whole lot more
4 hrs
Build a SwiftUI app for iOS 15 Part 2
Design and code a SwiftUI 3 app with custom layouts, animations and gestures using Xcode 13, SF Symbols 3, Canvas, Concurrency, Searchable and a whole lot more
3 hrs
Build a SwiftUI app for iOS 15
Design and code a SwiftUI 3 app with custom layouts, animations and gestures using Xcode 13, SF Symbols 3, Canvas, Concurrency, Searchable and a whole lot more
4 hrs
React Livestreams
Learn how we can use React Hooks to build web apps using libraries, tools, apis and frameworks
4 hrs
Design Founder Livestreams
A journey on how we built DesignCode covering product design, management, analytics, revenue and a good dose of learning from our successes and failures
2 hrs
SwiftUI Advanced Handbook
An extensive series of tutorials covering advanced topics related to SwiftUI, with a main focus on backend and logic to take your SwiftUI skills to the next level
4 hrs
iOS Design Handbook
A complete guide to designing for iOS 14 with videos, examples and design files
2 hrs
SwiftUI Handbook
A comprehensive series of tutorials covering Xcode, SwiftUI and all the layout and development techniques
7 hrs
Build a web app with React Hooks
Learn how we built the new Design+Code site with React Hooks using Gatsby, Netlify, and advanced CSS techniques with Styled Components.
4 hrs
UI Design Handbook
A comprehensive guide to the best tips and tricks for UI design. Free tutorials for learning user interface design.
2 hrs
Figma Handbook
A comprehensive guide to the best tips and tricks in Figma. Not affiliated with or endorsed by Figma, Inc.
6 hrs
SwiftUI for iOS 14
Build a multi-platform app from scratch using the new techniques in iOS 14. We'll use the Sidebar and Lazy Grids to make the layout adaptive for iOS, iPadOS, macOS Big Sur and we'll learn the new Matched Geometry Effect to create beautiful transitions between screens without the complexity. This course is beginner-friendly and is taught step-by-step in a video format.
3 hrs
SwiftUI Livestreams
This is a compilation of the SwiftUI live streams hosted by Meng. Over there he talks and teaches how to use design systems, typography, navigation, iOS 14 Design, prototyping, animation and Developer Handoff.
19 hrs
UI Design Livestreams
This is a compilation of the UI live streams hosted by Meng. Over there he talks and teaches how to use design systems, typography, navigation, iOS 14 Design, prototyping, animation and Developer Handoff.
26 hrs
UI Design for Developers
In this course we'll learn how to use design systems, set up break points, typography, spacing, navigation, size rules for adapting to the iPad, mobile and web versions, and different techniques that translate well from design to code.
3 hrs
Build an app with SwiftUI Part 3
This course was written for designers and developers who are passionate about design and about building real apps for iOS, iPadOS, macOS, tvOS and watchOS. SwiftUI works across all of those platforms. While the code is not a one-size-fits-all, the controls and techniques involved can apply to all platforms. It is beginner-friendly, but it is also packed with design tricks and cool workflows about building the best UIs and interactions.
4 hrs
Build an app with SwiftUI Part 2
This course was written for designers and developers who are passionate about design and about building real apps for iOS, iPadOS, macOS, tvOS and watchOS. SwiftUI works across all of those platforms. While the code is not a one-size-fits-all, the controls and techniques involved can apply to all platforms. It is beginner-friendly, but it is also packed with design tricks and cool workflows about building the best UIs and interactions.
4 hrs
Build a full site in Webflow
Webflow is a design tool that can build production-ready experiences without code. You can implement CSS-driven adaptive layouts, build complex interactions and deploy all in one tool. Webflow also comes with a built-in content management system (CMS) and Ecommerce for creating a purchase experience without the need of third-party tools.
3 hrs
Advanced Prototyping in ProtoPie
ProtoPie is a cross-platform prototyping tool that creates prototypes nearly as powerful as those made with code, with half of the efforts, and zero code. It's perfect for designers who want to quickly experiment with advanced interactions using variables, conditions, sensors and more.
3 hrs
Build an app with SwiftUI Part 1
This course was written for designers and developers who are passionate about design and about building real apps for iOS, iPadOS, macOS, tvOS and watchOS. SwiftUI works across all of those platforms. While the code is not a one-size-fits-all, the controls and techniques involved can apply to all platforms. It is beginner-friendly, but it is also packed with design tricks and cool workflows about building the best UIs and interactions.
4 hrs
React Native for Designers Part 2
React Native is a popular Javascript framework that builds on top of React by using native components to create a real mobile app indistinguishable from one made using Xcode or Android Studio. The main difference with native development is that you get to use CSS, hot-reload, Javascript and other familiar techniques that the Web has grown over the past decades. Most importantly, you're building for both iOS and Android using the same codebase.
3 hrs
React Native for Designers
React Native is a popular Javascript framework that builds on top of React by using native components to create a real mobile app indistinguishable from one made using Xcode or Android Studio. The main difference with native development is that you get to use CSS, hot-reload, Javascript and other familiar techniques that the Web has grown over the past decades. Most importantly, you're building for both iOS and Android using the same codebase.
5 hrs
Design System in Figma
Learn how to use and design a collaborative and powerful design system in Figma. Design Systems provide a shared library of reusable components and guidelines and that will let you build products much faster
3 hrs
React for Designers
Learn how to build a modern site using React and the most efficient libraries to get your site/product online. Get familiar with Grid CSS, animations, interactions, dynamic data with Contentful and deploying your site with Netlify.
3 hrs
Swift Advanced
Learn Swift a robust and intuitive programming language created by Apple for building apps for iOS, Mac, Apple TV and Apple Watch
9 hrs
Learn Swift
Learn Swift a robust and intuitive programming language created by Apple for building apps for iOS, Mac, Apple TV and Apple Watch
4 hrs
Learn Sketch
Learn Sketch a design tool entirely vector-based and focused on user interface design
5 hrs
Learn iOS 11 Design
Learn colors, typography and layout for iOS 8
1 hrs