Wix Studio Editor
Add to favorites
Getting to Know Wix Studio Editor
Play video
Build an Interactive Site with Wix Studio

Exploring the Editor
Alright, let's take a quick look at the Editor before we start building our website. It's a friendly tool that'll help us make our site look great. We will learn the basics of its features and how to use them easily. You'll notice that they're similar to those of all design tools such as Figma, Sketch, Adobe, etc. Don’t worry, it’s a user-friendly tool even if you”‘re a new designer.
Open New Page
When you start a new site, you'll find a simple page. It's like a blank piece of paper, ready for your ideas. This page has a top bar, called a header, a main area in the middle, and a bottom bar, known as a footer. It's just like setting up a room with a ceiling, floor, and walls. These parts help you organize your website. The header is great for your site's name or logo, the main area is where you put all your cool stuff, and the footer is perfect for contact info or links. It's all set up to make your website-building adventure easy and enjoyable!

Left Menu
Let's get familiar with the tools before we dive into building our awesome website! The left menu serves as the primary navigation hub, offering a range of options to enhance and manage your website. Each option in this menu provides specific functionalities, making site building intuitive and efficient. It's your main guide, packed with different options to add cool stuff and keep everything organized.

Inspector
Now, let’s move over to the inspector. In Wix Studio, the Inspector Panel is a critical component for fine-tuning the design and layout of your website. It’s where you can access and adjust various properties of the selected elements on your page. It offers a range of functionality that make the process of designing a website more efficient and user-friendly.
-
To open the inspector panel, just click on the arrow on the right side. In the design section, you have the flexibility to adjust the size, layout, and position of any element.
![Screenshot-202024-03-25-20at-2019.10.20]()
Animations and effects
The interactions tab is a feature that allows users to add motions and interactions to elements on their website. This menu offers a variety of animation and effect options like entrance, hover, click, scroll and loop.
 Great, that’s a quick overview of the studio editor.
Download Font Inter
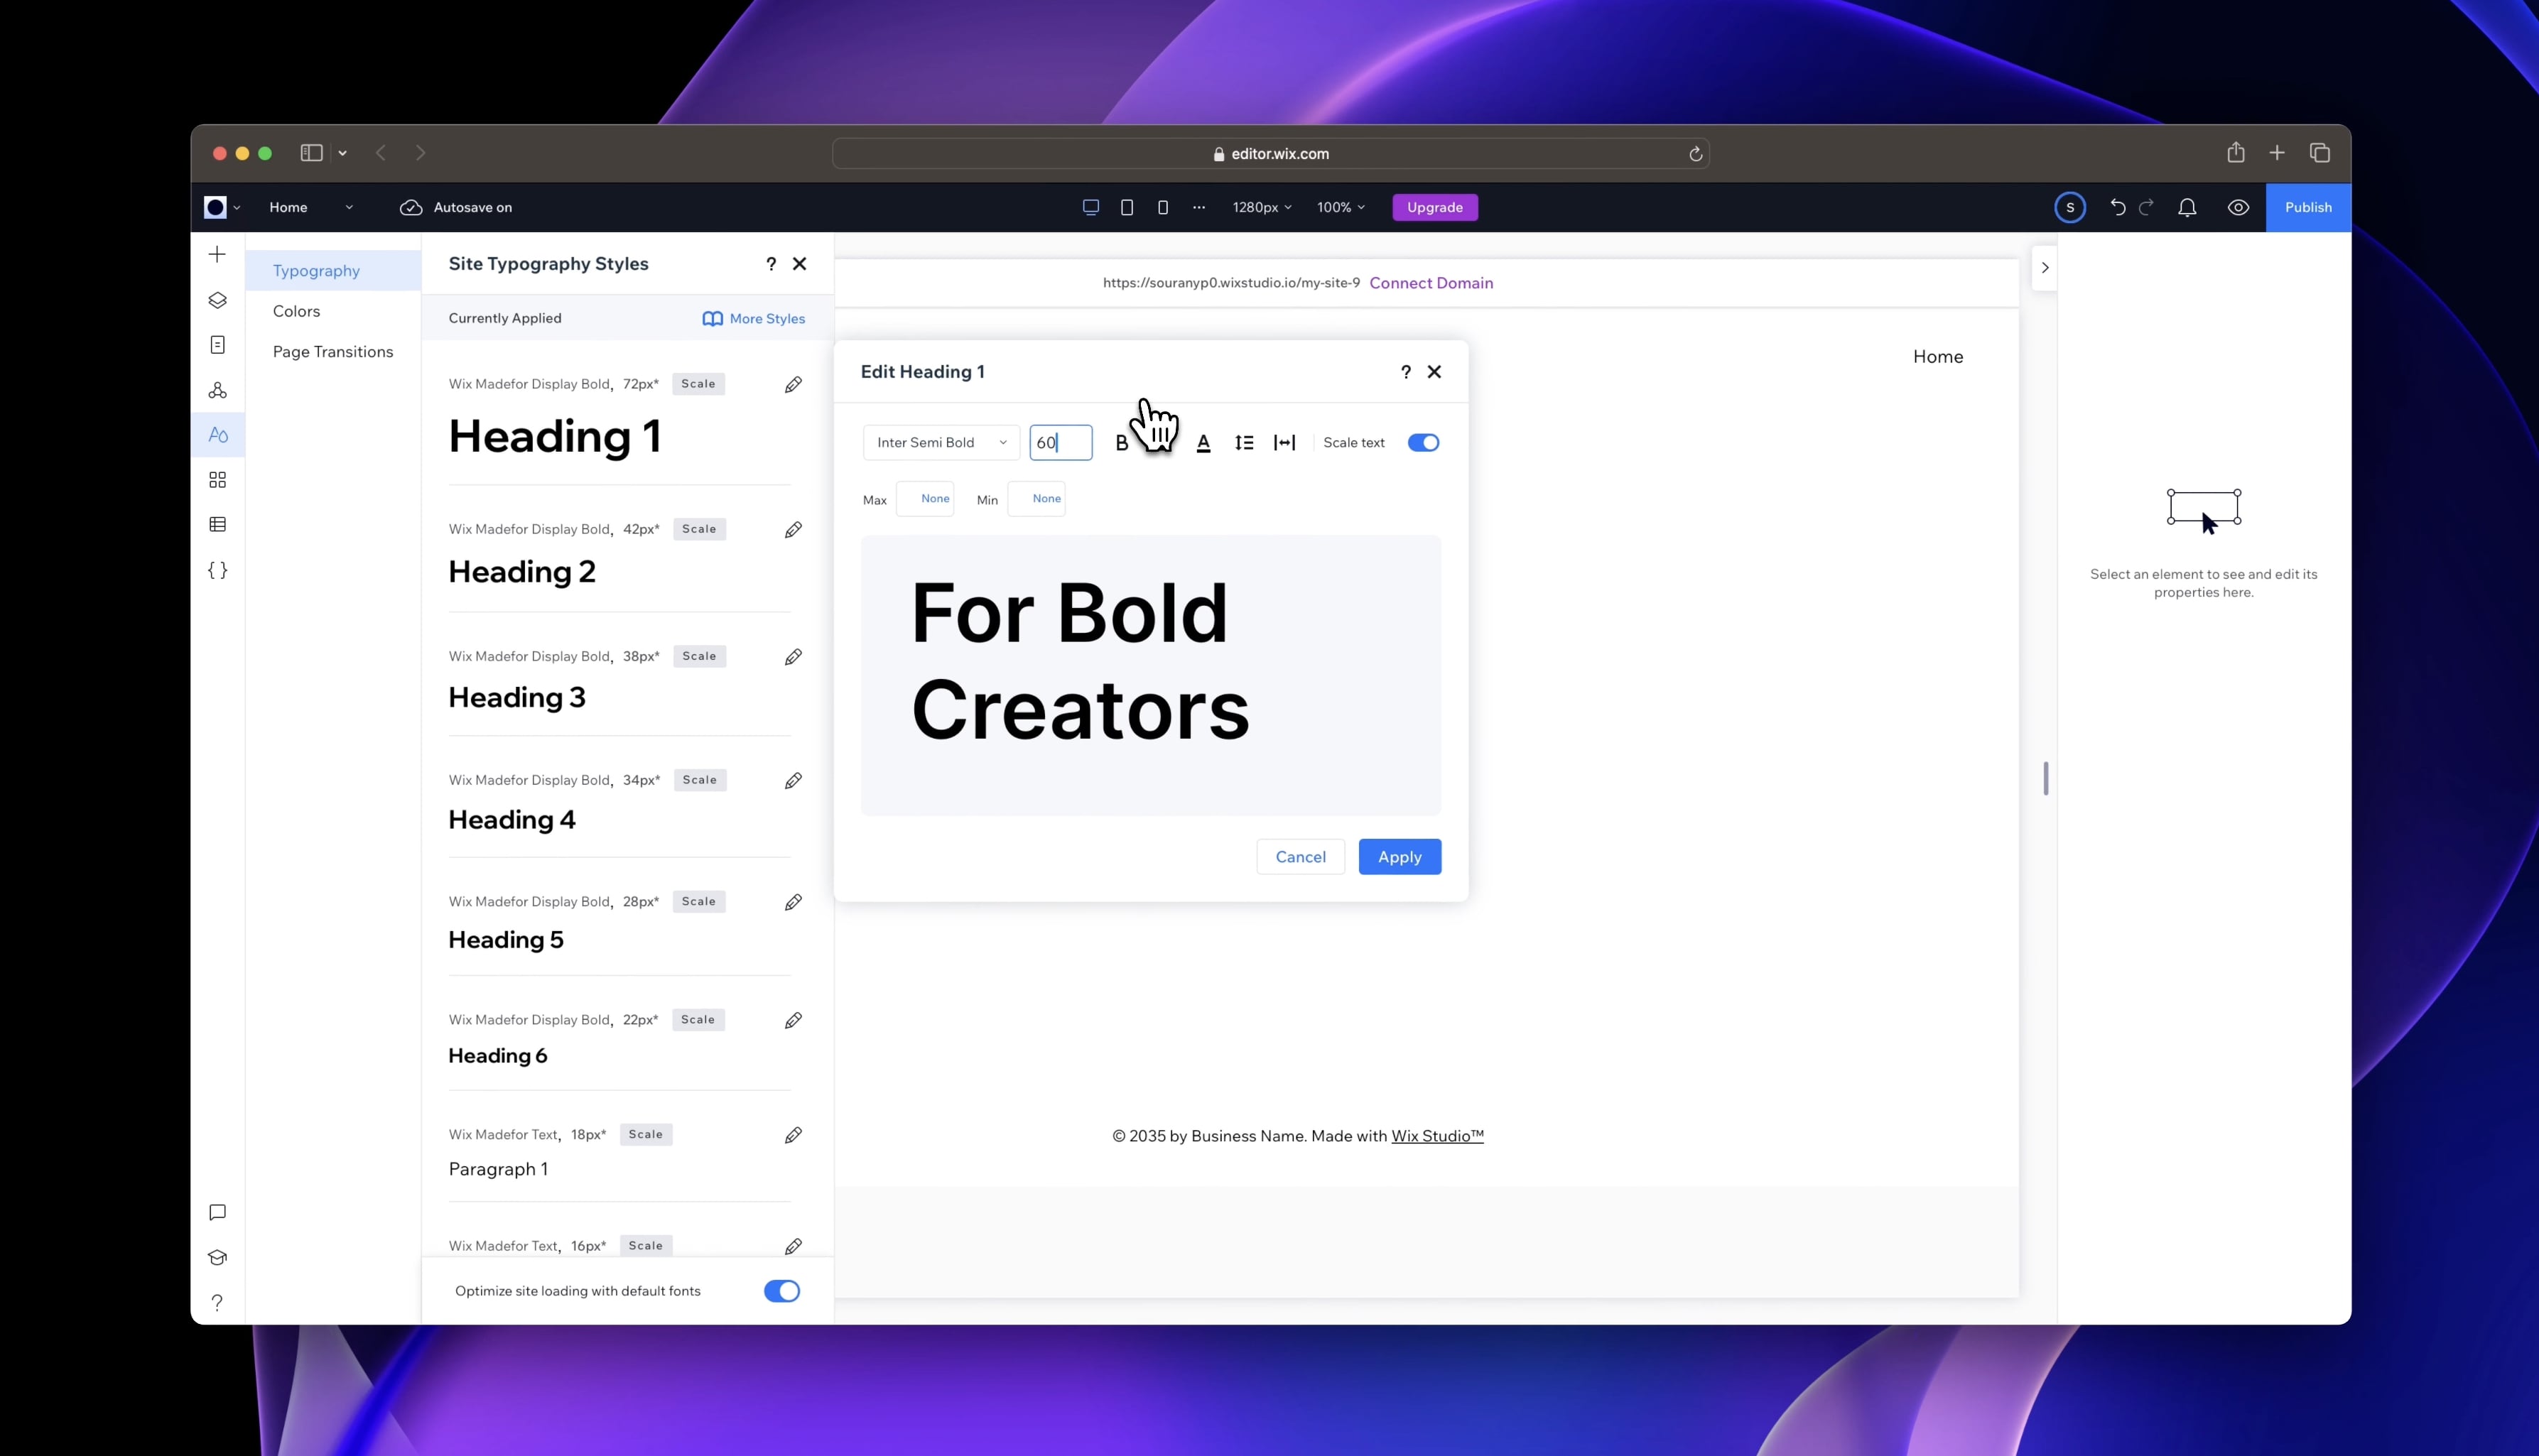
Now, the first thing we need to do is to get our site looking sharp with the right fonts and colors to make things easier and more efficient. It's like creating your own text and color style in Figma. You can use the fonts provided by Wix Studio or upload your own. We’ve already picked out a font in our Figma file, it’s called “ Inter ”. It's a neat, clean font that will make your website look professional. If you don’t have Inter font, Just pop over to “ Google Fonts ”, find Inter (or any font you like), hit “ Get Font ”, and download it. Back in the editor, you'll see a panel on the left side of your Wix Studio called “ Site Styles ”. Click on that to get started. Now, we're going to tackle typography first.

Add Text Style
Alright, we're going to customize the headings and paragraphs following the same text style as the Figma design.
- Select the pen icon here, click on the drop-down menu next to the font category and search for your font, or if you haven't downloaded the font yet, simply click on "Upload Fonts" at bottom left. For Heading 1, which will be our big title in the hero section, let's search for Inter Semi Bold and set the size to 60, then click on the Apply button.
- Repeat for the rest of the typographic styles.
![Wix Studio Editor image 6]()
Add Color Style
Great! After we’ve got our typography set up, it’s time to add some color. Using our Figma file as a reference, we will now customize the color palettes. Let’s move to the color section, you’ll notice the default color palette and let’s add these color code from Figma to Wix Studio.
- Right here, with the pen icon, you can change the colour scheme. When you select a colour, you get 5 shades of the chosen colour, and if you don't like a colour, you can edit it manually by selecting the one you want to change. For example, the first colour will serve as the primary colour and the second as the secondary colour for the text, but if it's not the colour I want, so let's change it manually.
- Just click on Edit, select the color palette and paste the color code here, then apply. Let's try with one of my shades of blue, go to the edit colour scheme, apply the colour code and you'll get 5 shades of blue ranging from light to dark blue and of course we can edit manually if we don't like it.
![Wix Studio Editor image 7]()
Add Media
Alright, the next step is to upload the elements of your website. You should always have everything ready before building your website. Let’s go to "Add Elements". Add Elements is a key feature that allows you to enhance your website by adding various types of content and interactive components. Think of it like adding building blocks to create the perfect webpage.
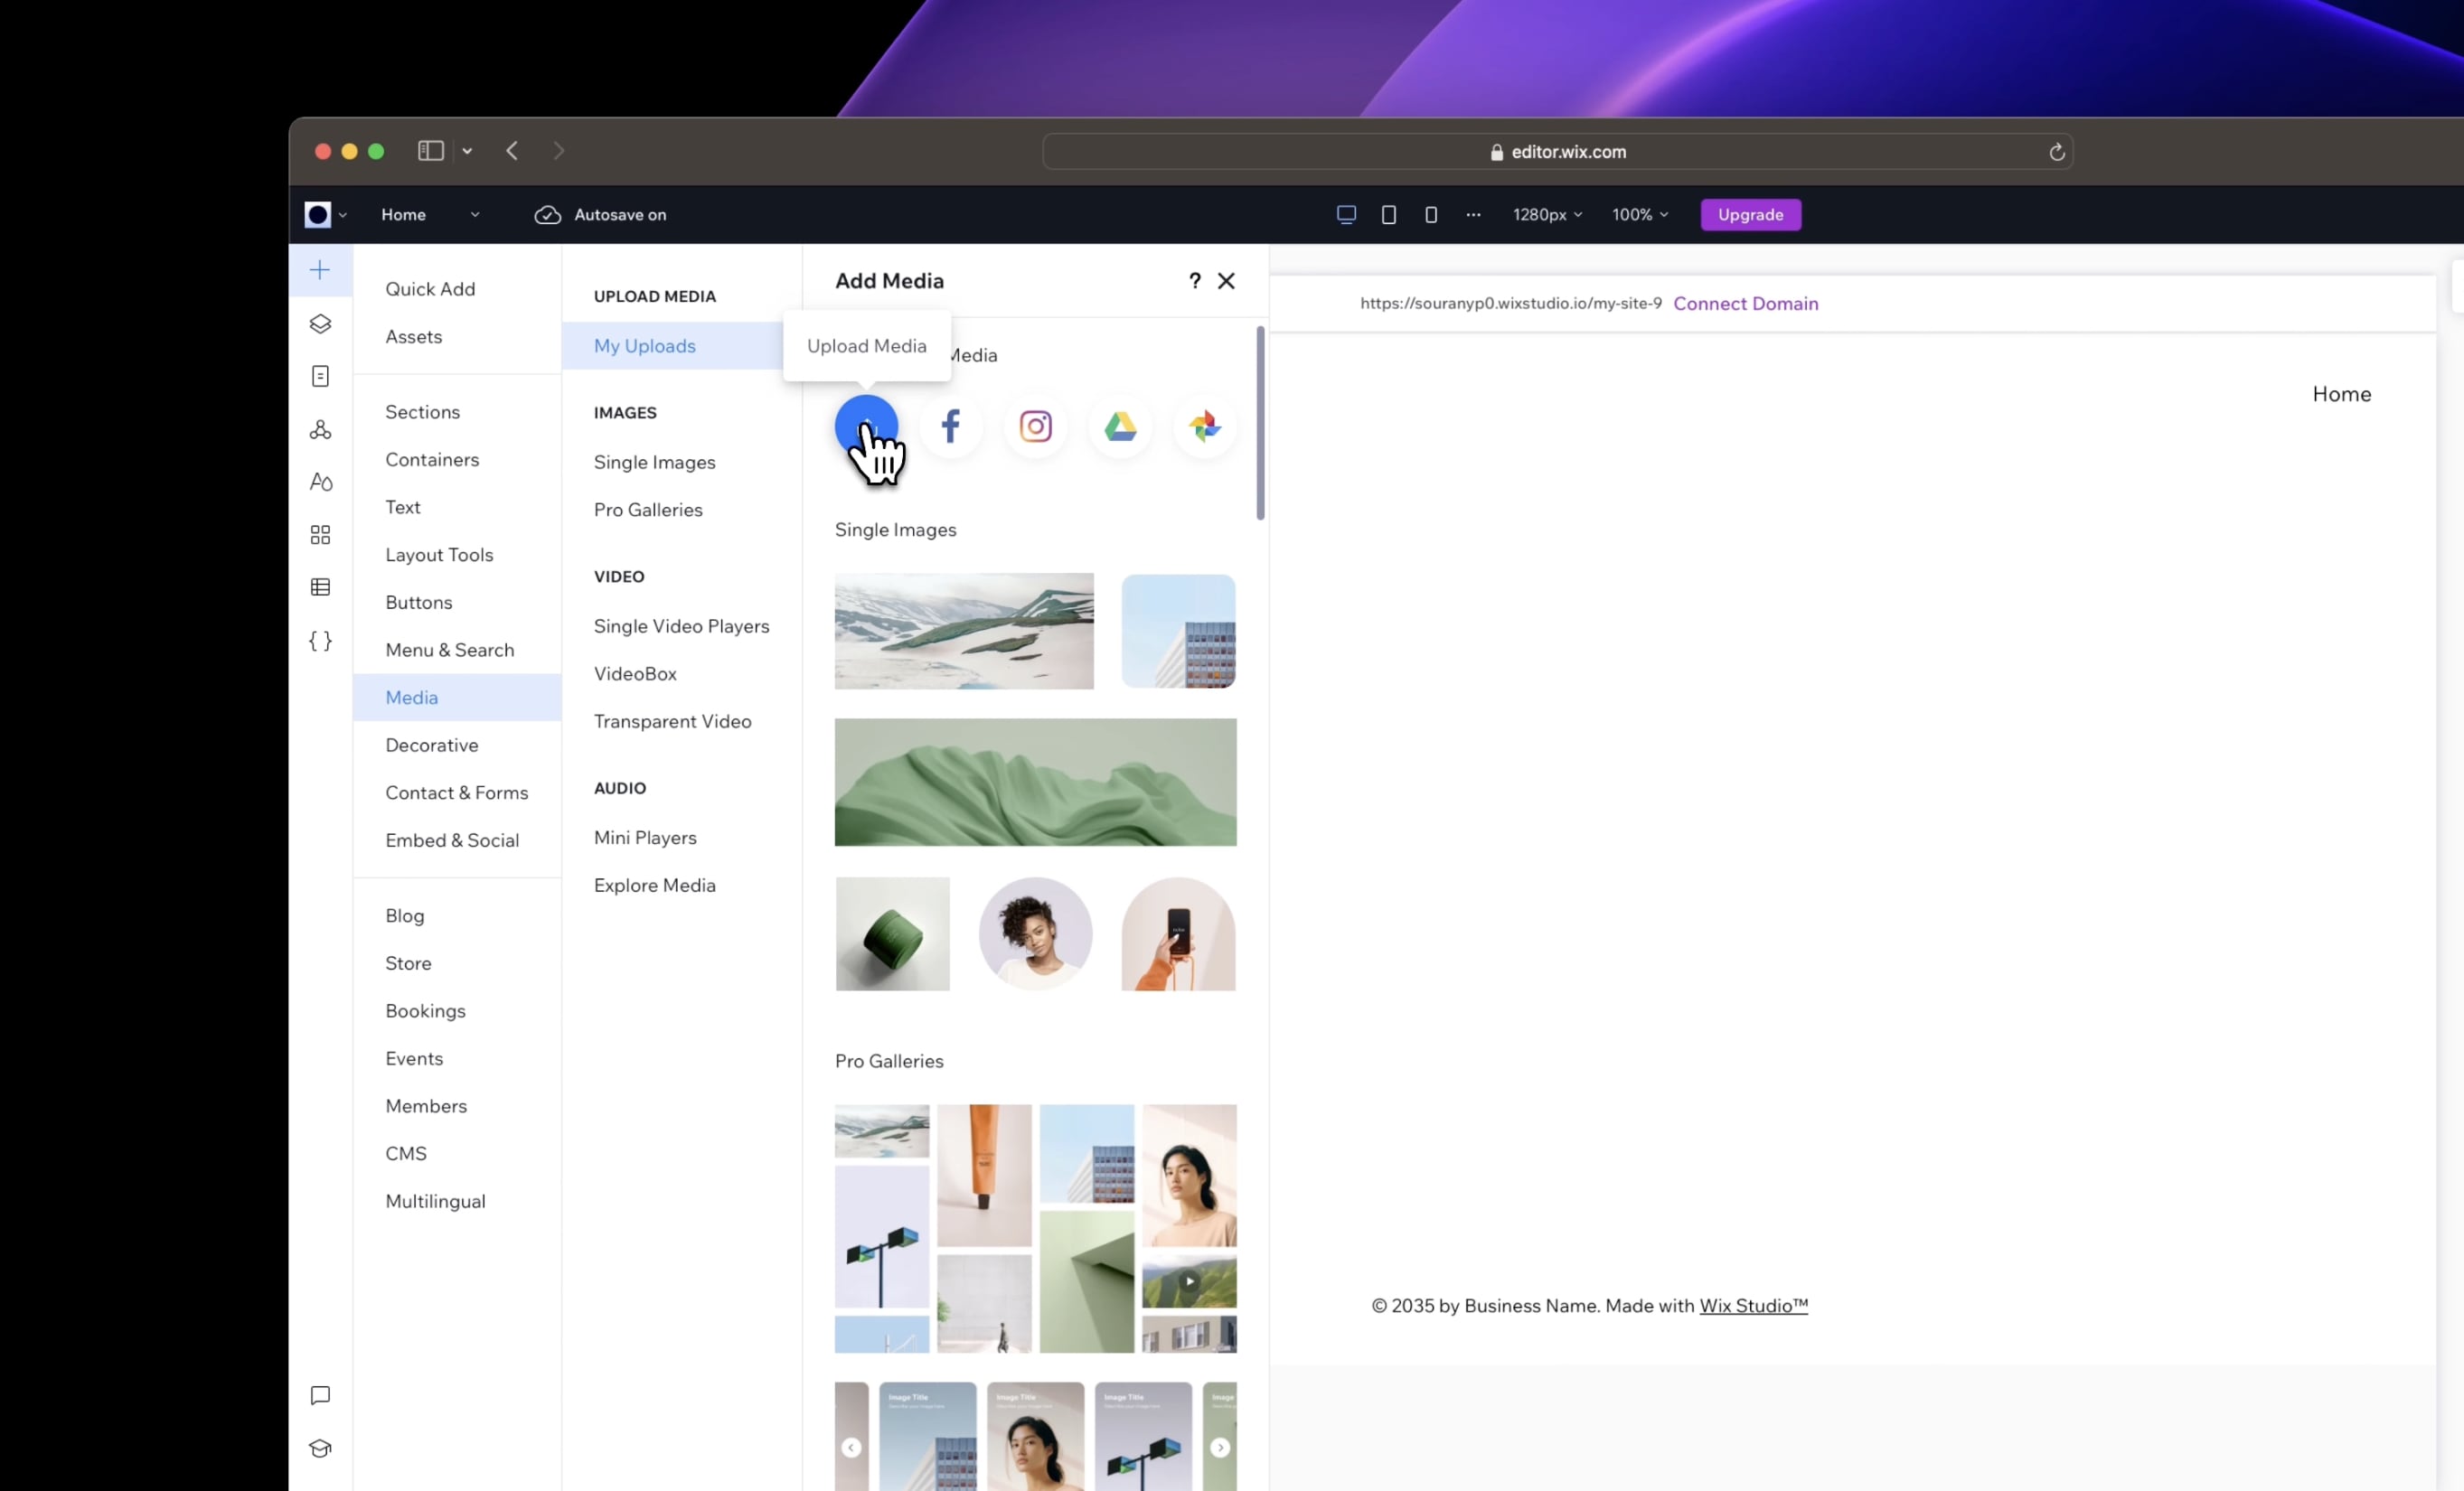
- Let's move on to the Media section. Here you can upload your own custom images, whether in PNG or SVG format, or even videos and audio files. You can also choose from a variety of pre-existing media options.
- So next, let’s select the "Upload Media" icon, then "Upload from Computer" or drag and drop right here.
![Wix Studio Editor image 8]() Each of these elements can be customized in terms of size, color, font, and other properties, giving you a lot of creative freedom in designing your website. The drag-and-drop interface makes it really easy to add and arrange these elements on your web pages.
Each of these elements can be customized in terms of size, color, font, and other properties, giving you a lot of creative freedom in designing your website. The drag-and-drop interface makes it really easy to add and arrange these elements on your web pages.
Conclusion
Awesome, we're all set to start building our website! Let's continue to the next section!
Templates and source code
Download source files
Download the videos and assets to refer and learn offline without interuption.
Design template
Source code for all sections
Video files, ePub and subtitles
Videos
Assets
1
Introduction to Wix Studio
Discovering Wix Studio: A Beginner's Guide
5:19
2
Wix Studio Editor
Getting to Know Wix Studio Editor
5:32
3
Layouts
Designing with Precision: Exploring Layouts in Wix Studio
10:15
4
Responsiveness
Responsive Web Building in Wix Studio
16:02
5
Animations and Interactions
Bringing Your Website to Life: Mastering Animation and Interaction in Wix Studio
11:39
Meet the instructor
We all try to be consistent with our way of teaching step-by-step, providing source files and prioritizing design in our courses.
Sourany Phomhome
UI Designer
Designer at Design+Code.
10 courses - 43 hours

Build an Interactive Site with Wix Studio
Discover Wix Studio: the no-code platform ideal for agencies and enterprises. This beginner-friendly video course guides you through web design basics, using intuitive tools for building responsive, professional websites. Learn to create animations easily—no coding required. Gain the skills to craft your own standout sites confidently.
1 hrs

3D UI Interactive Web Design with Spline
Learn to create 3D designs and UI interactions such as 3D icons, UI animations, components, variables, screen resize, scrolling interactions, as well as exporting, optimizing, and publishing your 3D assets on websites
3 hrs

Design and Prototype for iOS 17 in Figma
Crafting engaging experiences for iOS 17 and visionOS using the Figma design tool. Learn about Figma's new prototyping features, Dev Mode, variables and auto layout.
6 hrs

Design and Prototype Apps with Midjourney
A comprehensive course on transforming Midjourney concepts into interactive prototypes using essential design techniques and AI tools
8 hrs

Learn Figma Prototyping
Master interaction design with Figma Prototyping. Create an animated app experience using after delay, scrolling content, video prototype
1 hrs

UI Design for iOS 16 in Sketch
A complete guide to designing for iOS 16 with videos, examples and design files
3 hrs

Prototyping in Figma
Learn the basics of prototyping in Figma by creating interactive flows from custom designs
1 hrs

UI Design Android Apps in Figma
Design Android application UIs from scratch using various tricks and techniques in Figma
2 hrs

UI Design Quick Apps in Figma
Design application UIs from scratch using various tricks and techniques in Figma
12 hrs

Figma Handbook
A comprehensive guide to the best tips and tricks in Figma. Not affiliated with or endorsed by Figma, Inc.
6 hrs


 Each of these elements can be customized in terms of size, color, font, and other properties, giving you a lot of creative freedom in designing your website. The drag-and-drop interface makes it really easy to add and arrange these elements on your web pages.