
Animations and Interactions
Add to favorites
Bringing Your Website to Life: Mastering Animation and Interaction in Wix Studio
Play video
Build an Interactive Site with Wix Studio
This Course
Wix Studio offers a diverse array of animation options, but we'll focus on a few specific techniques in this section. We'll explore Scroll Interactions, which bring your pages to life as users scroll, and mouse effects, which create dynamic, interactive elements based on cursor movement. Additionally, we'll delve into embedding Spline 3D for more intricate graphical animations. While these powerful tools require no coding, Wix Studio also allows the integration of custom CSS for those who wish to add a personal touch. Thankfully, Wix Studio simplifies the process with its range of preset interactions, making it unnecessary to delve into complex coding to achieve professional, engaging results.

Text Transition
- First, let's start with the main text at the Hero Section. Our goal is to implement a Text Delay Animation, which, fortunately, isn't overly complex. This technique involves animating the text so that it appears with a slight delay, adding an engaging dynamic to your page's introduction. Don't worry, it's not hard at all!
- To create a text delay effect, first focus on each piece of text individually. We'll begin with the main headline, usually labeled as H1. Head over to the Interactions tab, under the "Entrance Animations", click on + Add. That's where you'll find what you need to give your title that cool delayed entrance!
Entrance Animations
- Adding an entrance animation to an element is an effective way to grab your visitors' attention. This animation activates when the element first comes into view, creating an immediate visual impact. They are commonly used to add a dynamic introduction to elements as a user scrolls through the website.
- For a smooth transition effect, choose the 'Fade' option. If you wish to customize your animation, simply click on “Adjust animations”. Here you can adjust some settings like the direction (how the text comes in), duration (how long the effect lasts) and delay (when it starts). But for the fade effect, there is no direction, since this effect creates an apparition in the same position.
- For the initial text, adjust the duration to 1.5 seconds for a smooth effect, and set the delay to 0 seconds. This ensures that the movement begins immediately as the page loads, creating an instant and engaging impact.
- Then, hit 'Preview' to see your text come alive instantly. It's a quick way to check and enjoy your animation in action!
- Repeat the same process for the second text with a delay of 0.5 and a delay of 1 for the buttons to obtain a regular delay.
- When you done, you can also click on the Preview button. This let you view your entire site in action, just as a visitor would. It's a handy way to step back and see everything without the distraction of the editing tools.
![Animations and Interactions image 2]()

Loop animations
Next, let’s move to the exciting part! Let's add some magic to the "Hero" section of our website. I'll guide you through two types of animations. First, we'll explore a simple Loop animation, perfect for adding a subtle, engaging effect. Then, we'll step up to a slightly more complex animation that might need a bit of coding.
- Loop animations are characterized by their continuous, repeating cycle. An animation starts, completes its sequence, and then begins again seamlessly. These animations play repeatedly in a loop, adding a lively feel to the site.
- Let's say I have a png image and I want to animate my earth by creating an infinite floating effect. For this, the Loop animation is your go-to choice. While you're free to experiment with various effects, the 'Breathe' effect is ideal for a gentle floating appearance. Click on adjust animation if you want to change the settings, but I'm perfectly happy with the default settings, so keep them as they are.
![Animations and Interactions image 3]()

Adding Spline 3D Animation
Time for the exciting part! Let's add some sparkle to the "hero" section of your website. If you want to achieve a unique effect, consider using a 3D object with an eye-catching animation. You may need a bit of code for the more complex animations, but don't worry, it's not as difficult as it looks. You can animate an png image with a loop effect for a simple animation. But for something more eye-catching, turn to Spline. Spline is a user-friendly 3D design tool that allows the creation and animation of 3D graphics, particularly for web design. It features an intuitive interface, making it accessible for beginners in 3D modeling and it’s free.
- Alright, just open up Spline. In there, you've got a library where you can search for any cool 3D design, or you can head over to the community section to check out awesome designs by various artists. You can search for something specific or just explore until you find a design that resonates with you. Let’s say you pick a planet design – you can interact with it to see the animation in action. This is a great way to try things out before you decide.
- Once you've found the one you like, click on "Remix" to start making it your own. You can change the design, play with the animation or simply leave it as is. Click on the "Play" button to take a look at your masterpiece and, if you like it, click on "Export".
![5]()
- Go to "Viewer" and select "Play Settings" before you grab the embed code. Be sure to check the right settings. You have the ability to show or hide the background for your scene. You can enable or disable options as needed to ensure the animation works perfectly on your site. Just a heads up, if you don't want the Spline logo on your design, you'll need to get a pro account. But don't worry, making your designs on Spline is free! To find out more about Spline, check out the link in the description. Then, click on Update "Viewer".


- Next go to the Overview section and copy the embed code. Return to Wix Studio, select the Add element, then go to Embed & Social and select Embed Code.
![Animations and Interactions image 6]()
- An iFrame will pop up—click on 'Enter Code' in it. Now, paste your copied code into this box and hit 'Update' to embed it into your site.


- Then adjust the size and position as needed. Make sure to place the earth background behind your text content, select the iFrame layer where the earth is displayed. Right-click on it, choose 'Arrange,' and then select 'Move Backward.' This will position the earth animation behind the text.
 This earth background is rotating, this one have the option of custom cursor that mean you have the freedom to rotate on any direction. You can take any shape background with animations, is up to you.
Scrolling Interaction
Let's talk about the scrolling interaction. Scrolling interaction on Wix Studio involves creating dynamic effects that are activated as a user scrolls through a webpage. These effects can range from simple animations, like objects moving or changing size, to more complex interactions like parallax scrolling, where background and foreground elements move at different speeds. It creates a sense of depth and dynamism, making the page more engaging. Even if your page is pretty simple, you can add this effect to the background of your title or other parts to make them stand out. So let’s try it out.
Easy Text Scroll with a Curve Effect
Let's start with an easy scroll effect for your titles. Just pick the text you want to work with. Head over to the animation and interaction area and click on Scroll effect. You'll see lots of different cool effects to choose from. Play around with them to see what you like! If you want to keep it simple, the Fade effect is a good choice. Right here, you have the option to tweak the starting opacity and the area where the animation begins and ends. However, the default settings usually work just fine. It's always good to experiment a bit and see what looks best on your page, but you don't necessarily have to make changes unless you want to.
 For adding some curve to your text as it scrolls, try the Arc effect. This effect makes the elements move in an arc-like motion, either vertically or horizontally, adding a dynamic and engaging visual element to the site. It's particularly useful for creating a sense of depth and motion, enhancing the overall user experience.
 Let's set the direction to horizontal and take a quick look at the preview to see the effect in action.
Now let's see how it looks with vertical movement. This direction seems pretty good too, so we might stick with it. Remember, this is up to your preference – you can choose whichever direction you think fits best for your site.
Parallax Scrolling
You can use this technique on other text or elements too. Next up is the fun part - trying out parallax scrolling. This is just a quick way to show you how to create a cool parallax movement. It's not too hard! Just have your PNG images ready for the background and foreground (or even middle ground). For instance, mountains can be your background, text can be in the middle, and an avatar can be in the foreground. Wix Studio has pre-made effects for this, making it easier.

- First, get all your PNG images ready. You can find these in the Figma Community or Spline community. If you're using Spline, you can export your 3D designs in PNG format. Or, if you have your own images, you can use the remove.bg plugin to get rid of the background, leaving just the image you want.

- Arrange your layers properly so that your foreground image is at the very top, followed by other elements like mountains, and so on. This way, you'll have a clear view of each layer. Let’s start with the foreground image first.
![Animations and Interactions image 12]()
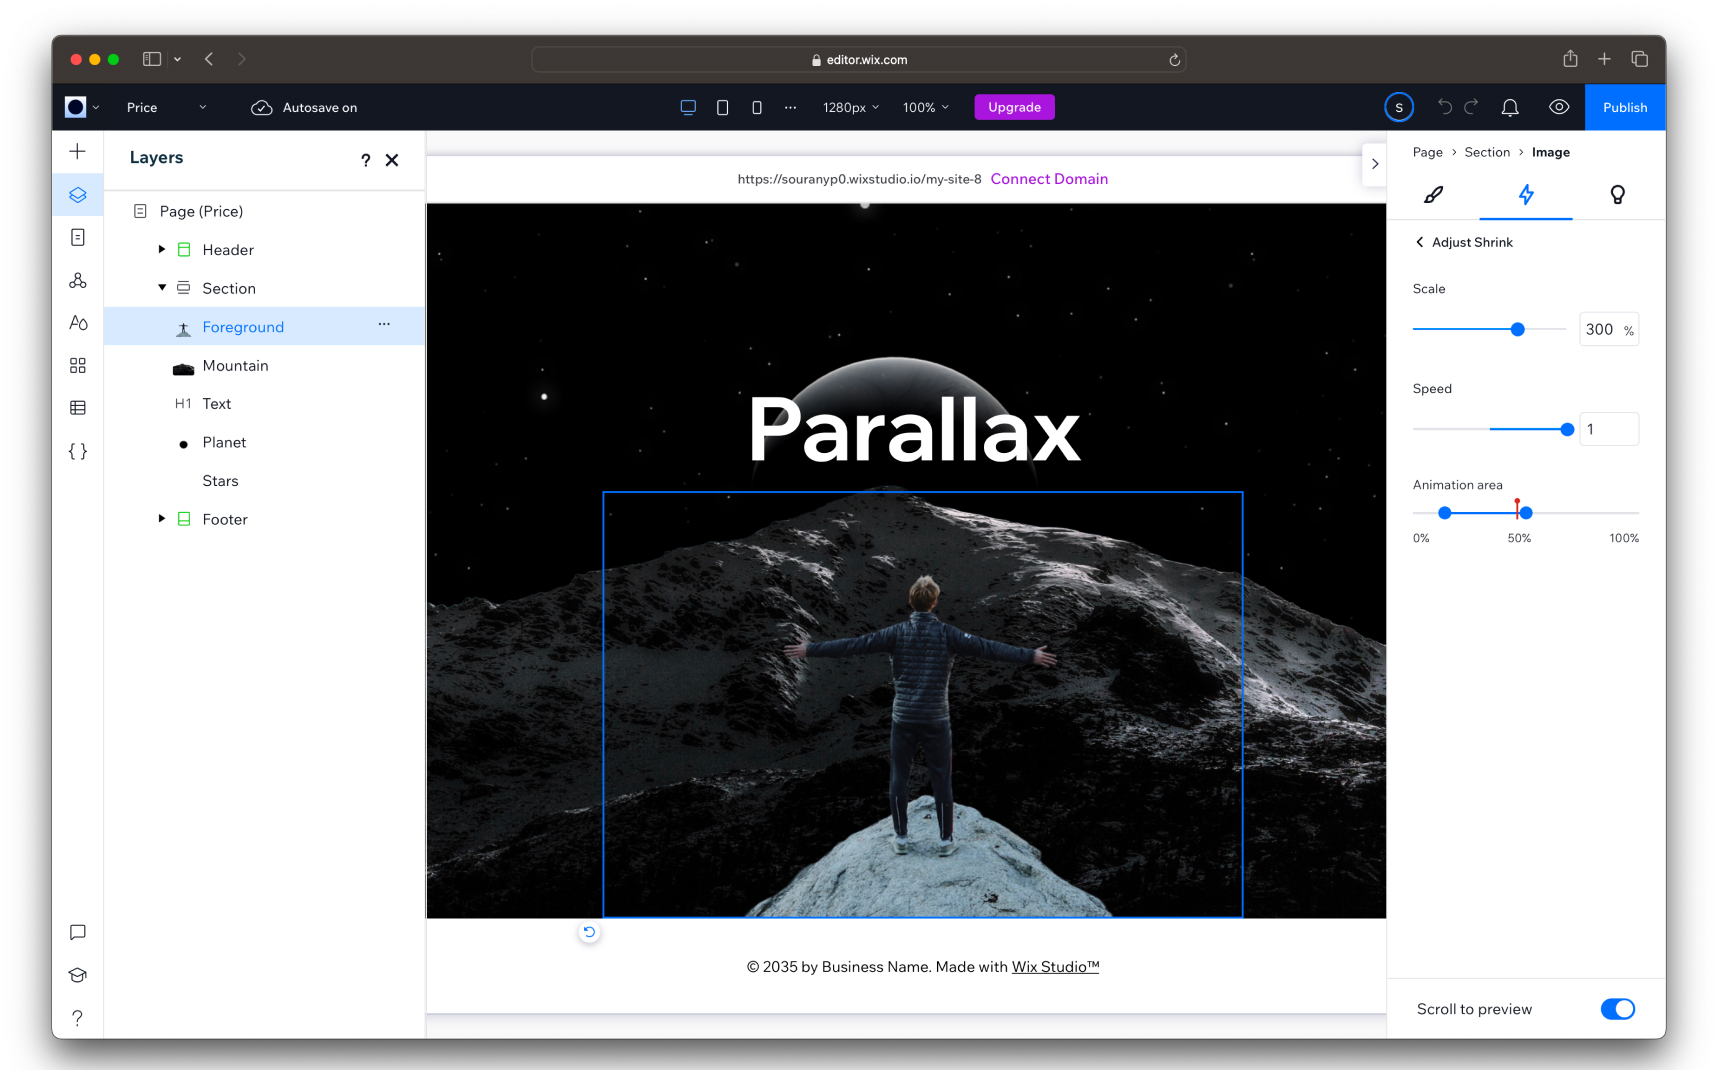
- Choose the 'Shrink' effect under scroll interactions. The 'Shrink' effect makes elements gradually decrease in size as you scroll down the page. With the animation area slider, you can set where the animation starts and ends in the viewer's screen. For instance, starting at 12% and ending at 50% means the shrinking starts just a bit down the page and continues until halfway. Setting the scale to 300% enlarges the element threefold on scrolling.These settings create a dynamic, multi-speed visual experience on your website.

 All right, let's scroll down to preview it. Perfect, I'm happy with that movement. Next, let's add the same interaction and effect to the rest of the elements, but with a different speed and animation area.
- To add variety and depth to your website, consider using different animation effects for various elements. For instance, applying the Parallax effect to elements like stars and the globe can create a unique sense of speed, making them move differently from others.
- In contrast, the Shrink effect could be used for other elements to vary the movement style. As for text, why not bring it to life with an entrance interaction, like a vertical slide effect? This approach prevents everything from moving in the same way and speed, adding a dynamic and engaging feel to your site.
- For the mountain, use the same Scroll effect as the foreground.
- For the text, set an entrance interaction with a 100% distance, a duration of 1.2 seconds, no delay, and an ease-in-out cubic easing.
![Animations and Interactions image 14]()
- Lastly, for the planet, apply the Parallax effect with a speed of 1, and an animation area ranging from 45% to 70%. These settings create distinct motions for each element, adding visual interest to your design.
![Animations and Interactions image 15]() Let's take a quick preview to see our entire page come to life. You'll notice the beautiful parallax movement adding depth and charm, making the website look really impressive. Remember, this part of our design is just for demonstrating various and cool techniques. It's not the final product, but a showcase of what can be achieved with these creative approaches.
Let's take a quick preview to see our entire page come to life. You'll notice the beautiful parallax movement adding depth and charm, making the website look really impressive. Remember, this part of our design is just for demonstrating various and cool techniques. It's not the final product, but a showcase of what can be achieved with these creative approaches.

 Let's take a quick preview to see our entire page come to life. You'll notice the beautiful parallax movement adding depth and charm, making the website look really impressive. Remember, this part of our design is just for demonstrating various and cool techniques. It's not the final product, but a showcase of what can be achieved with these creative approaches.
 Conclusion
Using Wix Studio for animation interactions opens up a world of creative possibilities for your website, without the need for any coding. Whether it's simple text animations, dynamic scroll effects, or intricate layered movements, Wix Studio's user-friendly interface makes it easy to bring your pages to life. By offering a range of pre-set animations and customization options, Wix Studio ensures that even beginners can create professional, engaging websites with minimal effort.
Templates and source code
Download source files
Download the videos and assets to refer and learn offline without interuption.
Design template
Source code for all sections
Video files, ePub and subtitles
Videos
Assets
1
Introduction to Wix Studio
Discovering Wix Studio: A Beginner's Guide
5:19
2
Wix Studio Editor
Getting to Know Wix Studio Editor
5:32
3
Layouts
Designing with Precision: Exploring Layouts in Wix Studio
10:15
4
Responsiveness
Responsive Web Building in Wix Studio
16:02
5
Animations and Interactions
Bringing Your Website to Life: Mastering Animation and Interaction in Wix Studio
11:39
Meet the instructor
We all try to be consistent with our way of teaching step-by-step, providing source files and prioritizing design in our courses.
Sourany Phomhome
UI Designer
Designer at Design+Code.
10 courses - 43 hours
Build an Interactive Site with Wix Studio
Discover Wix Studio: the no-code platform ideal for agencies and enterprises. This beginner-friendly video course guides you through web design basics, using intuitive tools for building responsive, professional websites. Learn to create animations easily—no coding required. Gain the skills to craft your own standout sites confidently.
1 hrs
3D UI Interactive Web Design with Spline
Learn to create 3D designs and UI interactions such as 3D icons, UI animations, components, variables, screen resize, scrolling interactions, as well as exporting, optimizing, and publishing your 3D assets on websites
3 hrs
Design and Prototype for iOS 17 in Figma
Crafting engaging experiences for iOS 17 and visionOS using the Figma design tool. Learn about Figma's new prototyping features, Dev Mode, variables and auto layout.
6 hrs
Design and Prototype Apps with Midjourney
A comprehensive course on transforming Midjourney concepts into interactive prototypes using essential design techniques and AI tools
8 hrs
Learn Figma Prototyping
Master interaction design with Figma Prototyping. Create an animated app experience using after delay, scrolling content, video prototype
1 hrs
UI Design for iOS 16 in Sketch
A complete guide to designing for iOS 16 with videos, examples and design files
3 hrs
Prototyping in Figma
Learn the basics of prototyping in Figma by creating interactive flows from custom designs
1 hrs
UI Design Android Apps in Figma
Design Android application UIs from scratch using various tricks and techniques in Figma
2 hrs
UI Design Quick Apps in Figma
Design application UIs from scratch using various tricks and techniques in Figma
12 hrs
Figma Handbook
A comprehensive guide to the best tips and tricks in Figma. Not affiliated with or endorsed by Figma, Inc.
6 hrs